
|
|
Administering iLeap - Overview |
| iLeap Platform provides a powerful, enterprise-centric management console for the administrators in the form of Control Panel. Through this user-friendly interface, administrators can configure, monitor, & manage several administrative tasks related to an ecosystem comprising of users, application/platform & process, quickly & easily. |
|
Only users with administrator privileges can access the control panel and make changes to the configurations. |

Listed below are some of the key features of Control Panel Admin Console:
|
| When you access the Control Panel for the first time, the following 'CONFIGURE ORGANISATION' dialog box appears prompting you to set the information related to time & date formats along with the location where application related data needs to be stored as per your requirements. |

|
|
|
|
You can do the following in Control Panel: |
| The Control Panel is primarily categorized into the following two key modules/areas to make it easy for administrators to carry out their tasks in a seamless manner. |
Control Panel Interface Dashboard

We will discuss each of these key modules in detail.
Control Panel Wizard:
You can also use the intuitive wizard to guide you through the sequential steps required in setting up & managing administrative tasks in Control panel.
Click Start Wizard to launch it from the control panel dashboard. Click the numbered sections to directly navigate to their respective sections from anywhere in Control Panel. Click Close to navigate back to the dashboard.

| Previous | Back to Contents | Next |
User Management
This module is further divided into the following sections.
|
Through this module, administrators can:
|
|
This is the first step in the configuration process. In this section, you can configure the user data source settings & then map the user profile indicating which field or column in the source maps to which corresponding column in the iLeap Platform. The user source can be any database management system such as Microsoft SQL server or Active directory that contains the details of the users who are going to access iLeap Platform. Note that only mapping to the appropriate columns/fields happens in this step. The actual import of the user records is carried out in the second step (Users section). |
Configure User Data Source & Map User Profiles
|
To configure the default data source & map user profiles, follow these steps: |
1. On the Control Panel dashboard, click Source. Alternatively, click Source on the wizard. The SOURCE page appears.

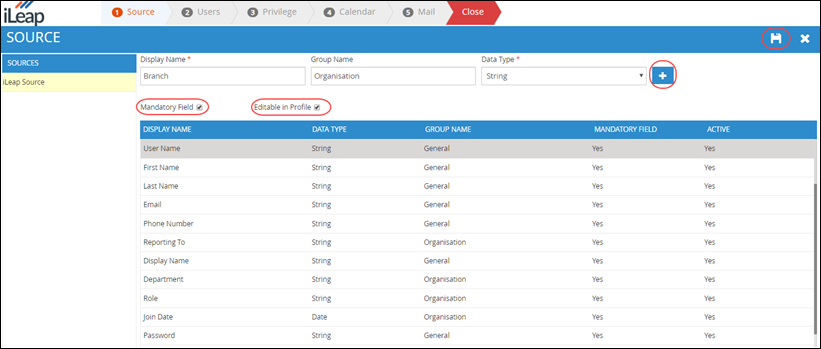
Notice that a default data source by name 'iLeap Source' already exists with a ready set of columns/fields pre-mapped. You can use this iLeap data source to add additional columns(custom) if needed. You can directly add users to this data source as well.
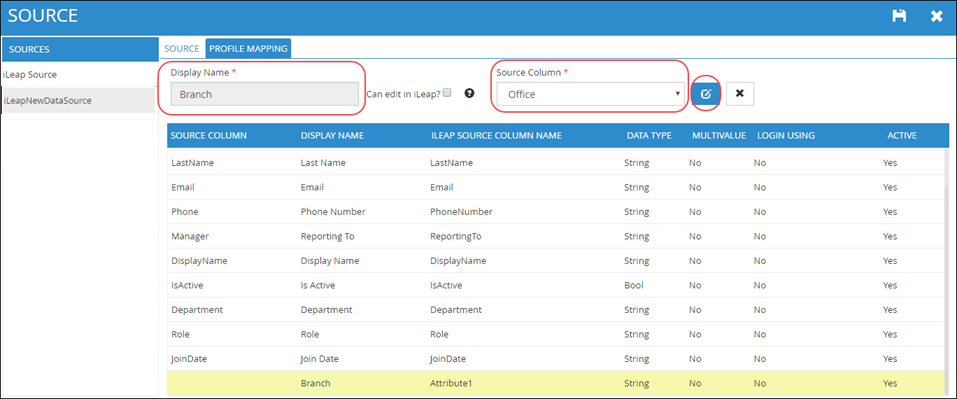
2. Click ![]() to edit the default data source. You can add new column(s) to the default data source & map accordingly.
to edit the default data source. You can add new column(s) to the default data source & map accordingly.
- Enter the display name of the column in the Display Name box. (For example, Branch)
- Enter the group name to which the column belongs to in the General box (For example, Organisation)
- Select the Data type from the Data Type list. The available options are: Integer, Double, String, Bool, Date, Time, DateTime & File.
- Select the Mandatory Field check box, if you wish to make this new column a Mandatory field.
- Select the Editable in Profile check box, if you wish to make this new column/field editable at the Profile level.
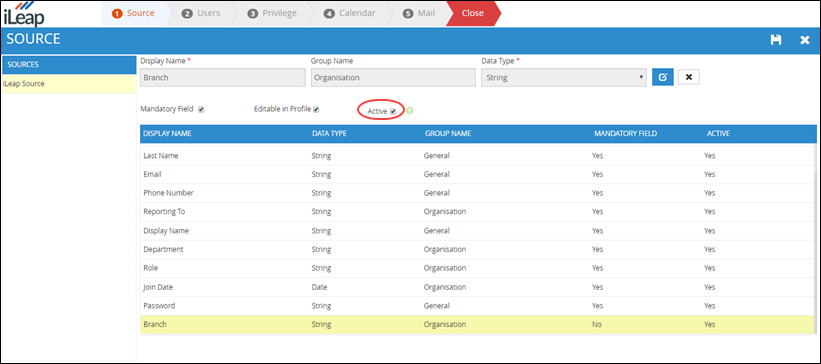
3. Click
 to add this new mapping.
4. Click ![]() to save the data source details.
to save the data source details.
5. Select the column/field to highlight it.
6. Select the Active check box, if you wish to make this new column field active.
7. Click ![]() to modify & update the newly mapped changes, as required.
to modify & update the newly mapped changes, as required.
|
Only the newly added column/field attributes to the default source can be edited in the user profile when you select the 'Editable in Profile' check box. The existing source column/field attributes are pre-set & cannot be edited at the user profile level. |
|
To configure a new user data source & map user profiles, follow these steps: |
1. On the top of the Source page, click
to add new data source. The following page appears.
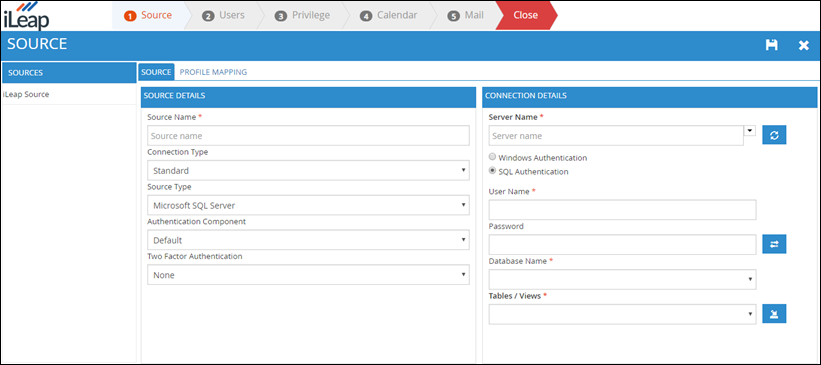
- Click the SOURCE tab.
- In the SOURCE DETAILS section,
- Enter the user data source name in the Source Name box (for example, iLeapNewDataSource)
- Select the type of connection from the Connection Type list. The available options are: Standard & Custom.
- Select the data source type from the Source Type list. The available options are: Microsoft SQL Server & Active Directory. If your data source type is Active Directory, see Active Directory.
- Select the authentication component from the Authentication Component list. The available options are: Default & Active Directory. If your authentication component is Active Directory, see Active Directory.
- Select the Two Factor Authentication option from the Two Factor Authentication list. The available options are: None, OTP & CAPTCHA.
- In the SOURCE DETAILS section,
- In the CONNECTION DETAILS section,
- Select the name of the connection server from the Server Name list. If the server name is not listed, click
 to refresh the server list to display the same.
 - Click the type of authentication. The SQL Authentication type option is selected by default.
- Enter the name of user in the User Name box.
- Enter the password in the Password box. Click
 to connect to the database.
 - If the connection is successful, a message 'Success! Source connected successfully' appears. The database name & tables/views are auto populated in the Database Name & Tables/Views lists. Select the appropriate Database name & Table from their respective lists. Click
 to fetch the user profile mapping details. On successful fetching of mapping details, ''Successfully fetched the mapping details'' message appears defaulting to PROFILE MAPPING tab.

- Select the name of the connection server from the Server Name list. If the server name is not listed, click

- On the PROFILE MAPPING tab,
- Select the corresponding source column from the SOURCE COLUMN list. Map the ILEAP COLUMN NAME to its corresponding Source Column one by one as required. Select the Source column to be used to login for end users from the LOGIN USING list.
- Click
 to save all the source details entered. If the source details are saved successfully, 'Success! Mapping details are saved successfully' message appears.
 - Click
 to close.

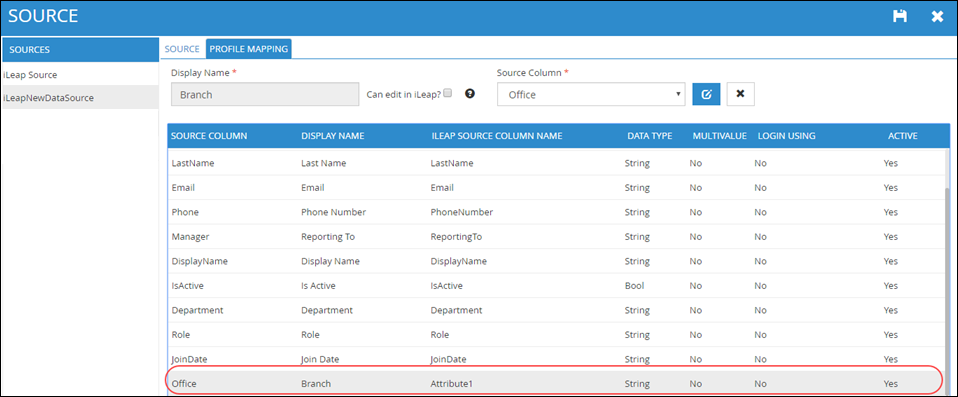
Notice the display of newly added data source 'iLeapNewDataSource' on the left pane.

2. Navigate to PROFILE MAPPING tab. The following page appears.
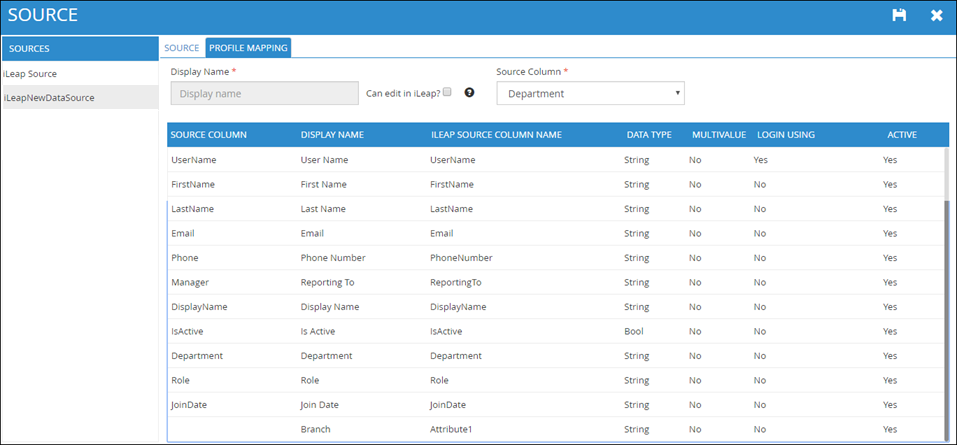
3. Now, map the Source Column 'Office' with the iLeap default data source column as shown.
4. Click
![]() to update mapping the selected source column. You can select the Can edit in iLeap check box, if you wish to make the mapped source column editable in iLeap Platform.
to update mapping the selected source column. You can select the Can edit in iLeap check box, if you wish to make the mapped source column editable in iLeap Platform.
5. Click
![]() to Save. If the source details are saved successfully, 'Success! Mapping details are saved successfully' message appears.
to Save. If the source details are saved successfully, 'Success! Mapping details are saved successfully' message appears.
Screenshot showing the selection of Active Directory as the data source type as well as authentication component.

- In the CONNECTION DETAILS section,
- Select the name of your Data Source (Domain Name) from the Data Source list.
- Enter the name of user in the User Name box.
- Enter the password in the Password box. Click to connect to the Active Directory.
- If the connection is successful, the Search Base information gets auto populated in the Search Base box as shown.
- In the Filters box, click to fetch the user profile mapping details. On successful fetching of mapping details, 'Successfully fetched the mapping details' message appears.
- On the PROFILE MAPPING tab, ensure configuring the mapping information compulsorily as shown.

|
|
| Previous | Back to Contents | Next |
|
In this second step, you can actually import a list of user records from the specified user data source to a mapped repository. You can also view details of the users imported & update them as required. In case of default data source, you can add users directly instead of importing them. |
|
In this section, you can also do the following: |
Import Users from the User Source Database
|
To import a list of users from a specified user data source to the mapped repository, follow these steps: |
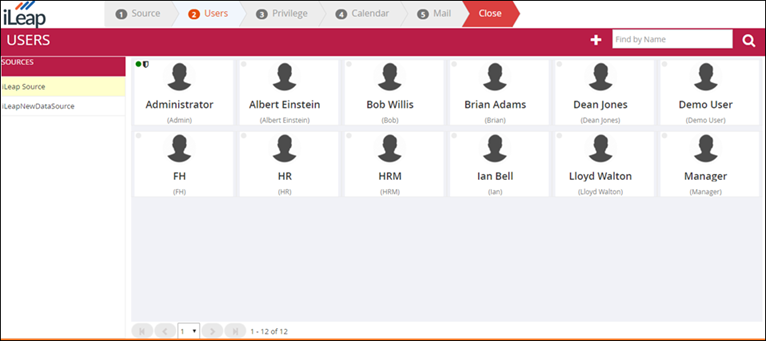
1. On the Control Panel dashboard, click Users. Alternatively, click Users on the wizard. The USERS page appears.
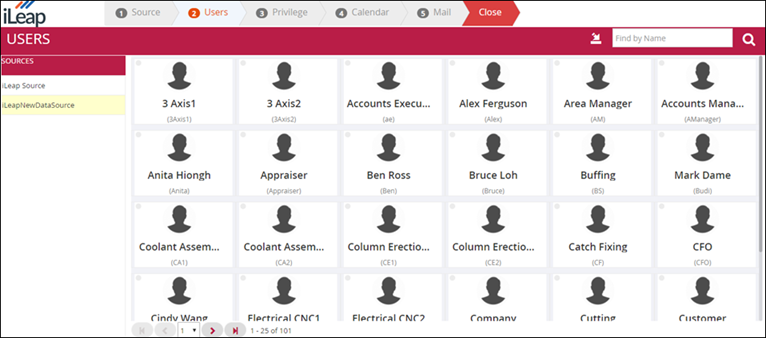
2. Select the user data source "iLeapNewDataSource" to which users would be imported to.

3. On the top of the USERS page, click to import users from the specified user data source. The following confirmation dialog box appears.

4. Click Yes. On successful importing of users, "Success! Users successfully imported" message appears.
You can click on any record to view the user details & update them as required.
Adding Users directly to default data source:
|
To add users to the default data source, follow these steps: |
1. On the Control Panel dashboard, click Users. Alternatively, click Users on the wizard. The USERS page appears.
![]()
2. On the top of the USERS page, click to add a user record to the selected default data source. The User dialog box appears.
![]()
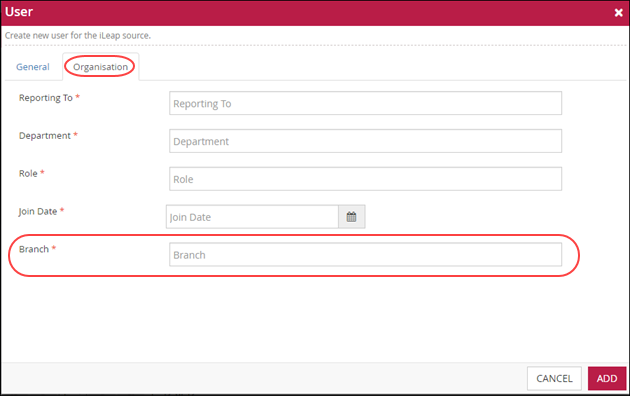
Notice the availability of the column field 'Branch' that was added to the default data source in the Source section earlier. In addition, presence of admin user already in the default data source is the same admin user that was created while adding organisation details information (Configuring iLeap Platform).
3. Key in the user details (for example Albert Einstein) as required in both General as well as Organisation tabs & click ADD.
Upon successful addition, "Success! User added successfully" message appears.
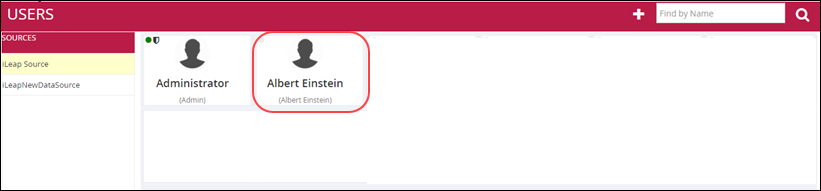
Notice the display of newly added user.
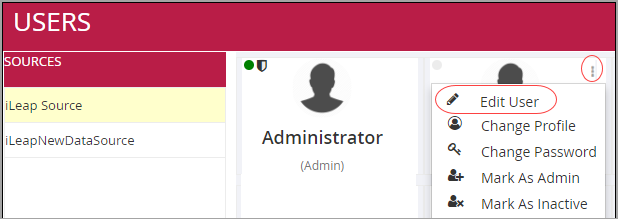
4. If you wish to make any edits or modifications to the user details, do the following:
- Hover the mouse pointer over the user you wish to modify. Click
 . A shortcut menu (Actions) appears.
 - Click Edit User from the shortcut menu shown.
The following User dialog box appears.
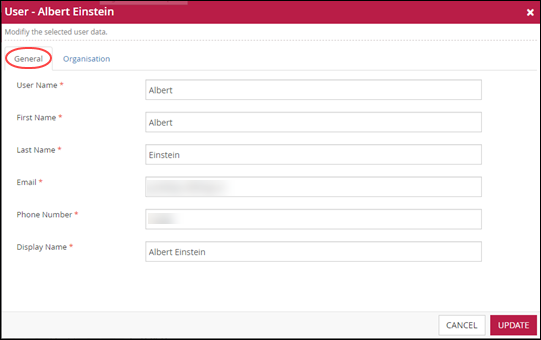
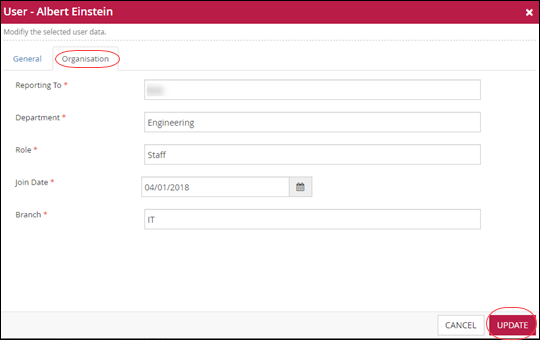
Make the requisite edits or modifications and click UPDATE. Immediately, "Success! User details updated successfully" message appears.
|
|
Changing the Profile Image of User:
For the selected user, you can change the Profile Image from the shortcut menu as shown.
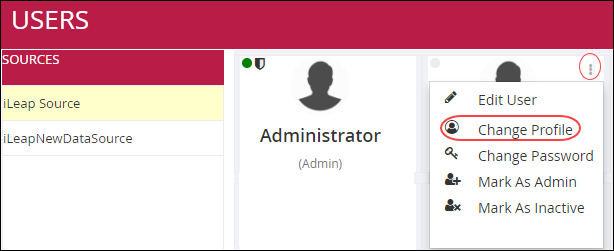
- Click Change Profile. Select the Profile image from the source location.
You can also change or modify the Profile image of any user just with a click on the user's profile image. The image file formats .PNG, .JPG, .JPEG & .BMP are supported currently.
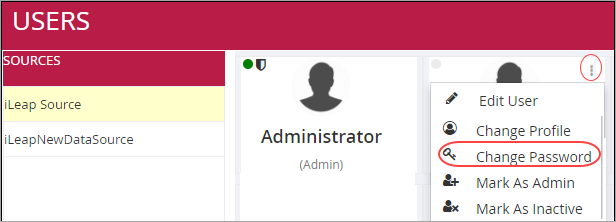
As an administrator, you can change the password of the user added.
- Hover the mouse pointer over the user name for whom you wish to change the password. Click A shortcut menu (Actions) appears.
- Click Change Password from the shortcut menu.
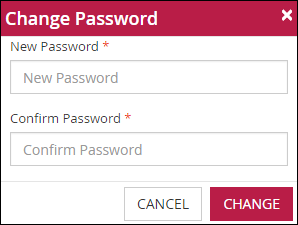
The Change Password dialog box appears. Key in the New Password & Confirm Password information in their respective boxes & click CHANGE to change it instantly. Please ensure that the Newly keyed Password must have a minimum of six characters. Immediately, "Success! Password Changed successfully" message appears.
Marking a User as Administrator:
As an administrator, you can make any user as an administrator from the shortcut menu as shown.

- Click Mark As Admin. Immediately, "Success! User converted as successfully" message appears & the selected user (For example, Albert Einstein) is granted the administrator privileges to the iLeap Platform. The Admin user can be identified from the rest of other users as shown.

You can also remove the administrator privileges from the designated administrator user account from the shortcut menu as well (as shown).
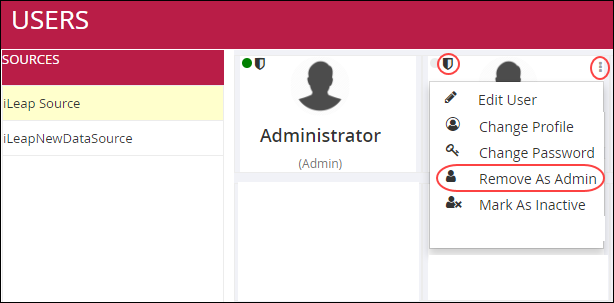
- Click Remove As Admin. Immediately, "Success! User converted as user successfully" message appears & the administrator privileges of the selected user are removed instantly. Notice the change in display notification on the user name.
As an administrator, you can make any active user as Inactive from the shortcut menu as shown.
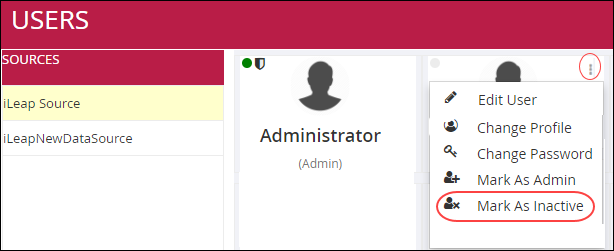
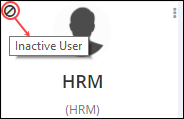
- Click Mark As Inactive. Immediately, "Success! User changed as inactive successfully" message appears & the selected user account is deactivated instantly. The Inactive user can be identified from the rest of other users as shown.
| Previous | Back to Contents | Next |
|
In this section, you can define a team or group of users for whom a task can be assigned through a process workflow in iLeap Platform. |
Create Different Teams/Groups for Assigning Tasks
|
To create a team of users to whom the tasks can be assigned, follow these steps: |
1. On the Control Panel dashboard, click Team. The TEAM page appears.

2. On the top of the TEAM page, click
![]() to add/create a team of users. The NEW TEAM dialog box appears.
to add/create a team of users. The NEW TEAM dialog box appears.

- Enter the name of team in the Team Name box. For example, Accounts.
3. Click SAVE. Immediately, 'team details saved successfully' message appears.

4. Click
![]() to add members to the team created. The SEARCH USER dialog box appears.
to add members to the team created. The SEARCH USER dialog box appears.

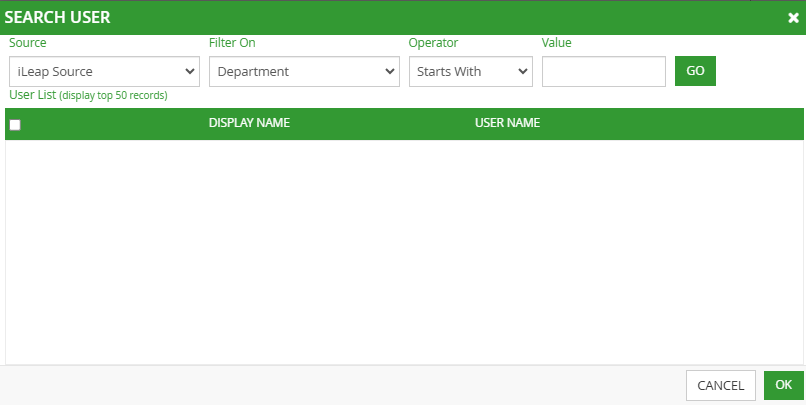
- Search the user to be added by selecting from the Source, Filter On, Operator drop-down lists & Value box as appropriate. Click GO. The search result gets displayed in the User List as shown. Select the user(s) to be added to the new team created.
- Click OK. Else, click CLOSE.

|
You can also edit or modify a Team name. |
| To edit the name of the team, follow these steps: |
1. On the TEAM page, select the team name to be edited & click
![]() to edit it. The CONFIGURE TEAM dialog box appears.
to edit it. The CONFIGURE TEAM dialog box appears.

2. Modify the team name as appropriate. Click SAVE.
Notice the display of information message below the team name.
|
|
| Previous | Back to Contents | Next |
|
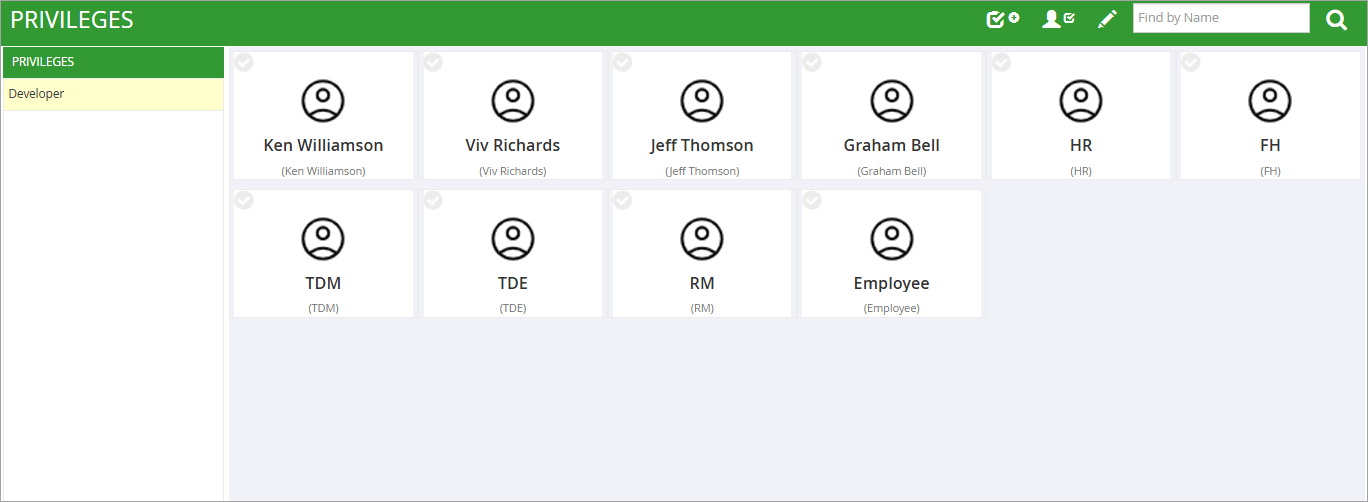
This is the third step in the configuration process. In this section, you can create new permission(s) or rights & specify the permissions that should be required for that privilege. You can select & add users who belong to the newly created privilege. By default, iLeap Platform has three default privileges in the form of Application Owner, Developer, & Application User. You can add or remove users who belong to any of these predefined privileges. Only for built-in default privileges such as Application Owner & Developer, a default dashboard type is predefined & cannot be changed. You can only change the dashboard type for newly created privilege(s). |
Create Privileges & Specify the Access Permissions
|
To create a new privilege & specify the permissions to it, follow these steps: |
1. On the Control Panel dashboard, click Privileges. Alternatively, click Privilege on the wizard. The PRIVILEGES page appears.
2. On the top of the PRIVILEGES page, click ![]() to add a new privilege. The NEW PRIVILEGE dialog box appears.
to add a new privilege. The NEW PRIVILEGE dialog box appears.
![]()
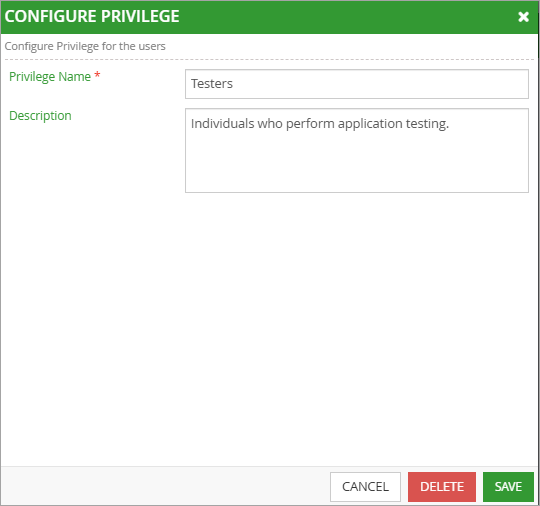
- Enter the name of new privilege you wish to create in the Privilege Name box.
- Enter an appropriate description for the new Privilege in the Description box.

3. Click SAVE to save the particulars set. Immediately, ''Privilege details saved successfully'' message appears. Notice that the newly created Privilege is displayed on the left pane.

Once you have created a new privilege & assign or specify the permissions, its time to add user(s) to it. The added users automatically inherit the permissions set for their parent privilege.
| To add user(s) to a privilege follow these steps: |
1. Click to add user(s) to the newly created Privilege. The SEARCH USER dialog appears.

2. Search the user to be added by selecting from the Source, Filter On, Operator drop-down lists & Value box as appropriate. Click GO.
The search result gets displayed just below the User List as shown. Select the user(s) to be added to the newly created privilege.
3. Click OK. Else, click CLOSE.
You can also edit or modify a Privilege.
|
To edit a Privilege, follow these steps: |
1. On the PRIVILEGES page, select the privilege to be edited & click to edit/configure the privilege. The CONFIGURE PRIVILEGE dialog box appears.
2. Make the necessary changes as appropriate. Click SAVE.
|
|
| Previous | Back to Contents | Next |
Application Management
This module is further divided into the following sections.
|
Through this module, administrators can:
|
|
This is the fourth step in the configuration process. In this section, you can create multi-geographical calendars at the organisation level. Each defined calendar can indicate the timezone in which it is applicable, work days of the week, & shift timings applicable for each day of the week. Users can choose one of the defined calendars as their current calendar. The calendar displays your schedule for the current month (by default). The calendar also supports indicators for days on which you have applied for a leave, days on which another person to whom your task(s) are delegated etc. The legends at the bottom of the screen indicate different types of data represented in a calendar. All the workflows in iLeap Platform use the calendar to calculate the availability of users, lapsed time on tasks, response time on tasks, etc., at any point in time. A default calendar is also available. You can create more than one calendar at the organisation level. |
Create a Multi-Geographical Calendar
|
To create a calendar at the organisation level, follow these steps: |
1. On the Control Panel dashboard, click Calendar. Alternatively, click Calendar on the wizard. The CALENDAR page appears.

Notice that a default calendar already is available.
2. On the top of the CALENDAR page, click
![]() to add a new Calendar.
to add a new Calendar.

In the CALENDAR CONFIGURATION section,
- Enter the name of the calendar in the Name box. (For e.g: Gulf Calendar)
- Select the appropriate time zone from the Time Zone list.
- Select the pattern of the calendar (in terms of work days) from Pattern list. The default option is 'NO'.
- Click
 to save the new calendar created. Immediately, 'Success! Calendar saved successfully' message appears.
Notice that the newly created calendar name is displayed on the left pane. You can add the new shift timings & new work days pattern only on creating a new calendar.
In the PUBLIC HOLIDAYS section,
- Enter the name of holiday you wish to add the calendar in the HOLIDAY NAME box.
- Click
 to display Calendar & select the date on which the holiday falls. Click
  to add a holiday.
3. Click
![]() to define the new shift timings. The SHIFT dialog box appears.
to define the new shift timings. The SHIFT dialog box appears.

- Click to add a new shift. Enter the Shift name in the Name box. Select the Span across 2 days check box, if you wish to specify the from & to shift timings to span across 2 days at once.
- Select the shift start time & shift end time from the From & To lists.
- Click to add the shift timings to the newly created shift.
- Click to save the new shift timings. Immediately, 'Success! Shift saved successfully' message appears.
- Click CLOSE.


|
|
4. Click ![]() to define a a new work days pattern. The WORKDAYS PATTERN dialog box appears.
to define a a new work days pattern. The WORKDAYS PATTERN dialog box appears.

- Click
to add a new workdays pattern. Enter the name of the pattern in the Pattern Name box. (For example, Day Shift Pattern)
- Select the working on options for each day of the week.
- Click
 to save the workdays pattern.
 - Click CLOSE.

5. Click ![]() to edit the Calendar.
to edit the Calendar.
6. Once all the calendar details are entered or edited as per requirements, click ![]() to save the calendar.
to save the calendar.
The newly created Calendar with all the details is shown below.

| Previous | Back to Contents | Next |
| In this section, you can edit few specific details of your organisation such as its address as well as contact information along with Log Interval. You can also change your organisation's logo by uploading a new one. |
Manage an Organization Profile
|
To edit your organisation details, follow these steps: |
1. On the Control Panel dashboard, click Organisation Profile. The ORGANISATION PROFILE page appears.

2. On the top of the ORGANISATION PROFILE page, click
![]() to edit the requisite organisation details.
to edit the requisite organisation details.
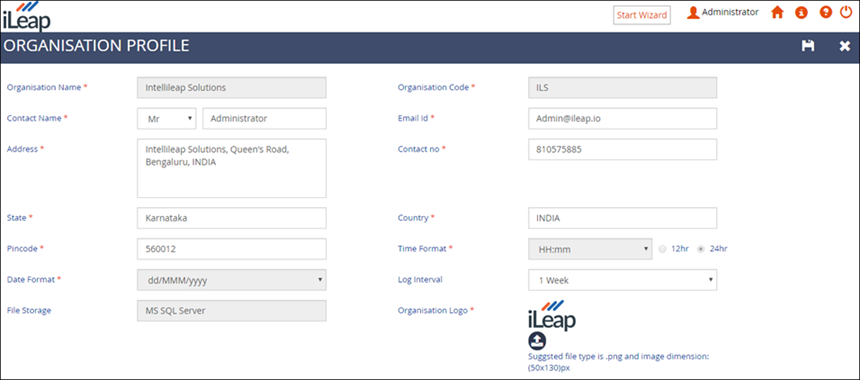
Notice that all the Organisation level field information details displayed on this page are fetched from the details you had entered earlier while configuring iLeap Platform & logging into Control Panel first time. See, adding organisation details described above as well. Also, notice that fields such as Organisation Name, Organisation Code, Date Format, Time Format & File Storage are grayed out (cannot be edited).
You can modify all the remaining information such as Contact Name, Address of your organisation, Country, Pin code, Email Id, Contact no, State & Log Interval. You can modify or upload your organisation logo as well.
3. Click
![]() to save the details entered. Immediately, 'Organisation details saved successfully' message appears.
to save the details entered. Immediately, 'Organisation details saved successfully' message appears.
|
Fields marked with * are mandatory. |
| Previous | Back to Contents | Next |
|
In this section, you can create credential(s) which is a list of User IDs & Passwords that can be used by users when connecting to a web service, database or any network service. You can store a secure login ID & Password combinations for any number of credentials, each identified by a unique name. Once a credential is created, users can request for a pair of these credentials to be used in a form field (in Form Designer), file transport activity/SOAP service activity (in Process Composer) etc. These credentials can also be used to restrict the process owners from viewing the credentials to the data table. |
Manage User Credentials
| To create a credential, follow these steps: |
1. On the Control Panel dashboard, click Credential. The CREDENTIAL page appears.
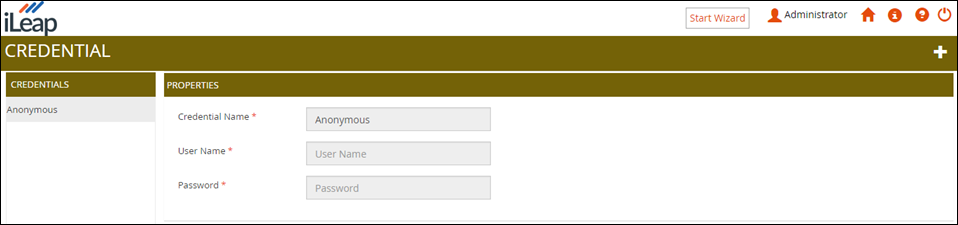
Notice that an Anonymous credential already exists by default.
2. Click
![]() to add a new Credential.
to add a new Credential.

- Enter an appropriate credential name in the Credential Name box.
- Enter the name of user in the User Name box.
- Enter the password in the Password box.
3. Click
![]() to save the credential. Immediately, 'Success! Credential details saved successfully' message appears. The newly created credential appears on the left pane.
to save the credential. Immediately, 'Success! Credential details saved successfully' message appears. The newly created credential appears on the left pane.
| You can also edit or modify a credential. |
|
To edit a credential, follow these steps: |
1. Select the credential to be edited & click
![]() to edit it. You can only modify the User Name & Password of a credential.
to edit it. You can only modify the User Name & Password of a credential.
2. Click
![]() to save the modified credential.
to save the modified credential.
|
You can create any number of credential. |
| Previous | Back to Contents | Next
Configure both Mail Server & SMS Server for Mail Notifications >> |
|
This is the fifth & final step in the configuration process. In this section, you can set up a single e-mail address using which all the e-mail notifications generated by the workflows during a user sessions are sent. Note that all user sessions are related to a repository. |
Configure both Mail Server & SMS Server for Mail Notifications
|
To configure an e-mail address through which workflow email notifications can be sent, follow these steps: |
1. On the Control Panel dashboard, click Mail Configuration. Alternatively, click Mail on the wizard. The MAIL CONFIGURATION page appears.

- In the SERVER SETTINGS section,
- Enter an appropriate description for the mail server in the Description box.
- Enter the name of the mail server in the Server Name box.
- Specify the port number in the Port Number box.
- In the SECURITY section,
- Select whether SSL needs to be used or not. The option 'No' is selected by default.
- Enter the email of the user in the User Email Account box.
- Enter the password in the Password box. (You can key in on this field only, if Authentication Required check box is selected).
- Select the Authentication Required check box.

2. Click ![]() to test this email configuration set up. On successful test set up, 'Success! Email setup is tested successfully and appears to be valid' message appears.
to test this email configuration set up. On successful test set up, 'Success! Email setup is tested successfully and appears to be valid' message appears.
3. Click ![]() to save this email configuration set up. On successful save, "Success! Email setup saved successfully" message appears.
to save this email configuration set up. On successful save, "Success! Email setup saved successfully" message appears.
|
|
| Previous | Back to Contents | Next |
|
In this section, you can view & monitor the logs for configured events (error, warning, or information) recorded during user sessions in each repository. These logs can then be used for troubleshooting & debugging purposes. |
|
To view the logs based on your configured events, follow these steps: |
1. On the Control Panel dashboard, click Audit Trail. The AUDIT TRAIL page appears.

2. Select the duration for which you wish to view the audit trail log information. The available options are: Today, Last 7 days & Custom. Click any of the options. If you choose Custom option, you need to specify From & To date as the duration additionally.
3. Select the type of log for the configured events you wish to view. You can view your log based on log types Information, Warning & Error. The Error log type is selected by default. The type of log to view/display by default is based on the log level set during the configuration of repository database stage.
4. Select the name of the process for which you wish to view the recorded log from the Name list. This list displays all the published processes in the Process Composer.
5. Enter Runtime Id & Warning Id, if they are available in their respective boxes.
6. Enter the name of the user in the User box.
7. Click SEARCH. If the search is successful, details of the searched record are displayed.
Sample view of the Audit Trail page:

- Click on any record to view its Log Details. Sample Log Details dialog box is as shown.

You can also export the log details to a CSV file as well.
To do so, click Export to expand the section & enter the custom duration for which you would like the log details to be exported as shown.

- Click EXPORT. The exported log details (in the form of .CSV file) can be found in the Downloads folder if you are using the Google Chrome browser.
Lastly, you can also delete all the audit trail log details for any duration as well.
To do so, click Delete to expand the section & enter the custom duration for which you would like the log details to be deleted as shown.

- Click DELETE. The following CONFIRMATION dialog box appears.

- Click YES.
| Previous
<< Configure both Mail Server & SMS Server for Mail Notifications |
Back to Contents | Next |
|
In this section, you can create an application data source that can connect to external systems by specifying the user credentials related to it. A data source definition acts as a pointer to a database containing all relevant details required to connect to that database. Once the application data source is created successfully, users can request one of these pointers to be used in a form control (Data Source definition for a form control in Form Designer) or in a database activity (in Process Composer). |
Create a Secured Web Service & Database Connections
| To create a new application data source & connect to it, follow these steps: |
1. On the Control Panel dashboard, click DataSource. The DATASOURCE page appears.

Notice the display of SQL AUTHENTICATION & WIN AUTHENTICATION modes on the left pane by default. Any new Data source created based on any of these types would automatically listed under their respective type.
- Enter the name of the data source in the DataSource Name box.
- Select the type of provider from the Provider Type list. The available options are: MSSQL & MSSQLWIN. The default option is MSSQL.
- Enter the name of the connection server in the Server Name list.
- Enter the name of user in the User Name box.
- Enter the password in the Password box.
- Enter the name of database in the Database Name box.
- Specify the connection time out value (in seconds) from the Time Out box. This time out value refers to the length of time to wait for connecting to the specified server before terminating the attempt. The default value is 30 seconds.
- Click
 to test the connection to the database.
 - On successful connection to the database, 'Connection successful' message appears.

2. Click
![]() to save the details. Immediately, 'Data source created successfully' message appears.
to save the details. Immediately, 'Data source created successfully' message appears.
|
|
| Previous | Back to Contents | Next |
|
In this section, you can create an auto schedule for a process & use it to automate it effectively. In addition, you can define the frequency (one time or recurring) at which the auto-scheduler needs to run. Users can assign a schedule to the Process (event) Listener property of a process. |
Create & Automate a Scheduled Process
|
To create a schedule & automate a process, follow these steps: |
1. On the Control Panel dashboard, click Auto Scheduler. The AUTO SCHEDULER page appears.

2. On the top of the AUTO SCHEDULER page, click
![]() to add a new scheduler.
to add a new scheduler.
- In the PROPERTIES section,
- Enter an appropriate auto scheduler name you wish to provide in the Auto Scheduler Name box. Click any of the options available ('Yes' or 'No') to set this auto scheduler to be Active as per your requirements.
- Click any of the options available ('One Time' or 'Recurring') for the Auto Scheduler Type. Click any of the options available ('Yes' or 'No') if you wish an automatic rerun of the set auto scheduler type.
- Click
to display the calendar. Select the date & time at which you want the scheduler to run.
3. Click
![]() to save the auto-scheduler details. Immediately, 'Scheduler saved Successfully' message appears. The name of the newly created Auto Scheduler is displayed on the left pane.
to save the auto-scheduler details. Immediately, 'Scheduler saved Successfully' message appears. The name of the newly created Auto Scheduler is displayed on the left pane.
|
You can also edit or modify a scheduler. |
|
To edit a scheduler, follow these steps: |
1. Select the name of the scheduler to be edited & click ![]() to edit its details as required.
to edit its details as required.
2. Click ![]() to save the modified scheduler details.
to save the modified scheduler details.
|
|
| Previous | Back to Contents |