
|
Rules - Overview |
|
One of the key objectives of an effective business rules engine is to separate business logic from your critical business applications so as to improve operational performance & gain competitive edge. iLeap Platform comes with a powerful business rule engine in the form of a 'Rule Composer' dynamically supporting process owners & business users to define business logic & rule sets independently and consume them across processes seamlessly. These business rules are defined globally by an intuitive interface that makes the definition easy-to-understand & manage, empowering users all the way. |
|
The powerful Rule Composer supports sophisticated & complex rules that captures your business workflow as well as your policies & procedures efficiently & integrates well with your existing IT assets effortlessly. The richly featured, easy-to-use user interface business rules engine models both if-then-action as well as the decision table (collection of logical conditions) style specification of rules. Rule Composer allows you to reuse your business rules any number of times in order to make your process automation much more efficient. The frequently used business rules in your project are created only once & then they only need to be associated to the new elements when they are required. The only catch point is in order to reuse those business rules you need to know where to create them in the first place!. The Integrated Rule Composer is loaded with many robust features empowering business users to create as well as manage business rules with agility. |
|

| Contents |

| What are Business Rules? |

| Previous | Back to Contents | Next
Constant >> |
|
Constant Definitions are directly defined by users as a fixed or static value & acquire values that do not depend on the data model. They are quite independent of any defined data models & can be consumed in multiple process rules. Generally, they need to be defined only one time & can be modified whenever needed as per your requirements. Constant acts as the definition used in the rule which holds the fixed or static value. |

| Contents |

| Previous | Back to Contents | Next
Global Field >> |

| Contents |

| Previous | Back to Contents | Next
Custom Fact >> |

| Contents |

| Consuming a newly defined Custom Fact: |
|
You can call the Custom Fact while setting the properties of a form control in the Form Designer (Data tab). While binding to Form Control, you can pass various parameters to the Custom Fact in order to build proper conditions. |

| Previous | Back to Contents | Next
Rule >> |
| Rule: |
|
Rule Composer allows you to create the following types of rules. |

| Previous | Back to Contents | Next
Process Rule >> |
| Process Rule: |
|
Process rules are used to evaluate simple business conditions. An action is executed when the condition is fulfilled. These rules are based on If, Else and Then logical operators.
Process rule acts as a declarative statement or function that has business logic incorporated to define business conditions. |

| Contents |
| Example Scenario: |
|
For the ease of understanding of how & where a Process rule can be created & consumed in a Process, let us consider a sample scenario of calculating the simple interest amount which varies based on other parameters such as Principal Amount, Rate of Interest & Duration in any Bank. At control level, iLeap Platform allows you to build basic String, Math & Date based functions to get any required result. If these kind of functions keep varying from time to time dynamically, then it is prudent to keep these functions outside or independent of the Process design itself in order not to modify the whole Process itself time & again. iLeap Platform’s Rules Engine or Rule Composer is specifically designed to effectively meet such real-time scenarios. It allows you to build these changing functions or rules outside the process by defining constants & Global Fields (Model attributes). Once defined, these process rules can be recalled & re-used any number times whenever the variables change at the process level without ever modifying or re-designing the whole process all over again!. In Rule Composer, process rules can be used only with Model based forms and processes.
We will create a Process Rule (with rule expressions having conditions to take care of calculating the dynamically changing Interest Amount) & integrate it with the above stated example process scenario. Expressions can consume Constants (Global), Global fields (defined from specific model attribute) and Local fields (local attributes) & a single process rule can have multiple ‘IF conditions’ to handle multiple ‘data scenarios’. |
Following mathematical formula is used to calculate the simple interest amount:
Interest Amount: (Deposit or Principal Amount * Duration * Rate of Interest (in %)) /100
I = P * T * R/100; where I=Interest Amount; P=Principal Amount; T=Time or Duration; R=Rate of Interest.
Here, the Rate of Interest is a defined constant or has a fixed value for all the depositors where as the Principal Amount & duration act as variables (case to case basis).
Hence to begin with, we need to create a constant as well as few global fields (derived from model attributes) before creating a Process rule in Rule Composer.
|
Following is the Process Flow Sequence:
|

| Consumption of Process Rule: |
| Following are the sequence of steps that needs to be carried out to understand the consumption of a Process Rule in our example process scenario (end to end): |
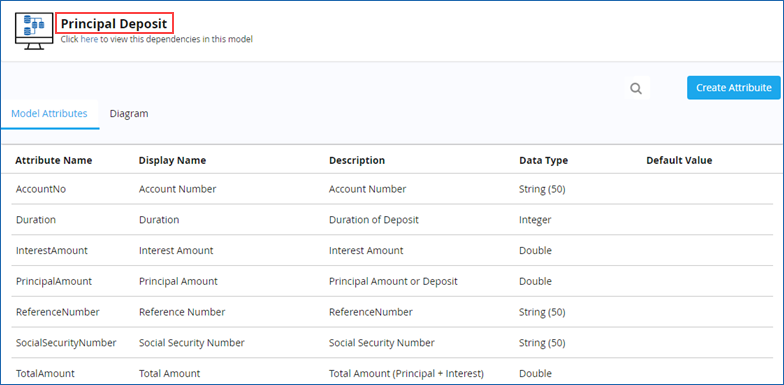
1. Start-off with creating a transactional data model ('Principal Deposit') with the process attributes as shown.
2. Create two forms (trigger form & action form) based on the above created data model in Form Designer.
- The first form acts as a trigger form ('Principal Deposit Form') to collect the basic account deposit details such as Account Number, Principal Amount & Duration.

- The second form (which is an associated form of the trigger form) acts as an action form ('Interest Calculation Form') with two additional fields: Interest Amount & Total Amount.

3. Create a Process diagram (Process name:'Deposit Interest') as shown & link or map the above two created forms to 'Start' event activity (via Process Properties dialog box) & 'Manager View' Human Task activity in Process Composer as shown in Step 7.
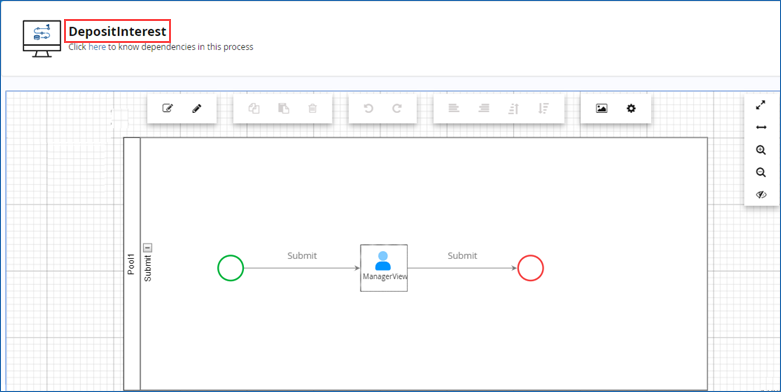
- Ensure that the trigger form is mapped or associated to the process as shown.
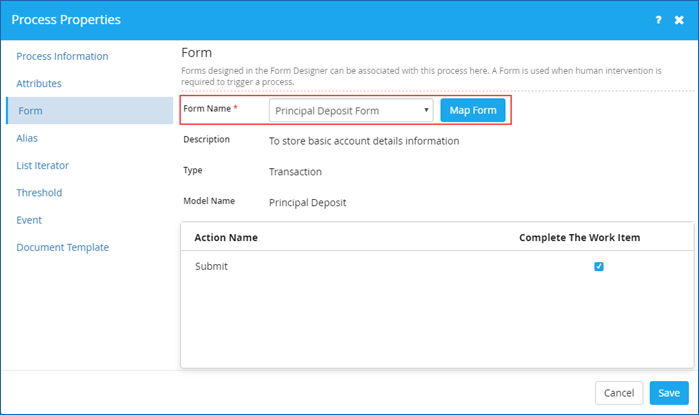
- Select the trigger form from the Form Name list as shown.
- Click Map Form to map the form along with attributes.
4. Before proceeding with Process Rule creation, create a new constant ('Rate of Interest') with a static or fixed value in Rule Composer. This value can be changed from time to time based on requirements.
5. Create or define few global fields (for example, Principal Amount [input], Duration [input], Interest Amount [Output], Total Amount [Output]) from model attributes. See creating a new global field.
6. Now, create a Process Rule in Rule Composer.
7. Once done, identify where the 'Process Rule needs to be invoked or called' in our Process. In our example scenario, we can either invoke it on submission of deposit details by the finance executive or at the start of the task opening in 'Manager View'. We will consider running our rule on the second option, where the Bank Manager receives the deposit details from the finance executive. This implies that the defined process rule should be invoked at the start of the activity with 'Rule On Start' in 'Manager View' Human Task properties dialog box as shown.
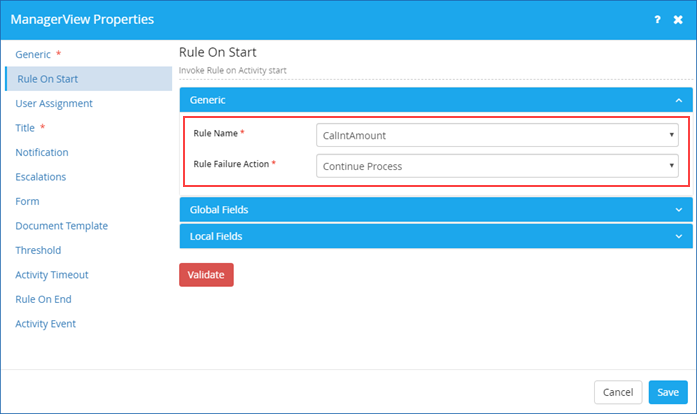
- Specify the 'Rule Failure Action' which defines what should happen in case the invoked rule fails. The available options are: Stop Process & Continue Process.
- Select 'Continue Process' from the Rule Failure Action list as shown.
- Now, map the related global fields listed & validate the rule mapped. On successful process rule mapping 'Success! Process Rule mapping details are valid' message appears.
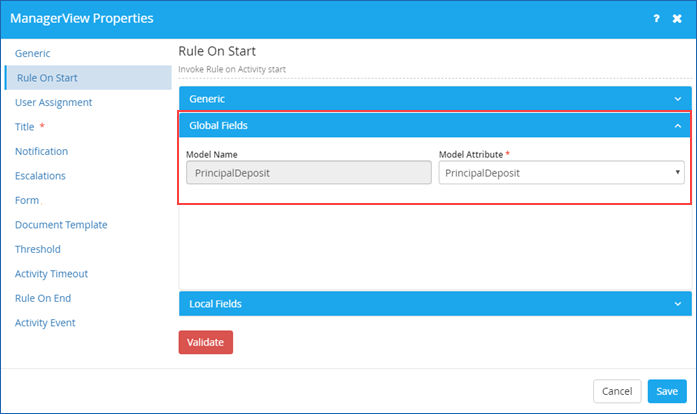
- Next, map the action form with the attributes to the Human task & assign actions as shown. Save & Publish the Process.
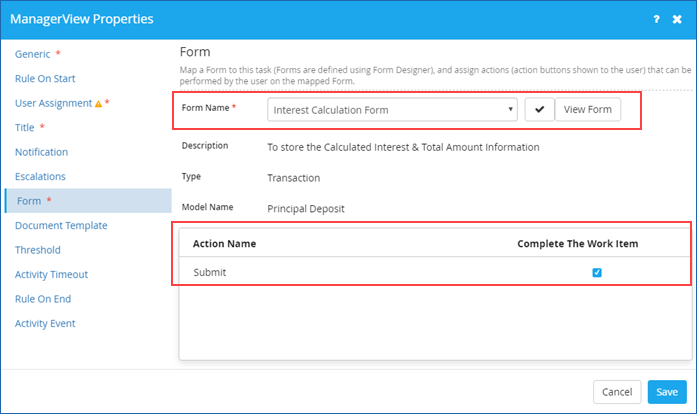
8. In this final step, for the defined relevant App ('Interest Calculator') for the defined process, trigger it & check the working of the Process rule defined as shown.


Following mathematical formula is used to calculate the simple interest amount:
|
Interest Amount = (Deposit or Principal Amount * Duration * Rate of Interest (in %) /100 |
|
Total Amount = (Deposit or Principal Amount + Interest Amount) |
In the example shown above, the Interest Amount is calculated on execution of the Process Rule defined updating the Total Amount automatically as well.
In our example, Principal Amount = $1,000 ; Duration=6 months; Rate of Interest / Defined Constant= 10%;
Therefore, on execution of Process Rule, Interest Amount = $600; Total Amount =$1600 (auto-calculated).

| Previous
<< Rule |
Back to Contents | Next |
| Creating a new Constant: |
|
In the following steps, we will be defining a constant having a fixed value, for example 10. This defined constant represents the Rate of Interest which we will be using in the example scenario of Process Rule later. |
| To create a new Constant, follow these steps: |
1. On the Rules tab, click Create Rule.
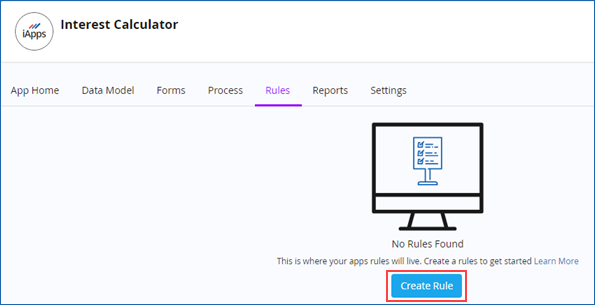
2 The New Rule dialog box appears.
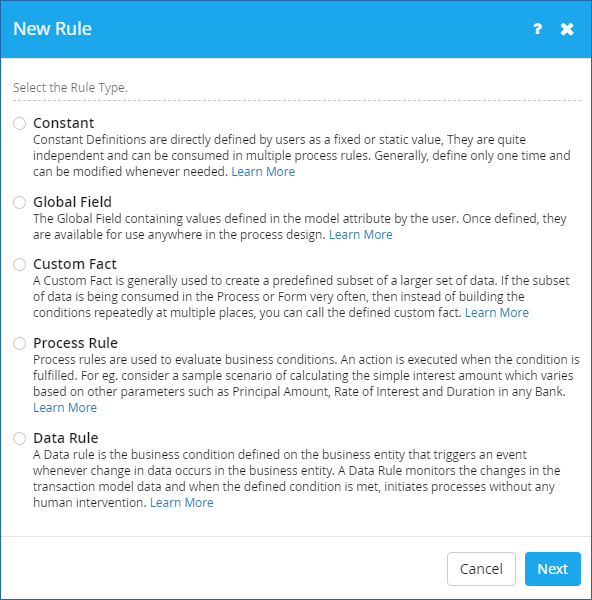
3. Select the rule type you wish to create. Click Constant.
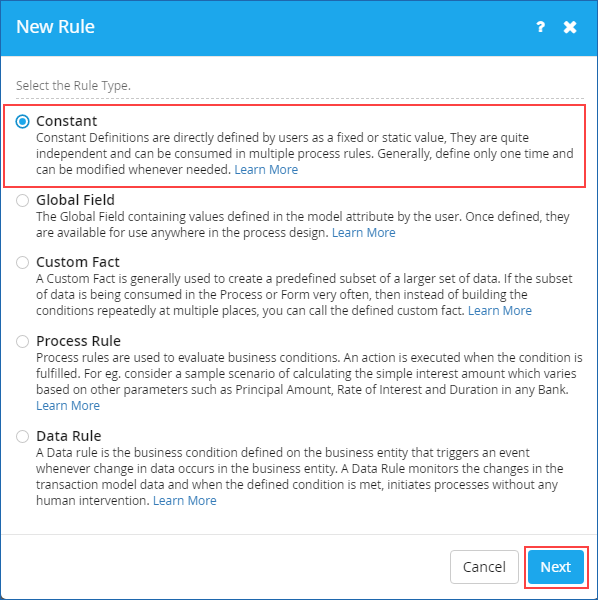
4. Click Next. The following dialog box appears.
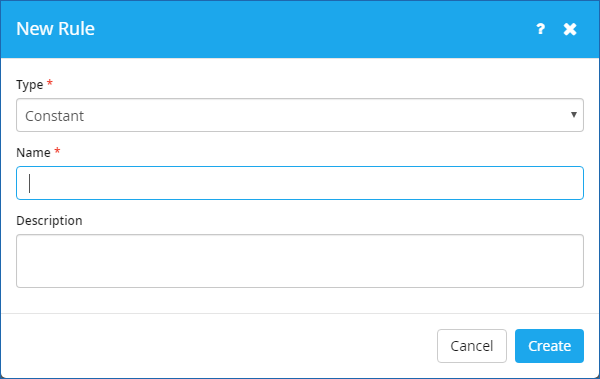
- Enter the name of constant you wish to define in the Name box. For example, Rate of Int.
- Enter an appropriate description in the Description box.
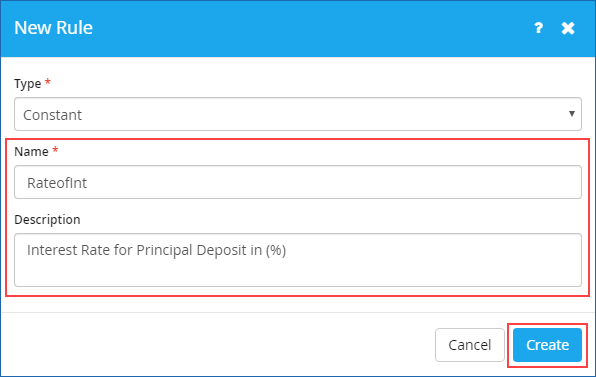
5. Click Create. The following page appears.

- Edit the name of the defined constant & its description, if you wish to in the Name & Description boxes respectively.
- Select the data type from the Data Type list. The available options are: String, Integer, Double, DateTime, Date, Time, & Bool.
- Enter a fixed value for the defined constant in the Value box. For example, 10.

6. Click ![]() on the toolbar to save the newly defined constant. Else, click
on the toolbar to save the newly defined constant. Else, click ![]() to save & publish the constant at once.
to save & publish the constant at once.
7. Immediately, ‘Success! Constant saved successfully’ message is displayed at the top, if you choose to save the constant, else ‘Success! Constant published successfully’ message is displayed, if you choose to save & publish in one go.
8. If you have chosen to save only, click Back at the top left side of this page to navigate to the previous screen to view the newly created Constant along with its details. Alternatively, you can navigate back to the previous screen on your web browser & view the same.

|
Fields marked with * are mandatory. |

| Previous
<< Process Rule |
Back to Contents | Next |
| Editing a Constant: |
|
You can edit a defined Constant at any time even after its publication as well. However, you can only modify the defined Constant's description & value fields once published. |
| To edit a Constant, follow these steps: |
1. On the Rules tab, hover the mouse pointer on any published Constant & click ![]() to edit it. Alternatively, on the toolbar, click
to edit it. Alternatively, on the toolbar, click ![]() to edit the currently selected constant.
to edit the currently selected constant.
2. Make the requisite modifications & then save or publish it as needed.
|
You cannot change the name of the Constant and its defined Data Type, once it is created. |

| Previous | Back to Contents | Next |
| Deleting a Constant: |
|
A constant once published cannot be deleted. It can only be deleted in its draft or editable state before being published. |

| Previous | Back to Contents | Next |
| Creating a new Global Field: |
| To create a new Global Field, follow these steps: |
1. On the Rules tab, click Create Rule.

2. On the New Rule dialog box, select the rule type you wish to create. Click Global Field.
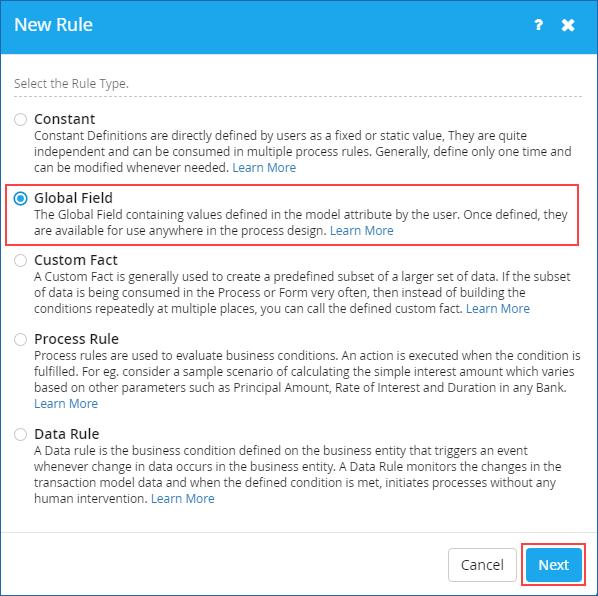
3. Click Next. The following dialog box appears.
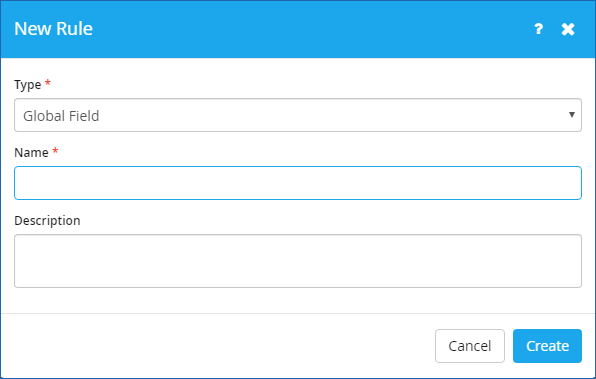
- Enter the name of Global Field you wish to define in the Name box. For example, Principal Amount.
- Enter an appropriate description in the Description box.
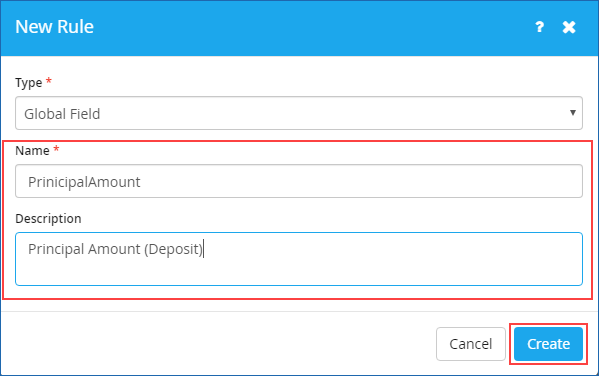
4. Click Create. The following page appears.
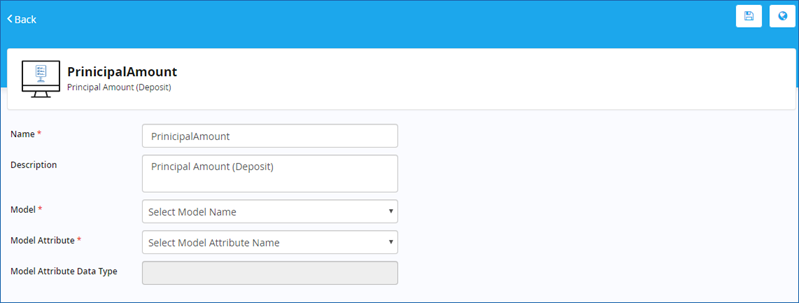
5. Edit the name of the defined Global Field & its description, if you wish to in the Name & Description boxes respectively.
6. Select the name of the model from the Model list. Only Published models appear on this list.
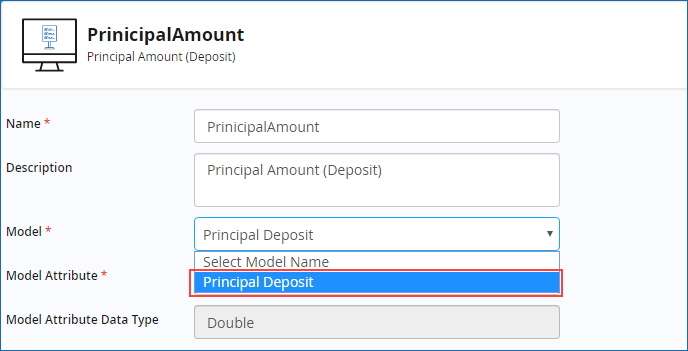
7. Select the name of the model attribute from the Model Attribute list. Only the attributes associated with the model selected appear on this list. Notice that the Data Type of the Model Attribute selected is auto-populated as defined in the data model.
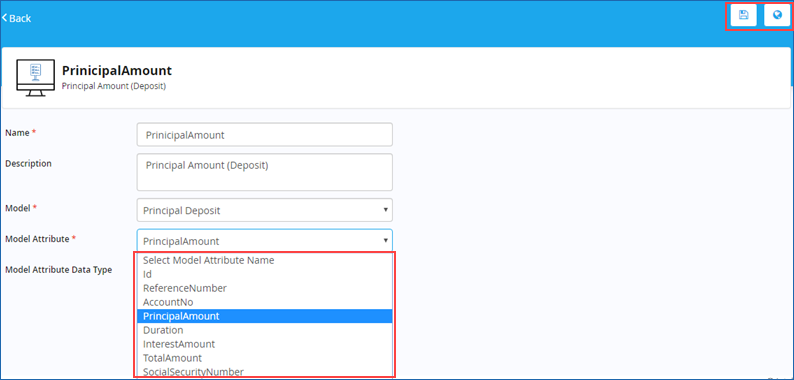
8. Click ![]() to save the newly defined Global Field. Else, click
to save the newly defined Global Field. Else, click ![]() to save & publish the Global Field at once.
to save & publish the Global Field at once.
9. Immediately, ‘Success! Global Field saved successfully’ message is displayed at the top, if you choose to save it, else ‘Success! Global Field published successfully’ message is displayed, if you choose to save & publish in one go.
10. If you have chosen to save only, click Back at the top left side of this page to navigate to the previous screen to view the newly created Global Field along with its details in draft mode. Alternatively, use the breadcrumb at the top left side of this page to navigate & view the same.

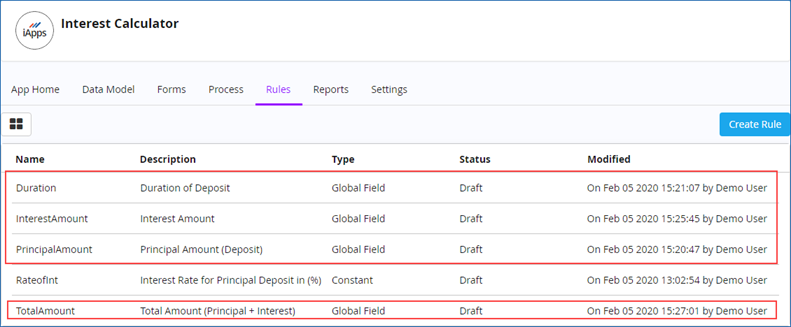
Similarly, we need to create or define three more global fields such as Duration, Interest Amount, Total Amount in our example scenario (as shown).
|
Fields marked with * are mandatory. |

| Previous | Back to Contents | Next |
| Editing a Global Field: |
|
You can edit a defined Global Field at any time even after its publication as well. However, you can only modify the defined Global Field's description & model attribute fields once published. |
| To edit a Global Field, follow these steps: |
1. On the Rules tab, hover the mouse pointer on any published Global Field & click ![]() to edit it. Alternatively, on the toolbar, click
to edit it. Alternatively, on the toolbar, click ![]() to edit the currently selected Global Field.
to edit the currently selected Global Field.
2. Make the requisite modifications & then save or publish it as needed.
|
You cannot change the name of the Global Field, once it is created. |

| Previous | Back to Contents | Next |
| Deleting a Global Field: |
|
A Global Field once published cannot be deleted. It can only be deleted in its draft or editable state before being published. |

| Previous | Back to Contents | Next |
| Creating a new Custom Fact: |
| To create a new Custom Fact, follow these steps: |
1. On the Rules tab, click Create Rule.
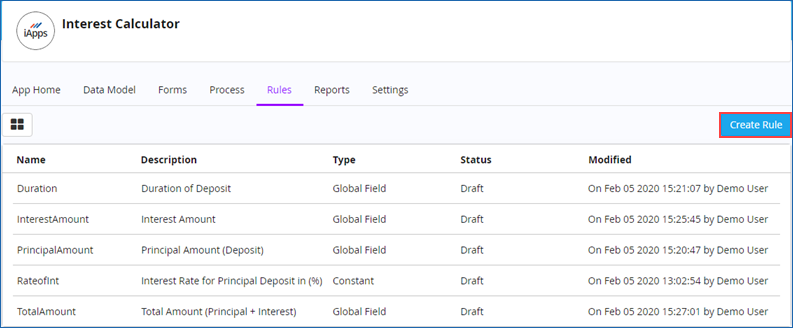
2. On the New Rule dialog box, select the rule type you wish to create. Click Custom Fact.
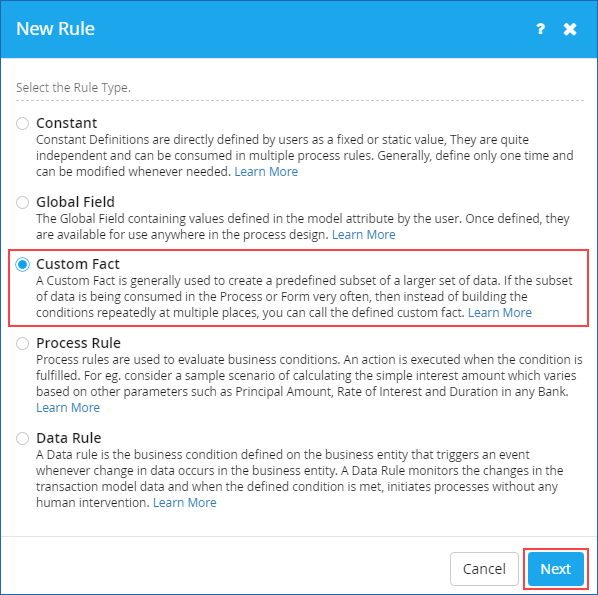
3. Click Next. The following dialog box appears.
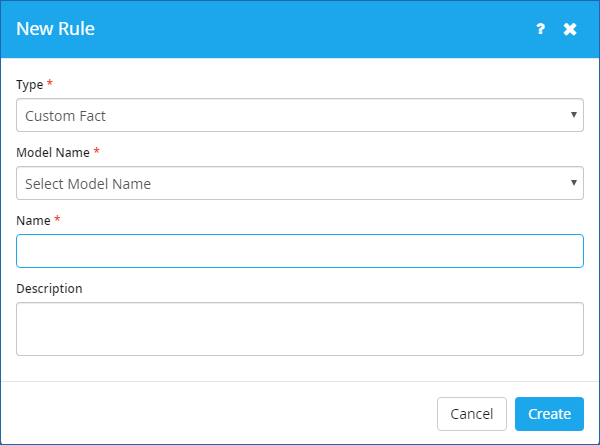
4. Select the name of the model from the Model list. Only Published models appear on this list.
5. Enter the name of the Custom Fact you wish to create in the Name box. For example, CustomerWithSSN.
6. Enter an appropriate description in the Description box.

7. Click Create. The following page appears. Notice the display of all the attributes (under Fields tab) related to the Model along with their display name & data type.
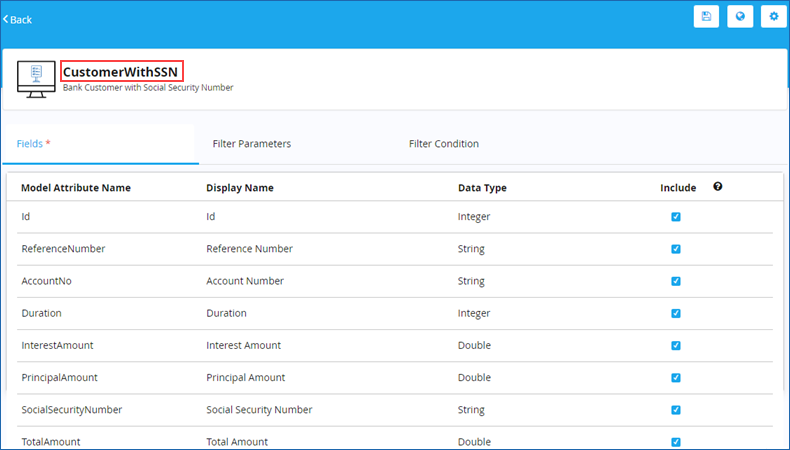
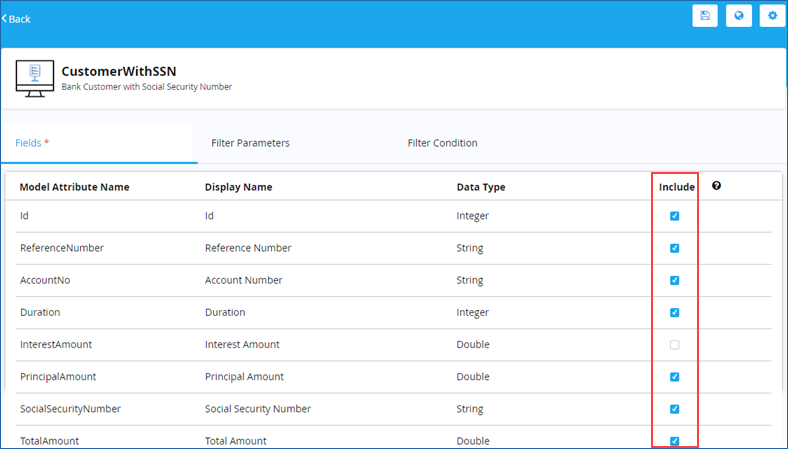
8. Clear the Include check box against each model attribute name, if you wish not to include it as part of the custom fact. All the model attributes are selected or included as part of custom fact by default.
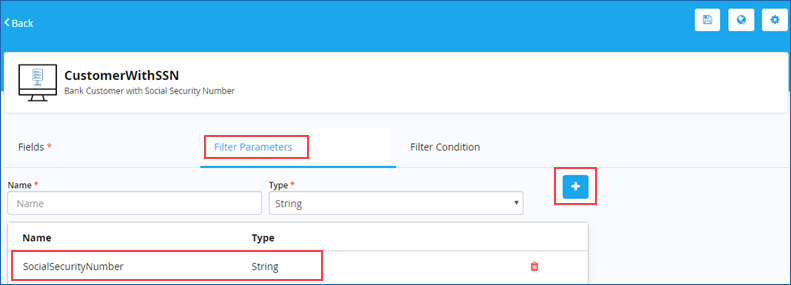
9. Click the Filter Parameters tab & specify the filter parameter as shown.
- Enter the parameter name in the Name box. For example, Social Security Number.
- Select the data type from the Type list. The available options are: String, Integer, Double, DateTime, Date, Time, & Bool.
- Click
 to add the defined parameter. You can add any number of parameters.
10. Click the Filter Condition tab & define the filter condition as shown.

11. Click Validate to validate the filter condition specified. If the validation is successful, 'Success!The Filter Condition is valid.' message appears.
12. Click ![]() on the toolbar to save the newly created custom fact. Else, click
on the toolbar to save the newly created custom fact. Else, click ![]() to save & publish the custom fact at once.
to save & publish the custom fact at once.
13. Immediately, ‘Success! Custom Fact saved successfully’ message is displayed at the top, if you choose to save it, else ‘Success! Custom Fact published successfully’ message is displayed, if you choose to save & publish in one go.
14. If you have chosen to save only, click Back at the top left side of this page to navigate to the previous screen on your web browser to view the newly created Custom Fact along with its details. Alternatively, use the breadcrumb at the top left side of this page to navigate & view the same.
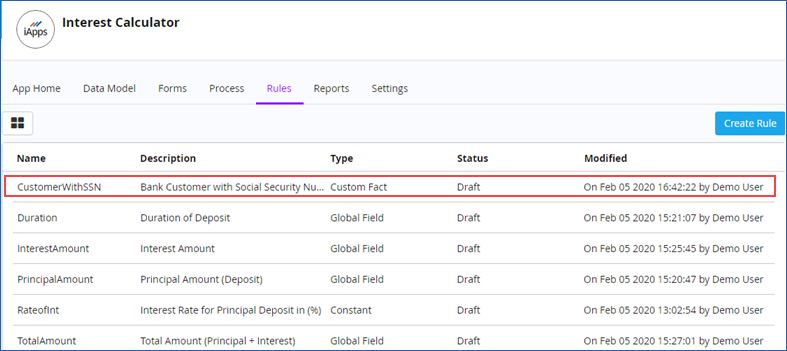

| Previous | Back to Contents | Next |
| Editing a Custom Fact: |
|
You can edit a defined Custom Fact at any time even after its publication as well. |
| To edit a Custom Fact, follow these steps: |
1. On the Rules tab, hover the mouse pointer on any published Custom Fact & click ![]() to edit it. Alternatively, on the toolbar, click
to edit it. Alternatively, on the toolbar, click ![]() to edit the currently selected Custom Fact.
to edit the currently selected Custom Fact.
2. Make the requisite modifications & then save or publish the Custom Fact as required.
|
You cannot change the name of the Custom Fact, once it is created. |

| Previous | Back to Contents | Next |
| Deleting a Custom Fact: |
|
A Custom Fact once published cannot be deleted either. It can only be deleted in its draft or editable state before being published. |

| Previous | Back to Contents | Next |
| Setting Custom Fact Properties: |
|
Rule Composer allows you to set few generic properties of a Custom Fact through the Custom Fact Properties dialog box. |
| To set Custom Fact properties, follow these steps: |
1. On the toolbar, click
 to set the generic properties for the newly created Custom Fact. The Custom Fact Properties dialog box appears.
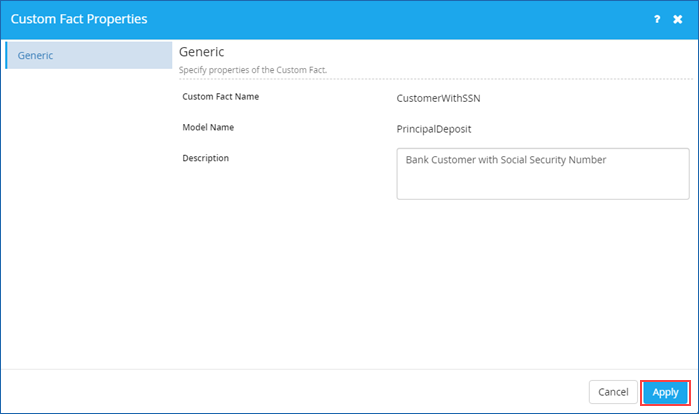
2. On the Generic tab, enter an appropriate description for the Custom Fact in theDescription box.
3. Click Apply.

| Previous | Back to Contents | Next |
| Creating a new Process Rule: |
|
Creating a Process Rule is simple & easy in Rule Composer. You can create well-defined process rules that range from simple to complex quickly & efficiently. |
| To create a new Process Rule, follow these steps: |
1. On the Rules tab, click Create Rule.
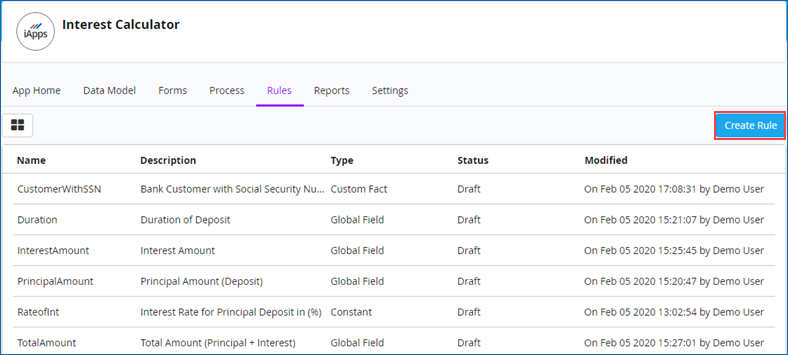
2. On the New Rule dialog box, select the rule type you wish to create. Click Process Rule.
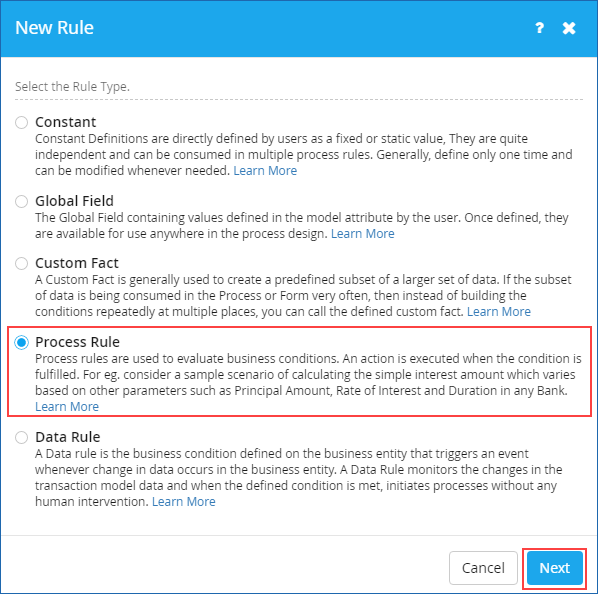
3. Click Next. The following dialog box appears.
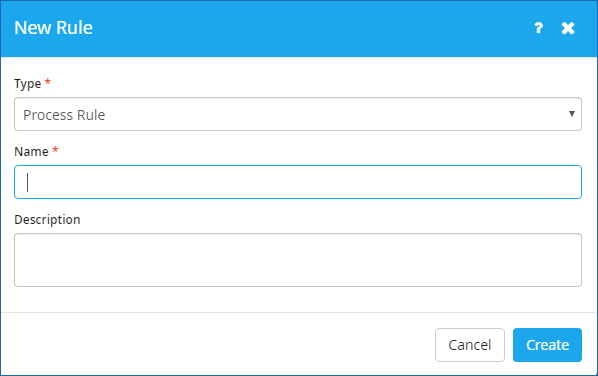
4. Enter the name of Process Rule you wish to create in the Name box. For example, Calculate Interest Amount.
5. Enter an appropriate description in the Description box.
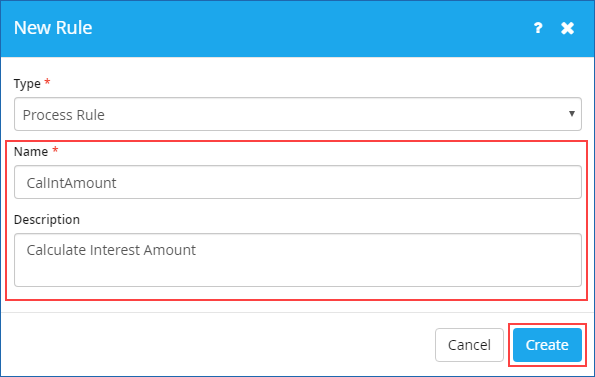
6. Click Create. The following page appears.
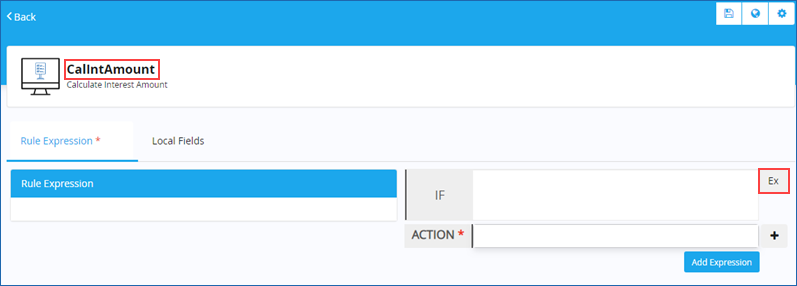
7. Click
![]() to add a new condition for process rule to be created. The Condition Expression dialog box appears.
to add a new condition for process rule to be created. The Condition Expression dialog box appears.
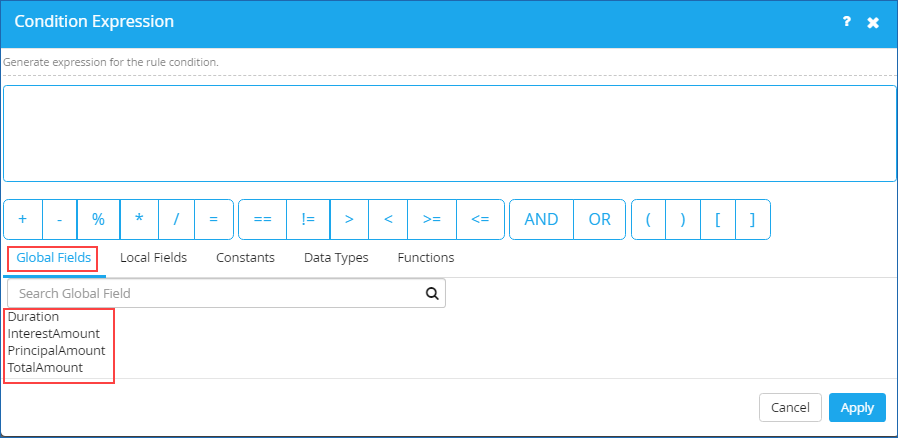
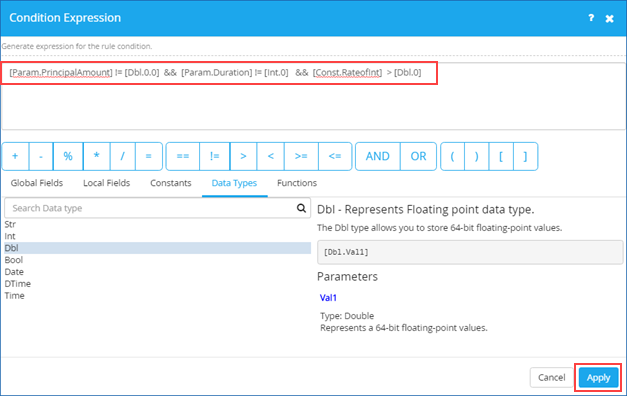
8. Generate a valid expression for the rule condition as shown. Click Apply.
- Click Global Fields to display all the published global fields in the list below. Alternatively, you can search the name of the global field you wish to choose to display in the list. Similarly, you can click other fields such as Local Fields, Constants, Data Types & Functions to display their respective values.
- Double-click any of the global field displayed on the list to select it for building your condition expression & use any of the mathematical operators shown on this dialog box with it to build a valid expression.
- Click any of the fields shown on the list to display its available help usage (in case of Data Types & Functions) on the right.
9. Immediately, the following page appears prompting you to add new action for the rule.
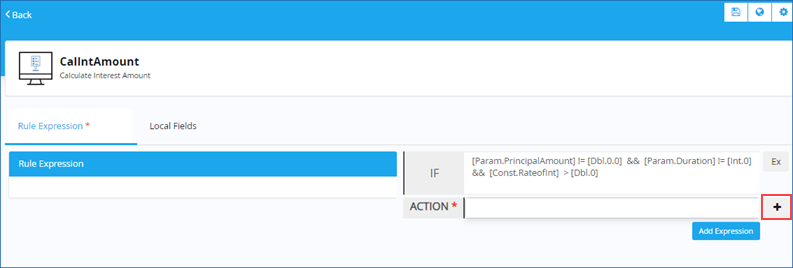
10. Click
![]() to add a new action for process rule to be created. The Action Expression dialog box appears.
to add a new action for process rule to be created. The Action Expression dialog box appears.
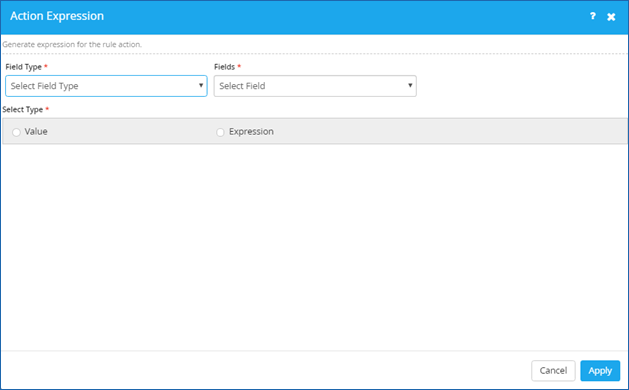
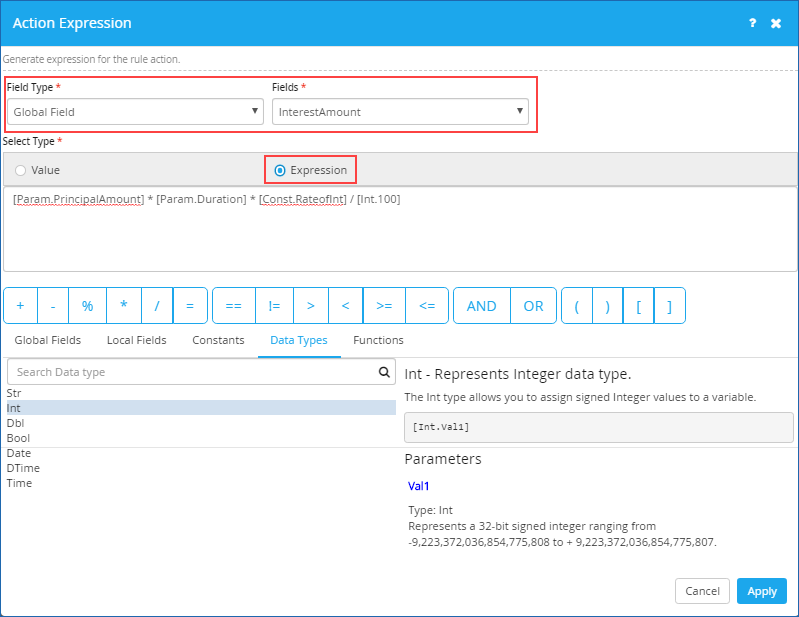
11. Define or generate an expression for the rule action as shown. Click Apply.
- Select type of field from the Field Type list. The available options are: Local Field & Global Field.
- Select the requisite field name from the Fields list. This list displays all the corresponding published fields based on the selected Field Type.
- Click any of the type options per your requirements (for example, Expression) to define your expression condition.
12. Immediately, the following page appears.
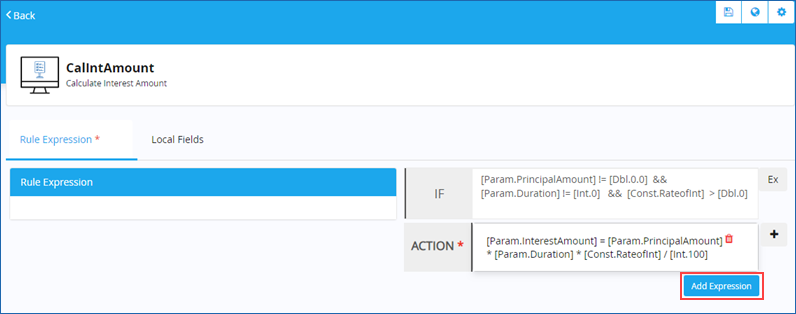
13. Click Add Expression. If the added rule expression is valid, 'Success! Rule expression validated and updated successfully' message appears.
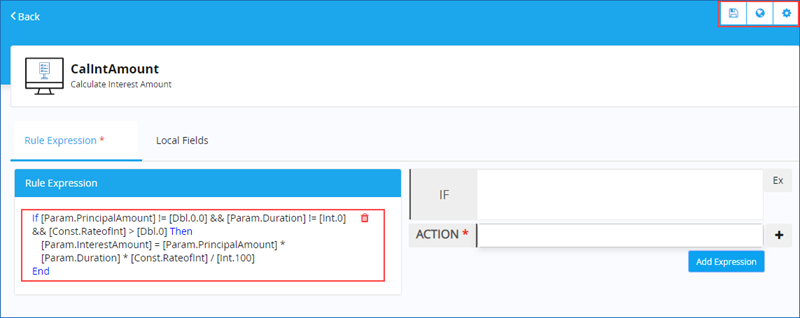
14. Click ![]() on the toolbar to save the newly created process rule. Else, click
on the toolbar to save the newly created process rule. Else, click ![]() to save & publish the process rule at once.
to save & publish the process rule at once.
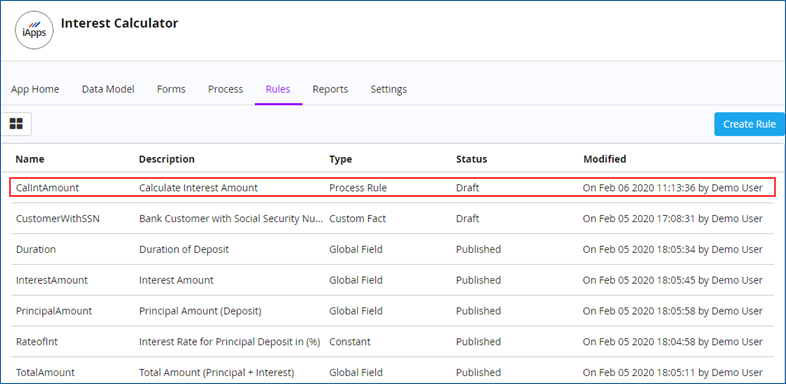
15. Immediately, ‘Success! Process Rule saved successfully’ message is displayed at the top, if you choose to save the rule, else ‘Success! Process Rule published successfully’ message is displayed, if you choose to save & publish in one go.
16. If you have chosen to save only, click Back at the top left side of this page to navigate to the previous screen on your web browser to view the newly created Process Rule along with its details. Alternatively, use the breadcrumb at the top left side of this page to navigate & view the same.

| Previous | Back to Contents | Next |
| Editing a Process Rule: |
|
You can edit a defined process rule at any time even after its publication as well. |
| To edit a Process Rule, follow these steps: |
1. On the Rules tab, hover the mouse pointer on any published Process Rule & click
![]() to edit it. The following page appears. Alternatively, on the toolbar, click
to edit it. The following page appears. Alternatively, on the toolbar, click
![]() to edit the currently selected Process Rule.
to edit the currently selected Process Rule.

2. Click on the Rule Expression so as select it. Click on the Action Expression to make the requisite modifications to it (conditions & actions) & click Update Expression to update it. Once updated, you can either save or publish the rule. Else, click Cancel Update to cancel the modifications made to the Rule Expression.


| Previous | Back to Contents | Next |
| Deleting a Process Rule: |
|
A Process Rule once published cannot be deleted. It can only be deleted in its draft or editable state before being published. |
|
You can delete the action expression condition as well the rule expression itself only when the process rule is in its editable state before being published. |

| Previous | Back to Contents | Next |
| Setting Process Rule Properties: |
|
Rule Composer allows you to set few generic properties of a Process Rule through the PROCESS RULE PROPERTIES dialog box. |
| To set Process Rule properties, follow these steps: |
1. On the toolbar, click
![]() to set the generic properties for the newly created process rule (For example, CalIntAmount). The Process Rule Properties dialog box appears.
to set the generic properties for the newly created process rule (For example, CalIntAmount). The Process Rule Properties dialog box appears.
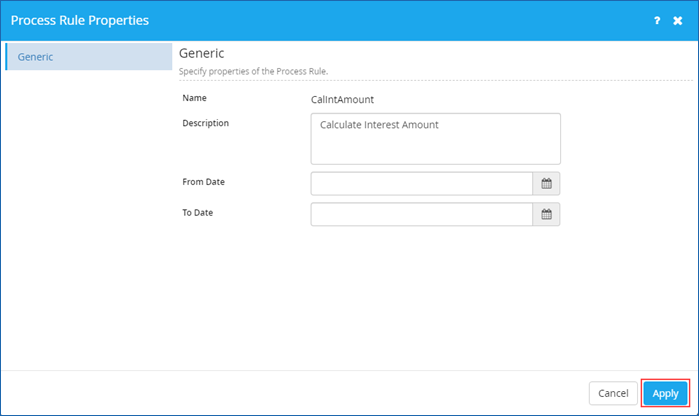
2. On the Generic tab, enter an appropriate description for the process rule in the Description box.
3. Select the from date & to date till which the process rule is applicable from the respective calendars displayed along with From Date & To Date lists.
4. Click Apply.
|
You cannot change the name of the Process Rule once it is published. |

| Previous | Back to Contents | Next
Data Rule >> |
| Data Rule: |
|
A Data rule is the business condition defined on the business entity that triggers an event whenever change in data occurs in the business entity. It can be applied on one or more transaction model attribute resulting in a value that is either 'Pass' or 'Fail'. Based on the result, another process can be triggered. A Data Rule monitors the changes in the transaction model data & when the defined condition is met, initiates processes without any human intervention. |
| Example Scenario: |
|
Let us consider the banking scenario example discussed earlier to illustrate where specifically a Data Rule can be defined. In any Bank system, customers normally deposit certain specific amount in their respective accounts for a pre-defined period. Now, let us define a Data Rule as follows: Only in the event of the principal amount deposited by the customer exceeds $10000, the concerned finance executive must collect the Social Security Number(SSN) of the customer (Secondary Process). Else, the Primary or Original Process continues as defined (without the collection of customer SSN). Usually, there would be two types of processes associated with a Data Rule. The first type of process would be a Primary process and the second type would be a Secondary process. On triggering of a primary process (by the user), the defined Data Rule monitors on the rule expression condition (in our example, Principal Deposit amount) & triggers the secondary process, if required. Let us illustrate this scenario a bit further. |

| Consumption of Data Rule: |
| Following are the sequence of steps that needs to be carried out to understand the consumption of a Data Rule in our example process scenario (end to end): |
1. Start-off with creating a transaction data model ('Principal Deposit') with the process attributes as described in the Process Rule section earlier.
2. Create an associate form ('Collect - SSN') of the action form ('Calculated Action Form') described in the earlier Process rule section having an additional model attribute (imported) named 'Social Security Number' as shown (sequence of screen shots). Save & Publish the form.
- Hover the mouse pointer over the form for which you wish to create an associated form. At the far right of the form, click
 . A shortcut menu (Actions) appears. Select Create Associated Form from the shortcut menu displayed.
- In the ASSOCIATED FORM dialog box displayed,
- Enter the name for the associated form in the Form Name box.
- Enter an appropriate description in the Description box.
- Click Create.
3. Now, create a Process diagram (Process name:'Collect SSN') & link or map the above created form to the 'Finance Exe View' Human Task activity in Process Composer. Save & Publish the Process.
4. Bind the above defined process to the newly created data rule as shown. Before binding the form, see creating a new data rule.
- Hover the mouse pointer over the process to which you wish to bind the data rule. At the far right of the process, click
 . A shortcut menu (Actions) appears. Select Data Rule from shortcut menu as shown.
 - In the DATA RULE dialog box displayed,
- Select the name of the Data Rule from the Data Rule list.
- Select the name of the Process Attribute from the Process Attribute list. Click SAVE.
- On successful mapping, 'Success! Data rule mapped successfully' message appears.
5. In this final step, trigger the Primary or the Original Process through an App ('InterestCal') & check the working of the Data rule defined.
- Notice that on triggering of the Primary Process, the Data Rule watches the Deposit amount keyed in & if required triggers the secondary process to collect the Social security Number from the Customer as defined. Here, the Principal or Deposit amount is monitored by the data rule & if the value exceeds the pre-defined level, it triggers the secondary process (Collect-SSN) to collect SSN from the customer.
|
Important Points to remember:
|

| Contents |

| Previous | Back to Contents | Next |
| Creating a new Data Rule: |
|
Creating a Data Rule is fairly easy in Rule Composer. It allows you to create simple as well as sophisticated data rule(s) which monitor the changes in the transaction model data & initiates processes without any human intervention when the defined condition is met. |
| To create a new Data Rule, follow these steps: |
1. On the Rules tab, click Create Rule.
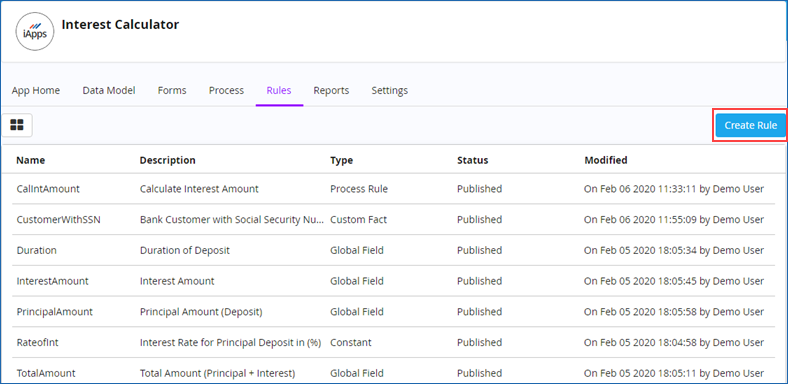
2. On the New Rule dialog box, select the rule type you wish to create. Click Data Rule.
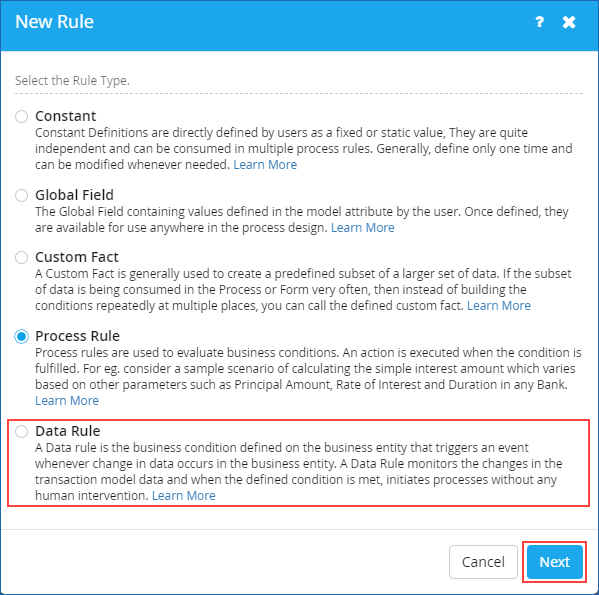
3. Click Next. The following dialog box appears.
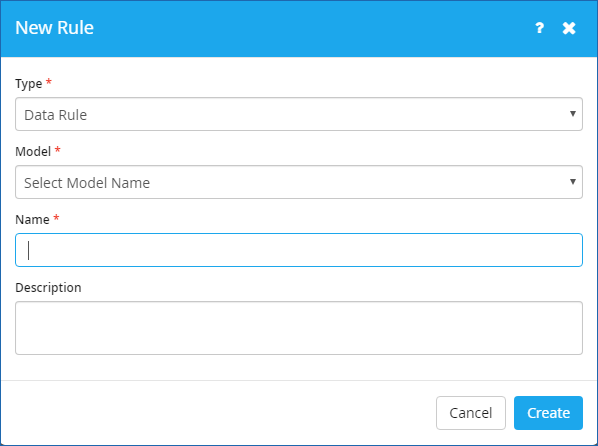
4. Select the name of the model from the Model list. Only your published models appear on this list.
5. Enter the name of the Data Rule you wish to create in the Name box. For example, Total Deposit Amount.
6. Enter an appropriate description in the Description box.
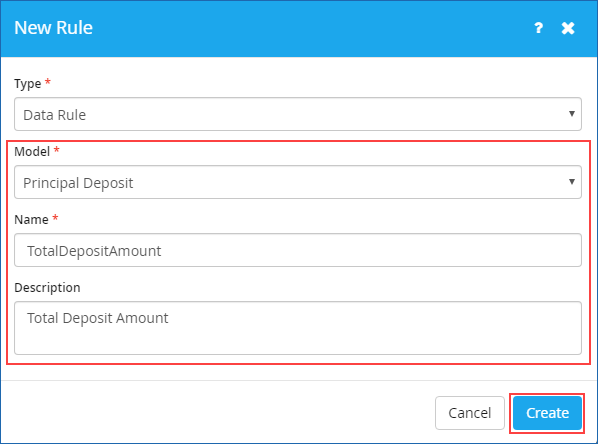
7. Click Create. The following page appears.
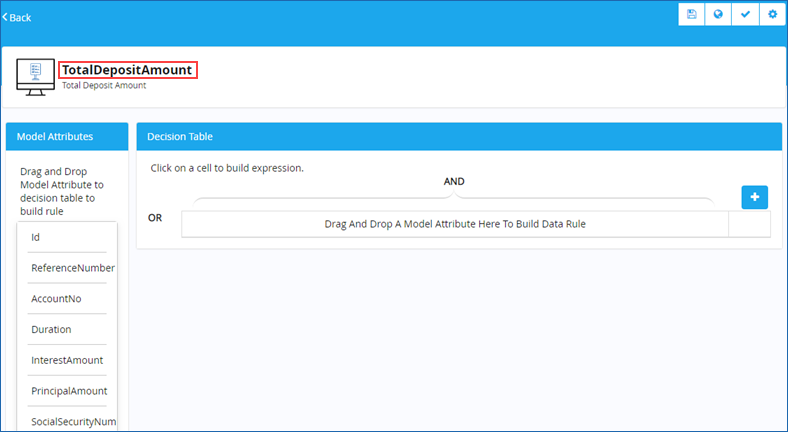
8. From the left pane, drag & drop the requisite model attribute on to the decision table that appears on the right to build a data rule. Notice that all the model attributes of the chosen data model appear on the left pane.
9. Click ![]() to add a new row to the decision table.
to add a new row to the decision table.
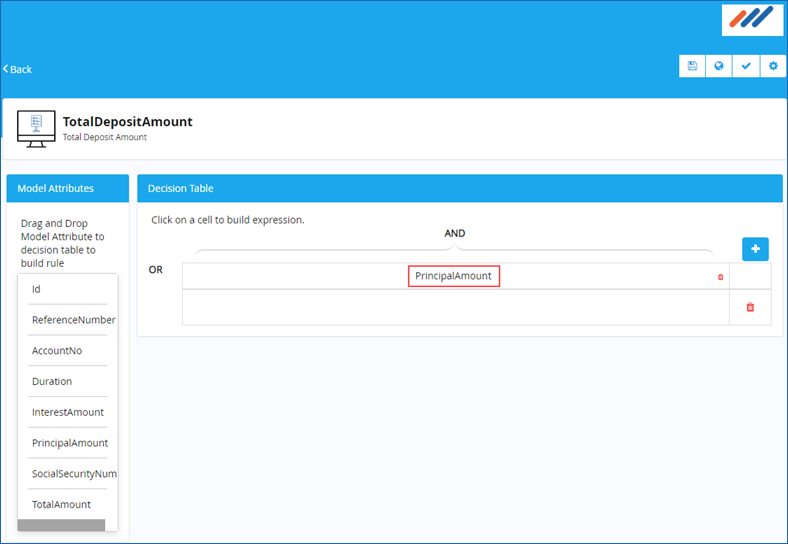
10. Click on any empty cell or row corresponding to the data model attribute in the decision table to build an expression for the data rule. The Data Rule Expression dialog box appears.
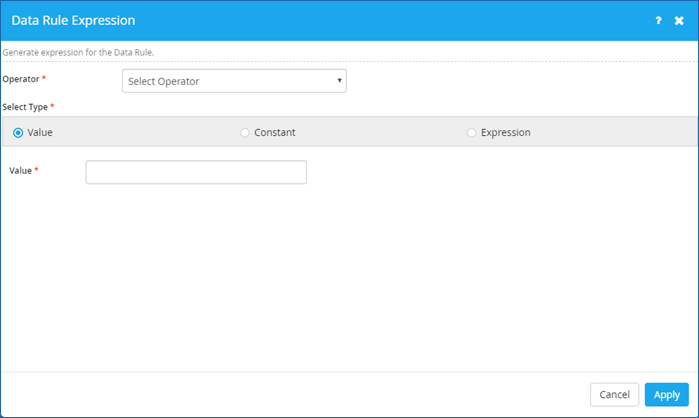
11. Select an operator from the Operator list. The available options are: <, >, >=, <=, ==, and !=.
12. Click to choose the type on which you wish to build your expression on. The available options are: Value, Constant, & Expression.
- If you choose the Value option then, enter the value in the Value box.
- If you choose the Constant option then, select the constant from the Constant list. This list displays all the constants defined & published in the Rule Composer.
- If you choose the Expression option then, define an expression for the data rule.
13. Click Apply.
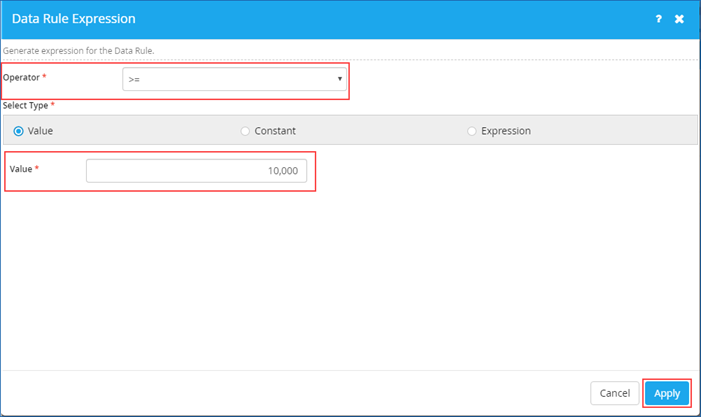
In the above screen shot, the data rule expression denotes the condition of Principal Deposit Amount being greater than or equal to $10,000.
14. Click ![]() on the toolbar to save the newly created data rule. Else, click
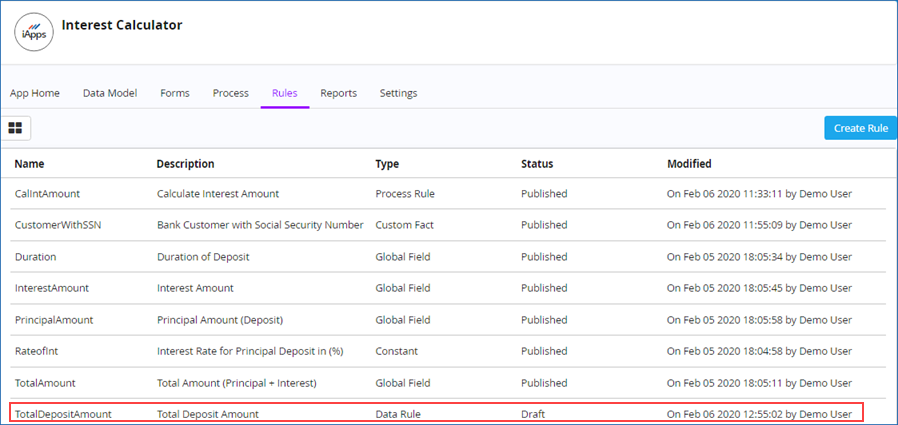
on the toolbar to save the newly created data rule. Else, click ![]() to save & publish the data rule at once.
to save & publish the data rule at once.
15. Immediately, ‘Success! Data Rule saved successfully’ message is displayed at the top, if you choose to save the rule, else ‘Success! Data Rule published successfully’ message is displayed, if you choose to save & publish in one go.
16. If you have chosen to save only, click Back at the top left side of this page to navigate to the previous screen on your web browser to view the newly created Data Rule along with its details. Alternatively, use the breadcrumb at the top left side of this page to navigate & view the same.

| Previous
<< Data Rule |
Back to Contents | Next |
| Editing a Data Rule: |
|
You can edit a defined data rule at any time even after its publication as well. |
| To edit a Data Rule, follow these steps: |
1. On the Rules tab, hover the mouse pointer on any published Data Rule & click ![]() to edit it. The following page appears. Alternatively, on the toolbar, click
to edit it. The following page appears. Alternatively, on the toolbar, click ![]() to edit the currently selected Data Rule.
to edit the currently selected Data Rule.
2. Make the requisite modifications & then save or publish the data rule as required.
|
|

| Previous | Back to Contents | Next |
| Deleting a Data Rule: |
|
A Data Rule once published cannot be deleted. It can only be deleted in its draft or editable state before being published. |

| Previous | Back to Contents | Next |
| Validating a Data Rule: |
|
You can also validate your defined data rule in Rule Composer. |
| To validate a Data Rule, follow these steps: |
1. Select the data rule you wish to validate in the Rule Composer.
2. On the toolbar, click ![]() to validate it. If the validation is successful, ‘Success! The provided Expression is valid’ message appears at the top else a warning message appears to key in a valid expression before validating the data rule again.
to validate it. If the validation is successful, ‘Success! The provided Expression is valid’ message appears at the top else a warning message appears to key in a valid expression before validating the data rule again.

| Previous | Back to Contents | Next |
| Setting Data Rule Properties: |
|
Rule Composer allows you to set few generic properties of a Data Rule through the Data Rule Properties dialog box. |
| To set Data Rule properties, follow these steps: |
1. On the toolbar, click
 to set the generic properties for the newly created Data Rule. The Data Rule Properties dialog box appears.
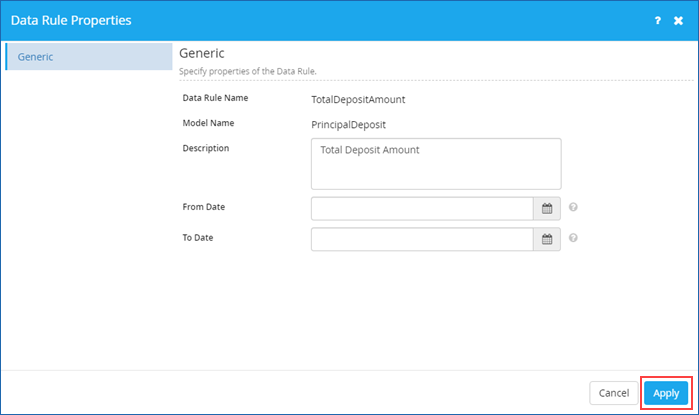
2. On the Generic tab, enter an appropriate description for the Data Rule in the Description box.
3. Select the from date & to date till which the Data Rule is applicable from the respective calendars displayed along with From Date & To Date lists.
4. Click Apply.

| Previous | Back to Contents |
