
| Activity - Overview |
|
This is a collection of activities that cater to different aspects of a process flow. These represent the work that is carried out as part of a business process. For example, the Cancel activity can be used to stop execution of a Human Task or Sub Process, or the File Transporter activity can be used to transfer files from one network location to another, etc. An activity can be atomic (task) or non-atomic (compound). |
|
Following are few of the key Activity related process components available in the Process Composer. |
| Human Task | Send Mail | Sub Process | Database | File Transporter | Template (DOCX) |
For a complete list of Process components available in Process Composer, see Process Component Table.

| Send Mail Activity |
| This activity is used to configure parameters for outgoing emails to both intended Internal as well as external recipients. It lets you send an email to a selected set of users (Internal or external). The users(s) can be selected by building a query. The subject and body of the email can be customized by the resource using the properties available. |
| To add properties to the process component activity 'Send Mail', follow these steps: |
1. Drag the Send Mail component from the left pane & drop it on the Process design area as shown.

Please note that this Send Mail component property is configured to reflect the Emp Ack Copy To RM send mail activity in the Travel Requisition Approval – Process Flow Diagram.
2. Double-click the
 icon. Alternatively, right-click the Send Mail activity icon, & then click Properties on the shortcut menu. The Send Mail1 Properties dialog box appears.
- On the Generic tab, enter an appropriate name for this activity in the Name box.
- Enter an appropriate description in the Description box.
- Select the mail format in which the e-mail to be sent from the Mail Format list. The available options are: Plain & HTML.
- Select the action in case of mail delivery failure from the Mail Failure Action list. The available options are: Continue Process & Stop Process.
- Select if you would like to display Instance Report of this activity along with its status from the Instance Report list. The available options are: Show & Hide.

3. Click the 'To(Internal Recipient)' tab. Set the intended internal primary recipients to whom the e-mail should reach. The recipients can be identified either by their e-mail ids or using conditions from the iLeap users list.
- Click Users and assign the task to the selected user.

4. Click the 'To(External Recipient)' tab. Specify recipients who are outside the iLeap Platform users list & need to receive the e-mail. External Recipients can be identified by mail ids or from process parameters.

- In the TO Email section, click
 to add the recipients. Similarly, add the email recipients in the CC Email and BCC Email sections as well.

- Click Apply.
5. Click the 'From' tab. Set the e-mail ids from which the e-mail should trigger. Choose an appropriate option based on your requirements. A multitude of options are displayed as shown.

6. Click the 'CC' tab & 'BCC' tab. Specify the e-mail ids to be included in the CC & BCC lists. The steps are similar to step 3 & 5 described above.
7. Click the 'Subject' tab. Set an appropriate subject line for the e-mail to be sent.
- Select the Context of the Process from the Process Context list. The available options are: Activity Detail, Attribute, Composite Attribute, Iterator,Model, Process Detail & Process Initiator.
- Select the value from the Value list. The options displayed on this list may vary based on the option selected from the Process Context list.
- Click to add.

8. Click the 'Body' tab. Set the body text template (html based) for the outgoing email. Format the body text using the format toolbar as required.
- Click to add.

9. Click the 'Reply To' tab. Set the e-mail ids to which the replies to be directed automatically.

10. Click the 'Attachment' tab. Specify the attachments to the e-mail using the process parameters.
- Select the Context of the Process from the Process Context list. The available options are: Attribute, Composite Attribute, Iterator, & Model.
- Select the value from the Value list. The options displayed on this list may vary based on the option selected from the Process Context list.
- Click to add the attachment to the e-mail.

11. Click the 'Rules On Start' tab. Set the Rule to be invoked when the activity starts.
- Select the rule name from the Rule Name list. This list displays the rules defined already in the Rule Engine.
- Select the action in case of rule failure from the Rule Failure Action list. The available options are: Stop Process & Continue Process.
- Map the related Global & Local Fields listed as appropriate & click Validate to validate the rule mapped.

12. Click the 'Rule On End' tab. Set the Rule to be invoked when the activity ends.
- Select the rule name from the Rule Name list. This list displays the rules defined already in the Rule Engine.
- Select the action in case of rule failure from the Rule Failure Action list. The available options are: Stop Process & Continue Process.
- Map the related Global & Local Fields listed as appropriate & click Validate to validate the rule mapped.

13. Click the Activity Event tab. Set the Events that can be used to trigger a custom action.
- Select the type of the event from the Event Type list. The available Event Types are: ActivityPreExecution, ActivityPostExecution, ActivityTimeout & ActivityOnError .
- Select the associated library event from the Event Library list. Note that this list displays the name of event library based on the event type selected. (for e.g: If you select ActivityPostExecution Event Type, then Activity Auto Execution Event is displayed for selection in the Event Library list).
- Click to add.

14. Click Save to save the entries made.
|
Fields marked with * are mandatory. |
| Previous | Back to Key Activities | Next |
| Sub Process Activity |
| Within a process, an existing process can be invoked as a sub process. This activity is used to trigger the existing process. Once defined, this sub activity can be reused within the current process any number of times. |
| Let us take as an example, a Parent Process named 'Office Supply Request Process' in which a Process named 'PRPO' is used as a Sub Process through the Sub Process Activity component named 'Quotations' to illustrate it better. |
Office Supply Request Process : (Parent Process)
|
Description: The 'Office Supply Request Process' starts when an employee of the organization submits an office supply request for approval to the immediate manager; the manager can approve, request changes or reject the request. If the employee request is rejected, the process ends there itself with an intimation to the employee via an email. If the request requires changes, it is returned to the employee (requester) who can review the comments and change it before re-submitting it for further approval. If the Manager approves the request without any changes, it goes to the Purchase Department Executive in charge of receiving the quotations & selecting the vendor to supply the requested office supply. Based on the quotation parameters, the vendor(s) are either approved or rejected. Approved vendor(s) are notified of the Purchase Order (PO) issued against them. The Purchase Dept verifies the Office supply & the employee (requester) is notified of his office supply request status. In the above described Parent Process, all the activities post the Manager approval of the Office Supply Request by the employee, right from receiving the quotations from the vendors to shortlisting them to provide the requested Office Supply to the employee (requester) & finally notifying the employee of the requested Office supply items is entirely carried out by a Sub-Process named 'PRPO'. |
|
The sequence of steps/process flow of the sample 'Office Supply Request Process' would be as follows:
|
| Process Flow Diagram - Parent:
|
|
Process Flow Diagram - PRPO Sub Process:
|


| To add properties to the process component activity 'Sub Process', follow these steps: |
1. In the Parent Process Flow diagram, double-click the  icon. Alternatively, right-click the Sub Process activity icon, & then click Properties on the shortcut menu. The Sub Process1 Properties dialog box appears.
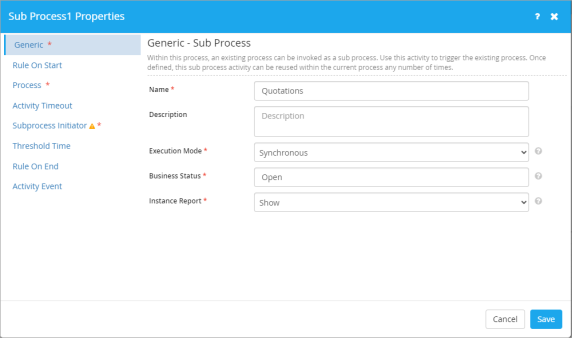
- On the Generic tab, enter an appropriate name for this activity in the Name box. For example, "Quotations".
- Enter an appropriate description in the Description box.
- Select the mode of execution from the Execution Mode list. The available options are Synchronous & Asynchronous.
-
Enter an appropriate business status for the activity during a process stage in the Business Status box.
-
Select if you would like to display Instance Report of this activity along with its status from the Instance Report list. The available options are: Show & Hide. If Show option is chosen, the activity and its status are displayed in the App Instance Report.
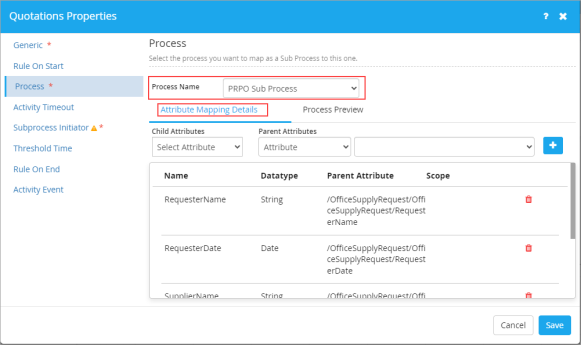
2. Click the 'Process' tab. Specify the name of the process you wish to map as a Sub Process to the Parent Process. For example, PRPO Process (this Sub Process is already pre-designed before being chosen).
- Select the corresponding Process Name. Ensure that the Process Attributes are mapped accordingly (Child - Parent Attributes as shown). Click the Process Preview tab to preview the Sub Process you wish to map.
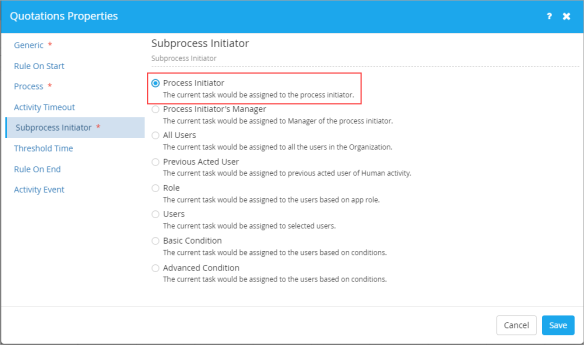
3. Click the 'Subprocess Initiator' tab. Set the Initiator for the mapped Sub Process as shown.
To set or define the properties for the remaining five tabs namely: Rule On Start ,Activity Time Out, Threshold Time, Rule On End & Activity Event, please refer to the steps described for these tabs earlier since they are very similar.
|
Fields marked with * are mandatory. |
| Previous | Back to Key Activities | Next |
| Database Activity |
| This activity is used to execute stored procedures or inline queries to retrieve or manipulate data in a database, and map results back to process attributes.
Using this activity, you (developer) can link a Table/Stored procedure/View with your Process data. The query within the Database activity can GET / INSERT / UPDATE / DELETE based on the conditions built within it. You can pass input / output values between the database and process(s). |
|
Usage Scenario: For the ease of understanding, the usage of Database activity is better illustrated with the following example scenario.
|
| Previous | Back to Key Activities | Next |
| File Transporter Activity |
| This activity is used to transfer documents from a network or ftp location to another. It can also be used to perform file transfers from within the workflow. In addition, this activity is used to transfer files within local networks using HTTP and FTP protocols as well. |
| Previous | Back to Key Activities | Next |
| Template (DOCX) Activity |
| This activity is used to create a document at any stage in a process. A Microsoft Word DOCX template for the document can be defined using this activity. |
| To create a new document template , follow these steps: |
For the ease of understanding, let us consider creating the following sample pre-defined document template Payment Instructions. |

1. To Start-off with, create the above shown sample document template in MS-Word.
2. Open this document template in MS-Word & key in their respective attribute values against each of the fields in the specified format as shown.

Legend:
- In the above specified format, DF stands for Data Field (Parent model) & TBL stands for Table (Child Model). Once the above new document template is created, it should be uploaded in Process Composer.
| To upload a new document template and map its attributes to fields, follow these steps: |
1. Open the sample Incentive Claim process in Process Composer.

2. Double-click the Payment Instructions Template Process activity in the Process Diagram. The Payment Instructions Properties dialog box appears.

3. Navigate to Template File tab. Here, you need to point to a template to be used for the document to be generated. In addition, you can also map process/model attributes to fields in the document template as well.

- On the File tab, click the
 icon so as to upload the newly created document template ‘Payment_Instructions’.

Notice the display of document template soon after it gets uploaded successfully. You can delete as well as download the uploaded document template if you wish to.

- Click any of the File Type options in which you wish to generate the document template. The available options are: PDF & Docx. By default, the option is set to .PDF format.
- Enter the name of the file name you wish to name the document template in PDF format in the Save As box (Mandatory field). Please note that the name you key in for the file here would bear the name of the generated document as well. If you wish to assign the name to the document template dynamically, choose the displayed options in the drop-down list. The available options are: Attribute, Composite Attribute, Model, Process Detail, Process Initiator & Value.
4. On the Field Mapping tab, notice the display of all the model attribute fields fetched from the Document Template uploaded.

5. Now, click the ![]() Map parameter value icon against each of the model attribute fields to map them. Map the model attribute fields in their respective Pop-up dialog boxes as shown.
Map parameter value icon against each of the model attribute fields to map them. Map the model attribute fields in their respective Pop-up dialog boxes as shown.

6. Click Apply. Ensure that you repeat this mapping process for each & every model attribute field.

Notice the change in color to ‘Blue’ of the Mapping icon after the successful map of each & every attribute.
7. Click Save.
The newly generated ‘Payment_Instructions’ in PDF format is shown below.

Now, you can modify the fields in the document template(layout design) based on any of the following requirements.
- If you wish to change the entire document template, then you need to create a new MS-Word document template from scratch & Upload in Process Composer.
- If you wish to make minor changes in the existing document template, do the following:
1. Open the Incentive Claim in Process Composer.
2. Double-click the Payment Instructions Template Process activity in the Process Diagram. The Payment Instructions Properties dialog box appears.
3. Navigate to the Template File tab.

- On the File tab, click the
 icon to download the existing document template to any of location on your system.
 - Make the requisite field level changes in the document template & re-upload this modified document template again.
|
| Previous |