

|
Process - Overview |
|
iLeap Platform's Process Composer is a 100% web based process designer with enterprise process modeling & deployment capabilities. Through its intuitive drag & drop interface, you can graphically design rich work-flow maps for business processes. A workflow map represents a business process in a flow-chart fashion with clear indications of the dependencies, conditions, and sequences in the tasks that must be performed from initiation to completion. The visual Process Composer allows you to create, group, zoom in, export, and distribute diverse process designs to the stakeholders on the fly. It is loaded with many of the best-in-class features to design & automate your business processes. |
|

| Process Description |
|
Scenario: Let us consider creating a 'Travel Requisition Approval' process as an example scenario to illustrate how easily you can create as well as design your process in Process Composer. |
|
The sequence of steps/process flow of the sample 'Travel Requisition Approval' process would be as follows: |
|
To see the designed sample process flow see, Travel Requisition Approval Process.

| Previous | Back to Contents | Next |
| Creating a new Process |
|
It is recommended that the process must be correctly analyzed with all the actors & process components properly defined before you proceed with creating and designing your process. Once the process is created, you can design your process diagram as per your requirements. iLeap provides you all the flexibility to design and model your process flow quickly and effectively. Let us go ahead & create the above illustrated sample, model based 'Travel Requisition Approval Process' as a new process using the Process Composer. |
| To create a new Process, follow these steps: |
1. On the Process tab, click Create Process.

2. The Create Process dialog box appears.
![]()
3. Select the type of Process you wish to create & the trigger form you wish to associate with it. Click Process triggered by Forms.

4. Click Next. The following dialog box appears.

- Select the name of the form from the Form Name list. For example, Travel Requisition Form - Employee. Only published forms are displayed in this list.
-
Enter the name of the Process in the Process Name box. Ensure to key in a unique Process name. For example, Travel Requisition Approval.
-
Enter an appropriate description for the new Process to be created in the Description box.

5. Click Create. The following page appears.
![]()
|
Notice that the blank process design area on which you will be designing your business process flow with its associated Process components is already populated with the first & last process activity events in the form of Start & End events. You can remove the Start & End process activity events from the Activity toolbar if you wish to work on a blank process design area. |
6. Drag & drop the requisite process components available on the left pane to the process design area to draw your process flow diagram.
7. Once the Process flow is drawn, the next step is to start setting or adding properties to each & every process component in the process. You can set the requisite properties of each & every process component by double-clicking on it (through their respective Properties dialog box).
For a complete list of Process components available in Process Composer, see Process Component Table.
8. For example, to add properties to the process component Human Task Activity, follow these steps:
- Drag the Human Task activity component from the left pane & drop it on the Process design area.
- Double-click the
 icon. Alternatively, right-click the Human Task activity icon, & then click Properties on the shortcut menu. The Human Task1 Properties dialog box appears.

- On the Generic tab, enter an appropriate name for this activity in the Name box. For example, Employee.
- Enter an appropriate description in the Description box.
- Select the priority of this activity from the Priority list. The available options are: High, Medium, & Low.
- Enter an appropriate business status for the activity during a process stage in the Business Status box.
- Select if you would like to display Instance Report of this activity along with its status from the Instance Report Display list. The available options are: Show & Hide.
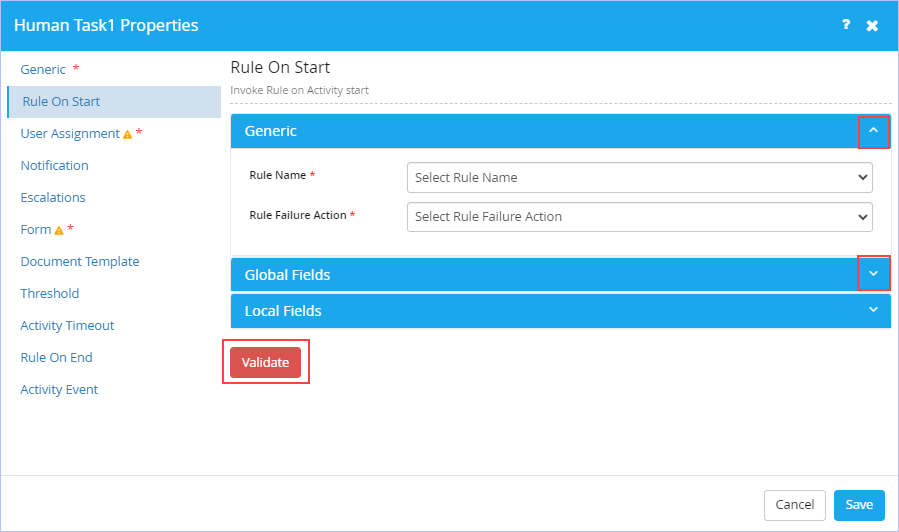
- Click the Rule On Start tab. Set the Rule to be invoked when the activity starts. For details, see consuming a Process Rule.
- Select the rule name from the Rule Name list. This list displays the rules defined already in the Rule Engine.
- Select the action in case of rule failure from the Rule Failure Action list. The available options are: Stop Process & Continue Process.
- Map the related Global & Local Fields listed as appropriate & click Validate to validate the rule mapped.
- Click the User Assignment tab. Set the assignee for this task. An assignee can be identified by its display name or by using conditional expressions.
- Click Users.
- Click Add Users to display the list of users from the user source defined.
- Select/Assign the requisite user as shown.

- Click the Notification tab. Specify the e-mail notification for the user if you wish to.
- Click Create Notification to add a notification.
- On the General Info tab, select the primary notification action from the Parent Action list. Enter particulars related to Subject and Body tabs as required. You can specify an appropriate description for this task notification. In addition, you can also modify the built-in template to provide a custom description for this task notification as well.
- Select Club Notification check box, if you wish to. This feature ensures that all the actors/users (role based) would get the same email notification shared among them instead of multiple individual email notifications sent.
- Click Save Notification to save the notifications set.

- Click the Escalations tab.Set the escalation notifications to be triggered in case an assigned task is not yet completed before the specified escalation timeout period.

- Click Create Escalation to add or define an escalation.
On the General Info tab, specify the Name of escalation, escalation action name, timeout value & escalation type (whether 24/7, Business Hours, User Calendar or Fixed Date Time (Predefined date time value in "dd/MMM/yyyy hh:mm" format)) details.
You can choose to specify your Escalation Timeout based on the following available options in the Timeout list.
Activity Detail, Attribute, Composite Attribute, Iterator, Model, Process Detail, Process Initiator & Value.

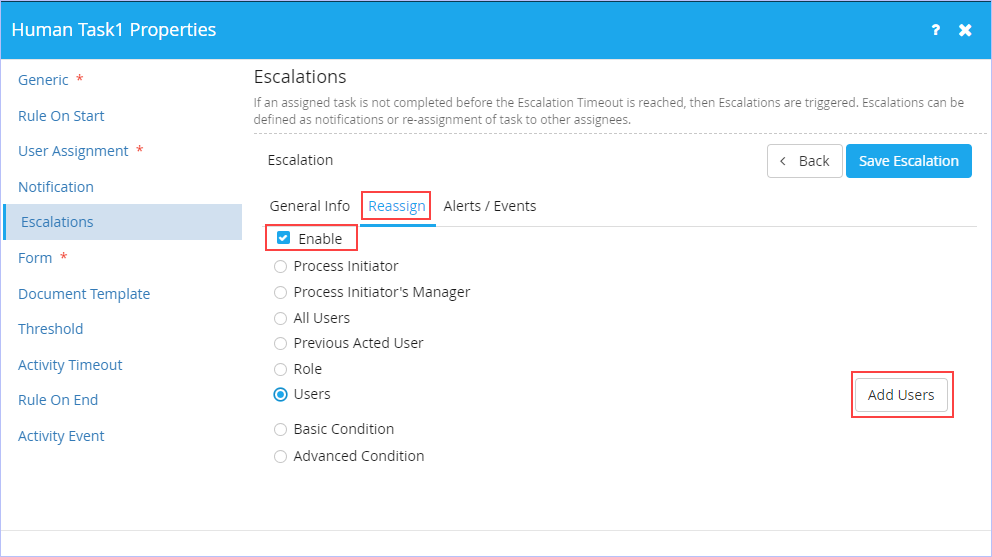
- On the Reassign tab, select the Enable check box, if you wish to reassign the task to any other assignee. Click to select re-assignee you wish to.
- On the Alerts/Events tab, select the Enable check box, if you wish to set the frequency of alert parameters in Days, Hours and Minutes.

- Click Alerts/Events.
- Click Add Alert & enter the relevant & mandatory alert particulars such as alert name and the manner in which the alert should be sent out (either via an Email or SMS), if you wish to set an alert.
- If you have chosen Shout Out option as Email, enter particulars related to Subject and Body tabs as well.
- Click Save Alerts to save the alert entries set.
-
Click Save Escalation to save the escalation entries set.

Sample screenshot showing the setting up of Escalations. Notice that you can also edit as well as delete the escalations.

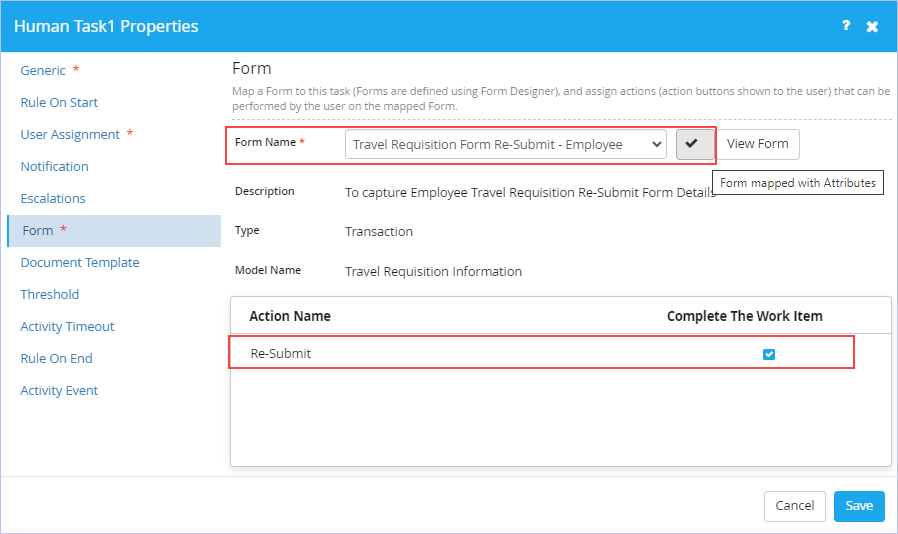
- Click the Form tab. Set the form defined in the Form Designer to be mapped to this task. Additionally, assign the actions that can be performed by the user on the mapped form.
- Select the name of the form from the Form Name list. For example, Travel Requisition Form Re-Submit - Employee. Only published forms appear in the Form Name list.
- Click
 to map the selected form to this task. Notice that the icon changes to
  indicating the successful mapping of the form along with attributes to this task. Notice that the defined action name(s) along with their action type(s) that can be performed on this mapped form by the user is displayed.
 - Click View Form to view the mapped form.
- Click the Document Template tab. Set any pre-defined document template (which is necessitated as part of the process that require either data or inputs to be presented in a specific format) to the Process.
- On the File tab, click
 to upload a template file in MS-Word template format to be attached to the Process. Currently, only MS-Word template in .docx format is supported.
 - Select the File Type format. The available options are: PDF & DOCX.
- Key in any other name for the uploaded file if you wish to in the Save As box.
- Navigate to Field Mapping tab. You can map the respective fields with their mapping attributes as required.

- On the File tab, click
- Click the Threshold tab. Set the Threshold time which defines the ideal execution time for a process. This feature is very useful since the measurement of ideal time in terms of threshold units can be used in reporting the critical metrics such as cost, efficiency or any other metrics for the process.
- Enter the expected threshold time for the execution of process in terms of days, hours & minutes in their respective boxes.
- Enter the number of threshold units in the Threshold Unit box. A Threshold Unit is a measurement of ideal execution time for a process. This field is used to calculate the cost.
- Enter the type of unit in the Unit Type box. A Unit Type is simply a symbol representing the measurement type. This field is used to measure the cost type.

- Click the Activity Timeout tab. Set the maximum amount of time in (dd.hh:mm) format this task can take to execute.
- Select the options from the Timeout list. The available options are: Attribute, Composite Attribute, Iterator, Model & Value.
- Specify an appropriate value based on the option selected from the Timeout list.

- Click the Rule On End tab. Set the Rule to be invoked when the activity ends.
- Select the rule name from the Rule Name list. This list displays the rules defined already in the Rule Engine.
- Select the action in case of rule failure from the Rule Failure Action list. The available options are: Stop Process & Continue Process.
- Map the related Global & Local Fields listed as appropriate & click Validate to validate the rule mapped.

- Click the Activity Event tab. Set the events that can be used to trigger a custom action.
- Select the type of the event from the Event Type list. The available Event Types are: ActivityPreExecution, ActivityPostExecution, ActivityTimeout, ActivityOnError, & ActivityCancelled.
- Select the associated library event from the Event Library list. Note that this list displays the name of event library based on the event type selected. (for e.g: If you select ActivityPreExecution Event Type, then ActivityPreExecutionEvent is displayed for selection in the Event Library list).
- Click
 to add them to the Process.

|
If you set the Event Type = ActivityPostExecution & Event Library = Activity Auto Execution, you can auto-complete a Human task without any manual intervention during process execution to speed up the process completion (Skip Activity). |
9. Click Save to save all the Human Task1 component properties set. Similarly, repeat setting the properties of each process component drawn in the process design area as appropriate.
For more information on the options available on the toolbar (Design View ) at the Process component level, see Toolbar options.
10. Customize & set the connecting path line properties as required. Ensure that the action must indicate the user or system input in the process path connecting the From activity and the To activity. Apart from action, you can also set line properties such as text alignment on the line (top, middle, bottom), its color & width as well. Click Apply.
11. Click  on the toolbar to Save this process. Immediately, "Success! Process saved successfully" message appears. Else, click
  to Publish this process at once. However, you must validate the process before publishing it.
For more information on the options available on the toolbar at the Process level, see Toolbar options.
12. Before going ahead with publishing your Process, click  to Save and Validate your process at once. if your Process is successfully validated without any errors, then you are prompted to go ahead and publish your process. If errors are found during the validation, you must rectify them first before publishing.
13. If you have chosen to publish your process post successful validation, the following Publish dialog box appears.

- Enter an appropriate comment in the Comment box.
- Select the publish option from the Publish option list. The available options are: Major version & Minor version.
14. Click Publish. Immediately, the following Confirmation dialog box appears.

15. Click Yes if you wish to map your published process with your App right away. Else, click No. You can map your process with your App anytime later too.
On choosing the No option, immediately 'Success! Process published successfully' message appears & you are navigated to the following page.

| Previous | Back to Contents | Next |
Travel Requisition Approval - Process Flow Diagram
|
The process flow diagram depicting the Travel Requisition Approval Process in iLeap Platform (Design View) is shown below. |

|
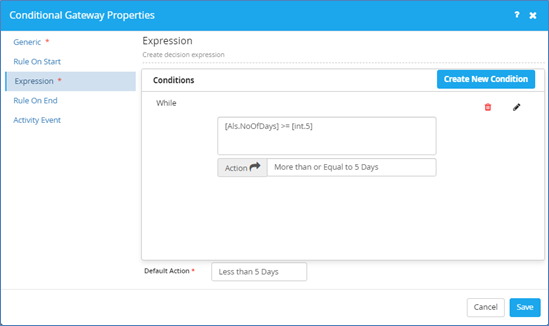
Sample of Conditional Decision Expression Set in the Conditional Gateway Properties Dialog box:
You must validate the mandatory properties set for few specific process components before publishing the process in Process Composer. You can publish your process only on successful validation.
|

| Previous | Back to Contents | Next |
| Process Design Area |
|
This is the primary area that appears as soon as you key in the process name along with its details for the process you wish to create and design. You can simply drag & drop a comprehensive list of Process Components or Design Controls available on the left pane (from a drop-down list) to the process design area on the right to draw or model your process flow diagram in an easy & effective way as per your business needs. These Process Components are highly customizable and can be connected to other components in the process using connectors. You can also display your designed Process(es) in either List View or Tile View. You can switch or toggle between any of these views any time. |
| To toggle between the displays of your Process, follow these steps: |
- On the Process tab, click
 .
.
List View:

Tile View:

- In the Tile View, hover the mouse pointer on any process to view as well as access its related features similar to List View.
| Previous | Back to Contents | Next |
Toolbar Options - Design View : (Process Level)
| To | Action |
| Save Process | Click
|
| Publish Process | Click |
| Save and Validate Process | Click  |
| Edit Process | Click  |
| View in Full Screen | Click  |
| Zoom Default | Click

|
| Zoom In | Click

|
| Zoom Out | Click  |
| Preview | Click

|
|
Export Process [To JPEG, PNG or JSON format] |
Click

|
|
Import Process [In JSON format] |
Click |
| Set Process Properties | Click  |
| Previous | Back to Contents | Next |
Toolbar Options - Design View : (Process Component Level)
| To | Action |
| Copy an Activity | Click  |
| Paste an Activity | Click  |
| Delete an Activity | Click

|
| Undo an Activity | Click  |
| Redo an Activity | Click  |
| Align Left | Click  |
| Align Right | Click  |
| Align Top | Click  |
| Align Bottom | Click  |
|
The above listed toolbar options are available to other process components as well. |
| Previous | Back to Contents | Next |
| Process Components - Overview |
|
Process Composer provides a comprehensive list of Process Components to design & automate your process as per your business needs. You can simply drag & drop the Process Components or Design Controls available on the left pane (from a drop-down list) to the process design area on the right of the Process Composer to draw your process flow. These Process Components are highly customizable and can be connected to other components in the process using connectors. For a complete list of Process components available in Process Composer, see Process Component Table. |
|
The Process Components are broadly categorized into five types namely: Activity, Data, Event, Gateway and Swimlane. After you define a process, you can publish the process and make it available to a set of users. |
| Previous | Back to Contents | Next |
|
The table below details each of the Process Components available to design & automate your business process in the Process Composer. |
| Name with Notation | Description | |
| ACTIVITY | This is a collection of activities that cater to different aspects of a process flow. For example, the Cancel activity can be used to stop execution of a Human Task or Sub Process, or the File Transporter activity can be used to transfer files from one network location to another, etc. | |
|
|
Use this activity to represent a decision or human input in a process work flow. An Assignee will be shown a new item in the Inbox. To add properties to the process component activity 'Human Task', see Human Task Activity properties. | |
|
|
Use this activity to transfer documents from a network or ftp location to another. The File transporter Activity can be used to perform file transfers from within the work-flow. In addition, this activity can also be used to transfer files within local networks using HTTP and FTP protocols as well. | |

|
Use this activity to configure parameters for outgoing emails. The Send Mail Activity lets you send an email to a selected set of users. The users(s) can be selected by building a query. The subject and body of the email can be customized by the resource using the properties available. To add properties to the process component activity 'Send Mail', see Send Mail Activity properties. | |

|
Use this activity to connect to a SOAP (Web service) Service, retrieve or manipulate data from the service, and assign the data to other process attributes. | |

|
Within a process, an existing process can be invoked as a sub process. Use this activity to trigger the existing process. Once defined, this sub activity can be reused within the current process any number of times. To know more, see Sub Process. | |

|
Use this activity to navigate to any other activity in the process. It is generally used for better visual clarity and understanding of the process work-flow (by reducing the clutter of multiple lines between any two activities). |
|

|
A Cancel Activity can prevent a mapped activity from being triggered, or discontinue the ongoing execution of a mapped activity. It can be applied only to a Human Task or a Sub Process. | |

|
Use this activity to execute stored procedures or inline queries to retrieve or manipulate data in a database, and map results back to process attributes. To know more, see Database activity. | |
|
|
Use this activity to execute stored procedures or inline queries to retrieve or manipulate data in a PostgreSQL database, and map results back to process attributes. |
|

|
Use this activity to create a document at any stage in a process. A Microsoft Word DOCX template for the document can be defined using this activity. See Document Template Generation. | |

|
Use this activity to fetch the report data for analysis purposes. | |

|
Use this activity to generate subset of records having limited rows and columns from a larger set by applying predefined conditions on the main data set. | |

|
Use this activity to integrate with external REST API based applications. | |
| DATA | This category is a collection of data update and retrieval activities that can be used during a process flow to update data in relevant repositories or to retrieve data from the same repositories. | |

|
Use this activity, if you wish to use the data updated using the Database activity in any other activity such as Send Mail. In such a case, this Refresh Process activity is required between Database activity and Send Mail activity. Use this activity only after Database activity and before any other activity such as Send Mail, Update Attribute, Template (DOCX) activity except Human Task activity. |
|

|
Use this activity to update Process Attribute values that can be used in subsequent activities. | |

|
Use this activity to update the mapped Attribute of the Parent Process in addition to the current Process Attribute. To know more, see Update Parent data activity. | |

|
When your process needs to make updates to a Data Model, use the Save Model activity. If the context of the data being processed is new, then the Save Model activity will insert it as a new record into the current Data Model. To know more, see Save Model data activity. | |

|
A list consists of items and each item is made up of elements. This activity uses the Iterator variable to locate a specific element within an item in a list and then read, update or delete that element. You can also use this activity to add a new element to the end of an existing list. To know more, see Update List data activity. | |
| EVENT | This category is a collection of Process related Event activities. Events are milestones in the progression of a process. For example, the starting of a Process, or the continuing of a Process path, forking of a process path, etc. | |

|
The Start activity simply marks the start of a process. | |

|
Use this activity to denote the end of a process and update the process status as completed. | |

|
A timer activity allows you to add a deliberate delay at any stage in a process. To know more, see Timer Activity. | |

|
Use this activity in conjunction with an ‘Event Gateway Join’ to create a gateway. This split is not based on any decisions, but a simple forking of a flow into multiple paths. Each path can listen for an event (see Event Listener & Wait for Event). The Gateway is deemed completed when the first path reports completion to the Event Gateway Join. All other Event Listeners in all the other paths are cancelled at this point. | |

|
Use this activity in conjunction with an ‘Event Gateway Split’ to create a gateway. This split is not based on any decisions, but a simple forking of a flow into multiple paths. | |

|
This activity is always used in conjunction with the ‘Wait for Event’ activity. Use this activity to define what event to listen for during a process. The ‘Wait for Event’ activity will then listen for an event that matches this definition and lead to the next step whenever the expected event happens. See Associating a Listener. |
|

|
Use this activity in conjunction with the ‘Event Listener’ activity to wait for an event defined in the Event Listener activity, and lead to the next step whenever the expected event happens. To know more, see Wait For Event activity. | |

|
This activity monitors process data changes for specific data conditions and can take actions when a condition is satisfied. To know more, see Conditional Event activity. | |

|
Use this activity to denote the end of flow for a branch in a process. Note that this is different from the End Activity - which denotes the end of the entire process. | |

|
This activity waits for some action in or outside System. | |
| GATEWAY | A Gateway is a combination of a Split (that aids forking a flow into multiple paths) and a corresponding Join, which rejoins all the paths to continue the flow after the desired results are achieved. Use them as decision elements to address complex business scenarios/conditions. | |

|
Use this activity in conjunction with an ‘Exclusive Or Join’ to create a gateway. You can have more than one conditional path defined, but only one of the paths will be completed. A default action has to be compulsorily defined for scenarios where none of the conditions are met. To add properties to the process component activity 'Exclusive OR Split', see Exclusive OR Split Gateway Properties. | |

|
Use this activity in conjunction with an ‘Exclusive Or Split’ to create a gateway. You can have more than one conditional path defined, but only one of the paths will be completed. | |

|
Use this activity in conjunction with an ‘Parallel Join’ to create a gateway. This split is not based on any decisions, but a simple forking of a flow into multiple paths. You can define a minimum number of conditions that have to be satisfied before the join can occur. To add properties to the process component activity 'Parallel Split', see Parallel Split Gateway Properties. |
|

|
Use this activity in conjunction with an ‘Parallel Split’ to create a gateway. You can have more than one path defined, and a minimum number of conditions that have to be satisfied before the join can occur. To add properties to the process component activity 'Parallel Join', see Parallel Join Gateway Properties. | |

|
Use this activity in conjunction with an ‘Inclusive Or Join’ to create a gateway. You can have one or more conditional paths defined, and one or more conditions may be satisfied in the flow. You can also have one or more of these conditions defined as mandatory. A default action has to be compulsorily defined for scenarios where none of the conditions are met. To add properties to the process component activity 'Inclusive OR Split', see Inclusive OR Split Gateway Properties. | |

|
Use this activity in conjunction with an ‘Inclusive Or Split’ to create a gateway. You can have more than one conditional path defined, and one or more conditions may be satisfied in the flow. The Join will wait for all active paths to complete. To add properties to the process component activity 'Inclusive OR Join, see Inclusive OR Join Gateway Properties. | |

|
Use this activity in conjunction with a ‘Complex Join’ to create a gateway. You can have one or more conditional paths defined, and one or more conditions may be satisfied in the flow. You can have one or more of these conditions defined as mandatory, in addition to defining a minimum number of conditions that have to be satisfied before the join can occur. A default action has to be compulsorily defined for scenarios where none of the conditions are met. | |

|
Use this activity in conjunction with a ‘Complex Split’ to create a gateway. You can have more than one conditional path defined, and one or more conditions may be satisfied in the flow. The Join will wait for all active paths to complete. | |

|
Use this activity to define a loop. Number of repetitions for the loop is defined as a condition that produces a true or false result, such that the loop terminates when the condition is satisfied. Use this activity in conjunction with the End While Loop. [A loop allows a sequence of activities to be repeated. The number of repetitions is derived from a loop condition]. | |
|
|
This activity simply marks the end of a While Loop. | |

|
A loop allows a sequence of actions to be repeated. To use this activity you first need to define an Iterator in the Process Properties. After the iterator is defined, use this activity to iterate through the list of items that the iterator points to. To add properties to the process component activity 'For Each Loop', see For Each Loop Properties. | |

|
This activity simply marks the next iteration of a For Each Loop. To add properties to the process component activity 'Next Loop', see Next Loop Properties. | |
| SWIMLANE | A Swimlane is used to organize aspects of a process. It visually groups objects into lanes, with each aspect of the process added to a separate lane. It can be arranged either horizontally or vertically. A Swimlane not only organizes activities into separate categories, it can reveal delays, inefficiencies, and the workers responsible for each step in a process. | |
|
|
A pool represents major participants in a process. It is a container that visually represents your organization and defines the context within which a process operates. A pool typically contains lanes (like a real swimming pool) that represent different departments within the organization. Use this activity to represent a process participant. | |

| Previous | Back to Contents | Next |
| Setting Process Properties |
|
You can set the Properties for a Process only when it is in draft or editable state. Once the Process is set, it is recommended to set its properties before publishing it for seamless automation. Process Composer allows you to set or define many properties for a process through the Process Properties dialog box. You can define process related variables, connect the process to specific forms, map document templates, set the Threshold time defining the ideal execution time for a process, & event related triggers. |
| To set or define properties of a process, follow these steps: |
1. On the Process tab, hover the mouse pointer on any draft process for which you wish to set properties for & click .
2. The Process Properties dialog box appears.
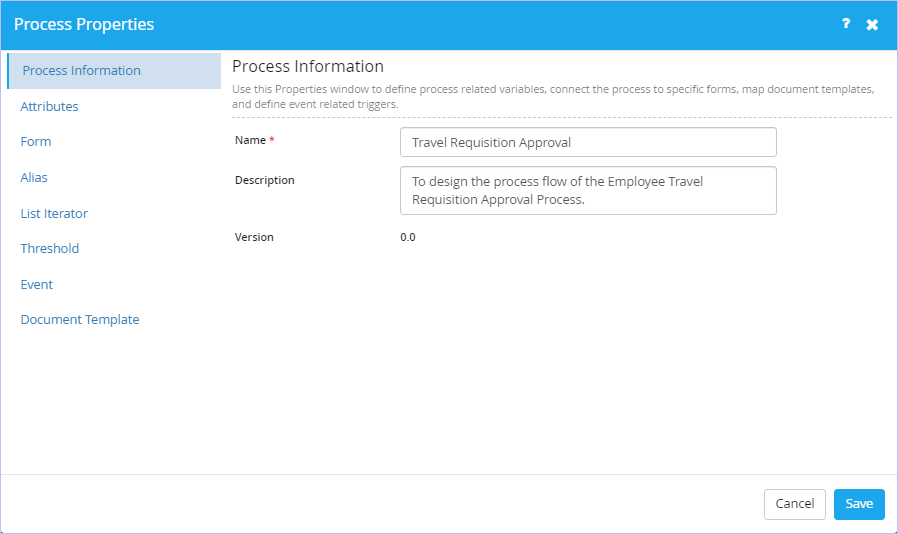
3. On the Process Information tab, modify the name of the Process, if you wish to in the Name box. Enter an appropriate process description in the Description box.
4. Click the Attributes tab. Set the attributes or process level variables that are used to store instance level values or data for the process. Different types of attributes are available for different types of data.
- Enter the name of attribute in the Name box. Select the data type from the Type list.
- Click
 to add this attribute to the process. Notice that the attribute name & its type are displayed. Click on them to view their details on the Information tab. You can also preview these details on the Preview tab. You can add many such attributes to the process.

- Click the Preview tab to preview the attribute details.

5. Click the Form tab. Set the forms designed in the Form Designer to be associated with the Process. A form is generally used whenever human intervention is required to trigger a process.
- Select the name of the form you wish to associate with the process from the Form Name list. For example, 'Travel Requisition Form - Employee'. Only published forms appear in the Form Name list.
- Click to map the selected form. Notice that the icon changes to indicating the successful mapping of the form along with attributes to this process.
- Click View Form to view the mapped form.

6. Click the Alias tab. Set the alias that are derived from process level attributes & which can be used to design a process in the Process Composer. It is recommended to include process level attributes that appear in the Process Composer to design the process quickly when triggering a request.
- Enter the name of alias in the Alias Name box. For example, NoOfDays.
- Select the data type from the Type list.
- Select the Context of the Process from the Process Context list. The available options are: Composite Attribute & Model.
- Select the Attribute & its value from the Attribute List & Value list respectively.
- Click to add them to the Process. Else, click
 to delete the alias created, if you wish to.

7. Click the List Iterator tab. Set the list iterator which acts as a variable in a process that points to a list of items in a process attribute. You can use the set list iterator in conjunction with the 'For Each' loop to traverse through the items in the list.
- Select the name of the iterator from the Iterator Name list.
- Select the repeating node for iterator from the list. The available options are: Composite Attribute & Model.
- Click to add them to the Process, if you wish to.

8. Click the Threshold tab. Set the Threshold time which defines the ideal execution time for a process. This feature is very useful since the measurement of ideal time in terms of threshold units can be used in reporting the critical metrics such as cost, efficiency or any other metrics for the process.
- Enter the expected threshold time for the execution of process in terms of days, hours & minutes in their respective boxes.
- Enter the number of threshold units in the Threshold Unit box. A Threshold Unit is a measurement of ideal execution time for a process. This field is used to calculate the cost.
- Enter the type of unit in the Unit Type box. A Unit Type is simply a symbol representing the measurement type. This field is used to measure the cost type.

9. Click the Event tab. Set the events that can be used to trigger a custom action in the Process. An event is nothing but a pre-defined set of milestones in a Process. There can be a variety of event types in a Process.
- Select the type of the event from the Event Type list. The available Event Types are: ProcessStarted, ProcessCancelled, ProcessPaused, ProcessResumed, ProcessCompleted, ProcessTimeout & ProcessOnError.
- Select the associated library event from the Event Library list. Note that this list displays the name of event library based on the event type selected. (for e.g: If you select ProcessStarted Event Type, then ProcessStartEvent is displayed for selection in the Event Library list).
- Click to add them to the Process.

10. Click the Document Template tab. Set any pre-defined document template (which is necessitated as part of the process that require either data or inputs to be presented in a specific format) to the Process.
- On the File tab, click to upload a template file in MS-Word template format to be attached to the Process. Currently, only MS-Word template in .docx format is supported.
- Select the File Type format. The available options are: PDF & DOCX.
- Key in any other name for the uploaded file if you wish to in the Save As box.
- Navigate to Field Mapping tab. You can map the respective fields with their mapping attributes as required.

11. Click Save to save the process configurations set.
|
|
| Previous | Back to Contents | Next |
| Editing a Process |
|
You can edit a Process at any time (any number of times) even after its publication as well. |
| To edit a Published Process, follow these steps: |
1. On the Process tab, hover the mouse pointer on any published Process & click ![]() . Alternatively, open any published Process you wish to edit & click
. Alternatively, open any published Process you wish to edit & click  on the toolbar to edit it.
2. Make the requisite modifications & then save or publish the Process as required.
| Previous | Back to Contents | Next |
| Deleting a Process |
| A Process once published cannot be deleted. It can only be deleted in its draft or editable state before being published. |
| To delete a Process, follow these steps: |
1. On the Process tab, hover the mouse pointer on any draft process you wish to delete & click ![]() .
.
2. A confirmation message prompts you to choose an option between Yes or No to delete the draft version. Click Yes. On successful deletion, "Success! Process deleted successfully." message appears.
|
|
| Previous | Back to Contents | Next |
| Viewing the History of a Process |
| Process Composer allows you to view the history of any Process through the Process History dialog box. Through this dialog box, you can view the older published versions (both major & minor) of any selected process. You can even view the details (including its Process diagram) of any version from the displayed list. |
| To view the history of a Process, follow these steps: |
1. On the Process tab, hover the mouse pointer over the Process for which you wish to view the History & click
![]() .
.

2. The Process History dialog box appears.

Notice that the history of all the older published versions of the selected process is displayed. You can click on any version to view its process diagram.
| Previous | Back to Contents | Next |
| Viewing the Dependency Details & Usage of the Process |
|
Process Composer allows you to view the information related to the usage or dependencies of specific iLeap components such as Forms and Models in any Process at any point in time. |
| To view the dependency details & usage of any Process, follow these steps: |
1. On the Process tab, hover the mouse pointer over the Process you wish to view details & click
![]() .
.

2. The Process Usage dialog box appears.

- Notice the display of form(s) along with details used in the Process under the Form tab.
- Navigate to the Model tab to view the model and its details used in the Process.
3. Click Close.
| Previous | Back to Contents | Next |
| Binding Data Rule to a Process |
| Process Composer allows you to bind a defined Data Rule to a Process. See, binding a Data Rule for the corresponding steps (Step 4 & 5). |
|
The Data Rule must have been created earlier in the Rule Composer before you proceed with binding it to your process. |
| Previous | Back to Contents | Next |
| Associating an Event Listener to a Process |
| The Listener basically monitors event watchers, and based on the inputs from the event watchers, initiates the associated processes without human intervention automatically. It is used to define what event to listen for during a process. |
| To associate a Listener to a Process, follow these steps: |
1. On the Process tab, hover the mouse pointer on any published process for which you wish to associate the listener to & click
![]() .
.

2. The Process Listener dialog box appears.
![]()
- Select the type of event listener you wish to associate to listen to, from the Event Listener list. The available options are: FileWatcher & Scheduler.
- Select the type of Listener from Listener Type list. The options available on this list vary based on the Event Listener type you choose in the Event Listener list. IProFileWatcherListener & IProSchedulerListener options are populated for selection based on the Listener Type you choose.
- Select the Process Attribute Mapper to use with the event generated output from the Process Attribute Mapper list.

- Key in the Path or Location in which the file needs to be watched in the File Watcher Path box. For example, \\host name\folder name
- Enter the name of the file that needs to be watched or monitored, in the File Name box. For example, W_Confirm.txt. (This file should be available in the above File Watcher Event folder).
- Select the File Action 'to look for' from the File Action list. The available options are: Created, Changed, & Deleted.
- Created - denotes when the file is created in the event folder
- Changed - denotes when the file is changed in the event folder
- Deleted - denotes when the files is deleted from the event folder
If the type of event listener selected is a Scheduler, then:
- Select the name of the Scheduler defined from the Scheduler Name list.

In the following sample example shown, the defined Scheduler 'CSV Upload' starts uploading the corresponding CSV files to the database at the specified schedule time (Event Listener) automatically.

3. Click Save.
|
In the event of you associating an scheduler event listener, ensure that the scheduler has already been defined in the Scheduler. |
| Previous | Back to Contents |