
|
|
App Configuration Settings - Overview |
|
This page outlines the configuration, access and permission settings you need to set and manage while developing your enterprise app. Being an intuitive and flexible App development platform, iLeap allows you to configure a number of settings on your App. These configurable settings are always available and accessible at all stages of your iLeap App Development Life Cycle. |

On the Settings tab, you can configure several app related settings through the following sections:
Configuring App Display Name and Adding or Changing App Icon
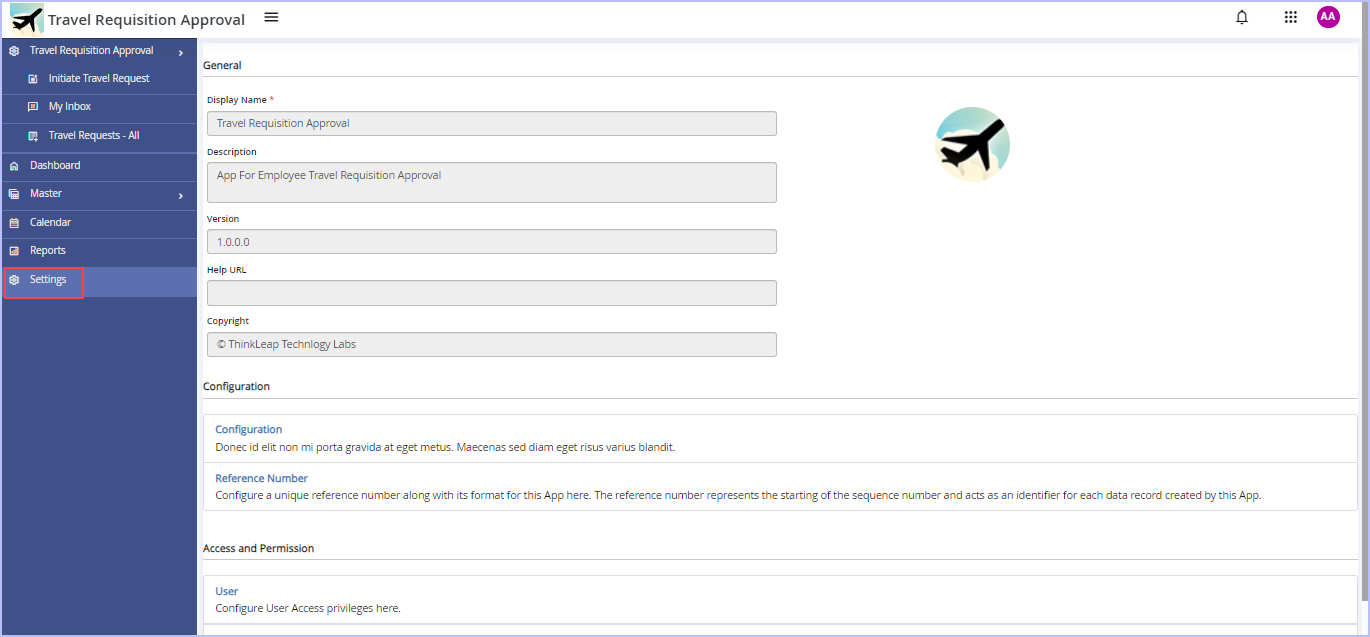
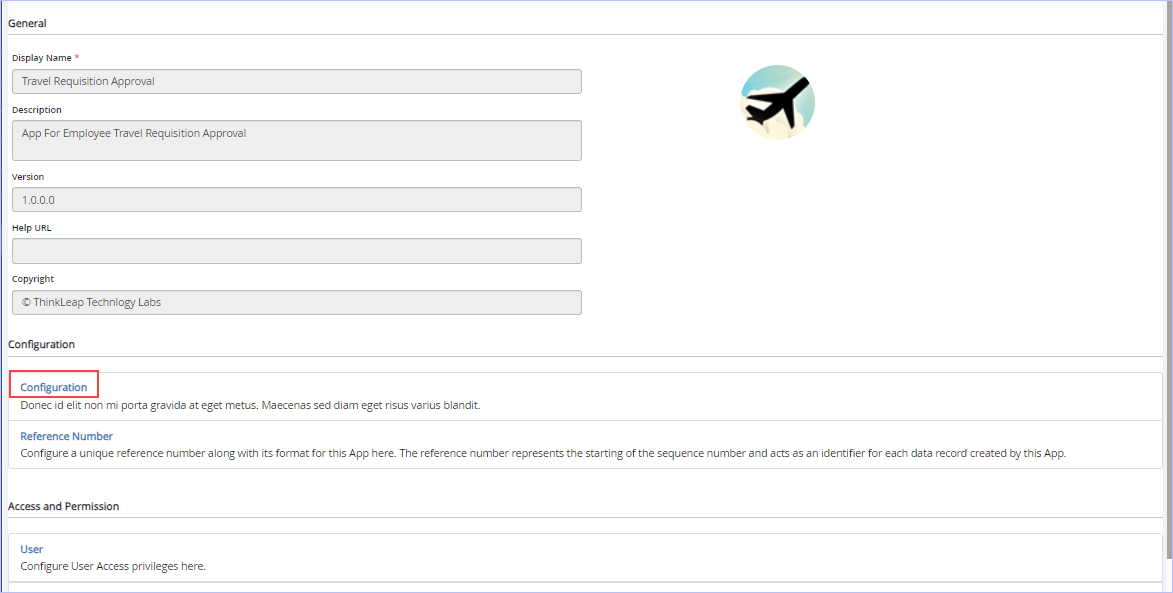
| iLeap allows you to set a new display name or modify the display name of your app along with its description at any time. The display name of your App and its description are auto populated in their respective fields from the information you had given while creating your App. You can choose to modify them afresh as you wish. You can also configure other generic properties related to your App such as App Version, Help URL for the App, Copyright info from here. |
| To configure the display name of your app, follow these steps: |
1. Open the App for which you wish to add a new display icon. Click Settings. Alternatively, hover on the chosen App (Recent Apps section) & click the ![]() icon to navigate directly to its Settings area as shown.
icon to navigate directly to its Settings area as shown.
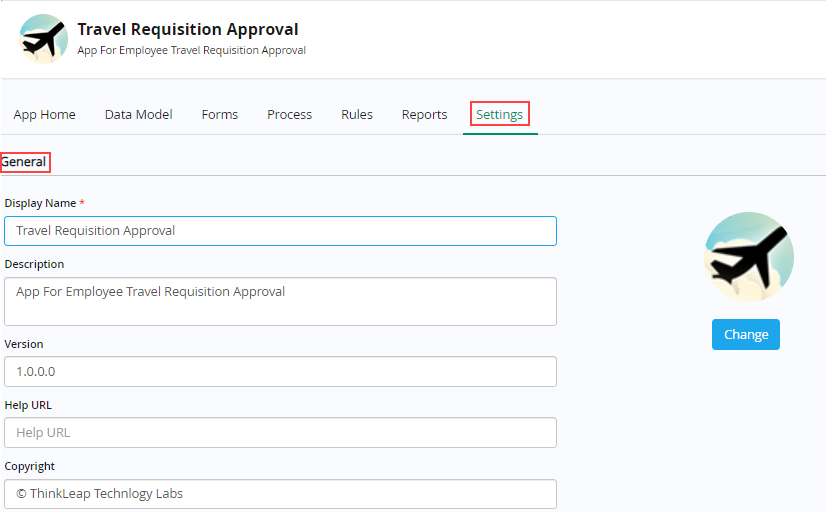
2. In the General section, modify the display name as well as description in their respective boxes.
3. Key the version for your App in the Version box.
4. Key in the Help URL or link you wish to provide for your App in the Help URL box.
5. Key in the copyright information you wish to provide in the Copyright box.
| To add or change the display icon of your app, follow these steps: |
1. In the General section, click Change. The following App Icon dialog box appears.
![]()
Notice the display of many pre-built App icons. You can select your App display icon from this App icon gallery with just a click on it or you can choose to upload a display icon of your choice.
2. Click Upload to select an App display icon of your choice from your source location. Once uploaded, the selected App display icon is displayed as shown.
![]()
3. Click Save to save the changes made.
|
You can change the display icon of your selected App anytime with just a click on it as well. |

| Previous | Back to Contents | Next |
In the Configuration section, you can configure the following.
Configuring App Pages (Sitemap)
|
Sitemap – Overview An App's Sitemap outlines the general structure and navigational hierarchy of all its pages. A logically structured Sitemap helps all its stakeholders including App designers and developers understand the structure and relationships between various App design elements. iLeap allows you to design well-defined Sitemap leading to an optimal and seamless user experience catering to a diverse audience. A structured & well-crafted Sitemap provides a clear hierarchy of various app design elements driven by business logic and role/access privileges ensuring in efficient application design & development. With well-orchestrated Sitemap features, iLeap ensures low-code app development becomes faster, nimbler & more exciting with better results. In a nutshell, iLeap empowers organizations with the flexibility and control needed to design user-centric applications while improving their own application development experience with Sitemap features.
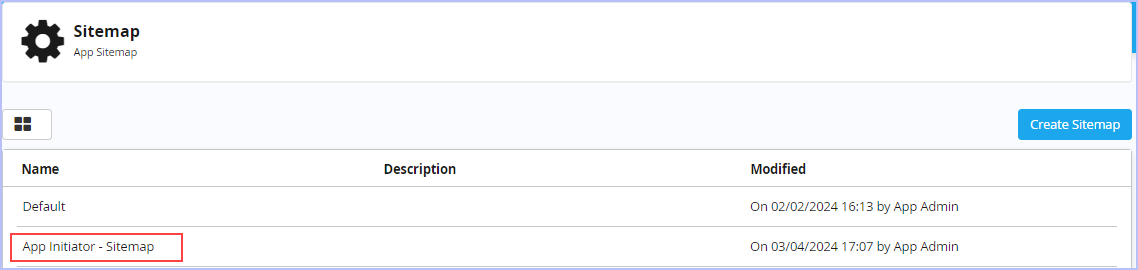
Configuring a Sitemap for an App is dynamic in nature and aligns with the App designer's or developer’s discretion on how to present the App's interface to their end users. Hence, the same App varies in its look or appearance to an end user based on how the Sitemap is configured. iLeap comes with a default Sitemap that needs to be setup/configured. On the other hand, iLeap allows you to create your own new Sitemap based on your unique requirements as well. An App Developer can create several Sitemaps for the Same App based on requirements. A Sitemap needs to be associated to an App/App role defined. |

|
To start off with, we will describe the steps required to configure a new App Sitemap separately for all the actors/users of our sample example app ‘Travel Requisition Approval’. Then, we will illustrate the steps required to configure the default Sitemap as well. |
Creating and Configuring a New Sitemap
| For illustration purposes, we will be creating & configuring new Sitemaps for all the actors (Employee, Reporting Manager, Functional Head, Travel Desk Executive & Travel Desk Manager) involved in our sample example ‘Travel Request Approval’ app as below. |
Actors and their Sitemaps:
| Actor | Sitemap Name | Menu Configured | |
| Employee (Requester) | App Initiator - Sitemap |
|
|
| Reporting Manager (RM) | Level 1 Approver - Sitemap | My Inbox (Inbox List -Page Type) | |
| Functional Head (FH) | Level 2 Approver - Sitemap | My Inbox (Inbox List -Page Type) | |
| Travel Desk Executive (TDE) | Travel Desk Executive - Sitemap | My Inbox (Inbox List -Page Type) | |
| Travel Desk Manager (TDM) | Travel Desk Manager - Sitemap | My Inbox (Inbox List -Page Type) |
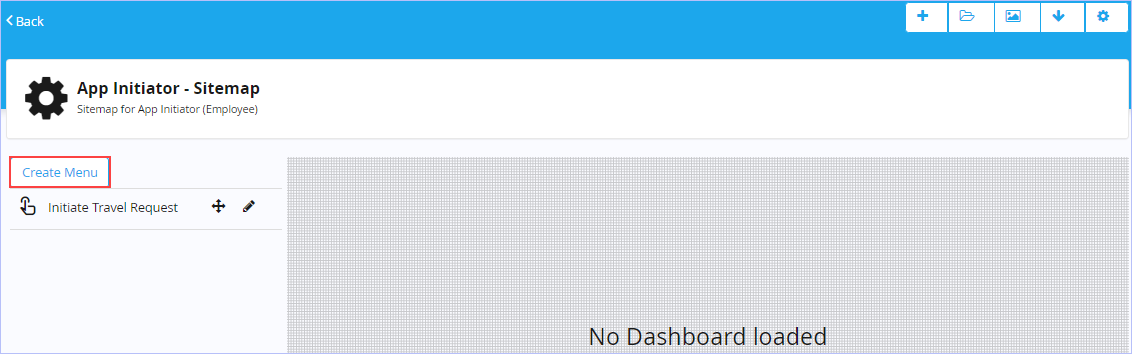
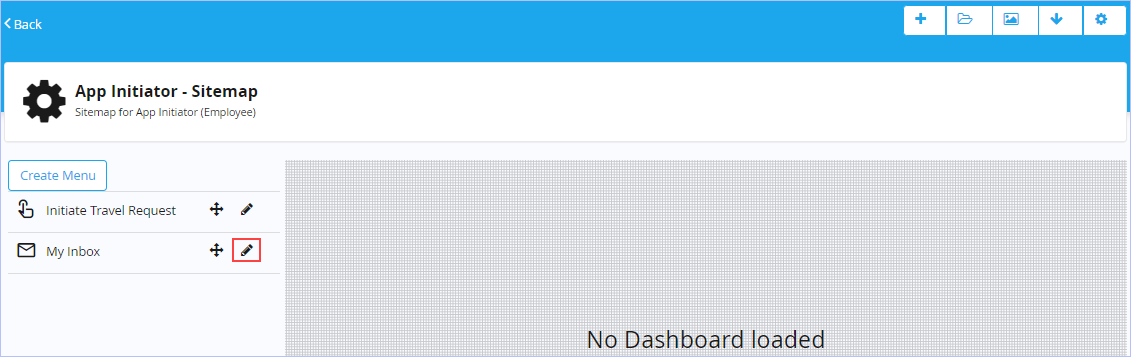
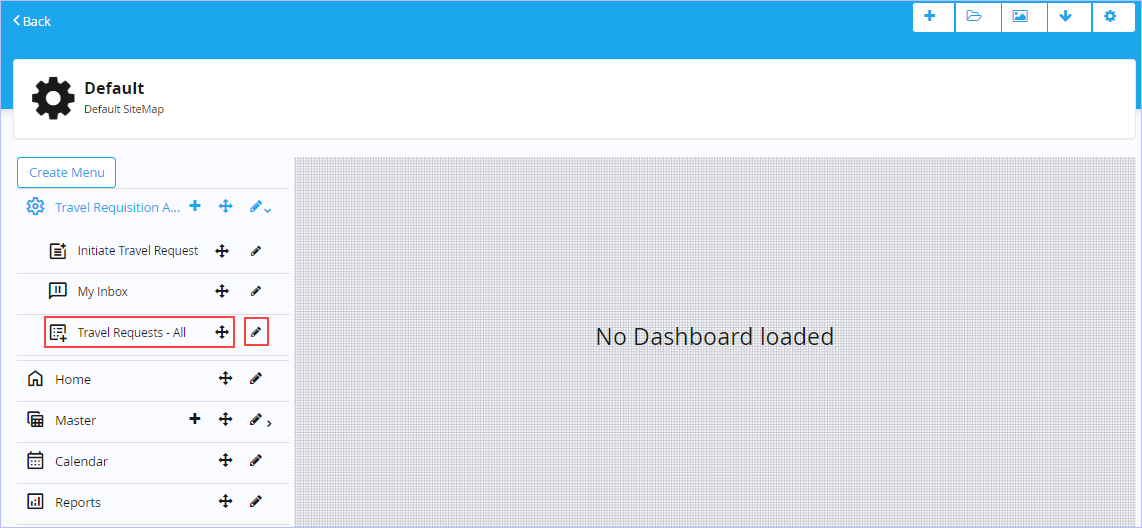
| To start off with, for illustration purposes, we will create and configure a new Sitemap for the actor Employee consisting of two menus namely Initiate Travel Request (with Trigger Process – Page Type) and My Inbox (with Inbox List – Page Type) followed by specific Sitemaps for the other actors as listed above. |
| To create and configure a new Sitemap for your App (App Initiator – Sitemap), follow these steps: |
1. On the Sitemap page, click Create Sitemap.

2. The New Sitemap dialog box appears.
![]()
- Key in the appropriate name in the Name box. For example, App Initiator - Sitemap.
- Key in the appropriate description in the Description box.
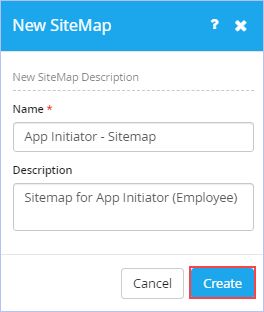
3. Click Create. The following page appears.
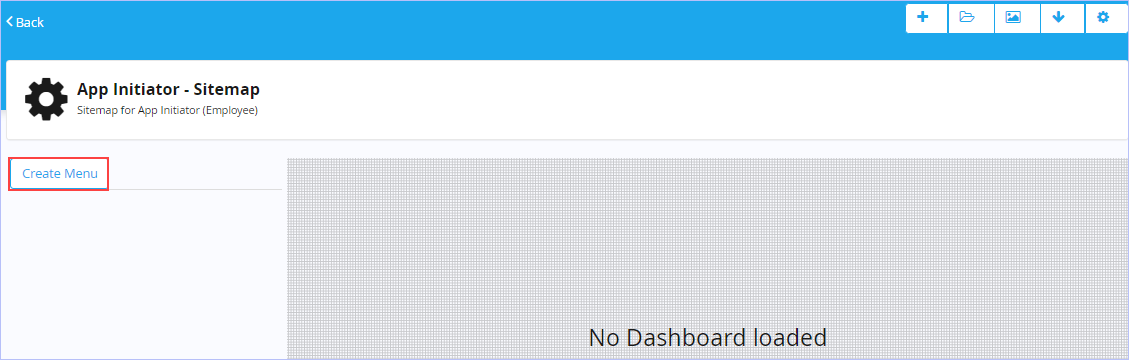
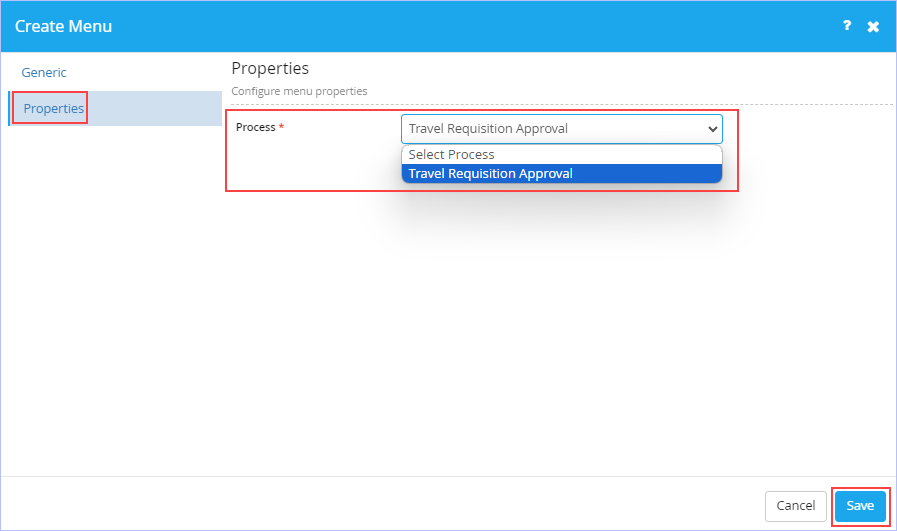
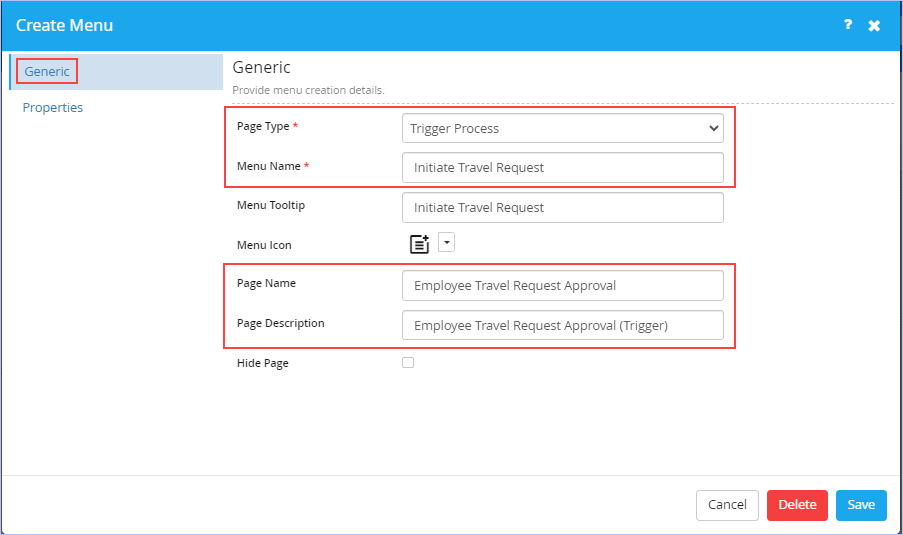
4. On the left pane, click Create Menu. The Create Menu dialog box appears.
![]()
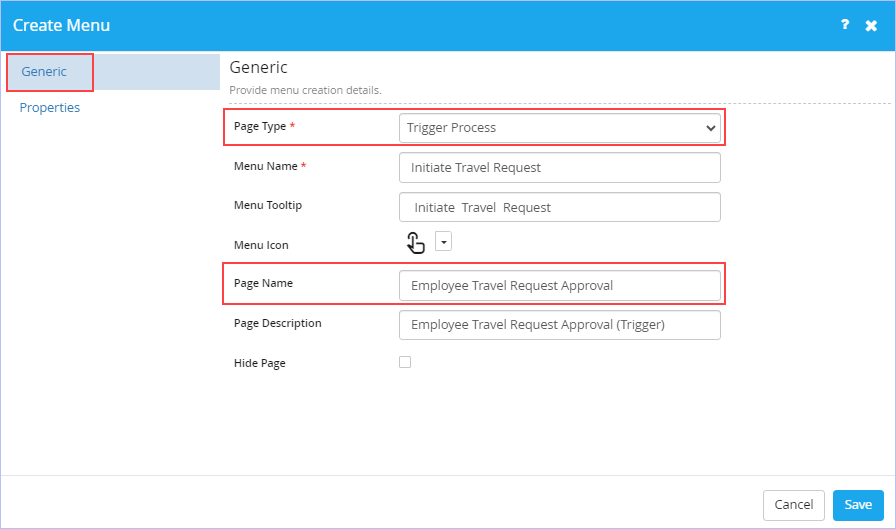
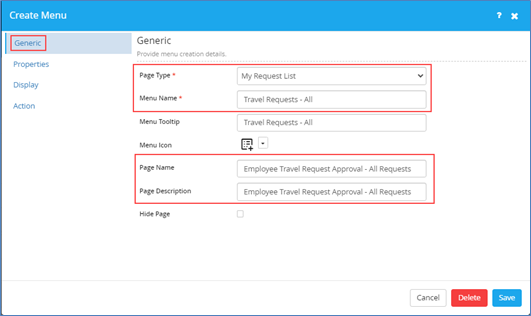
- On the Generic tab, Select Trigger Process as the page type in Page Type drop-down list. The available page type options are: Dashboard, Trigger Process, My Request List, My Request Draft List, My Calendar, Inbox List, Create Master Record, Master Record List, Report List, Report, URL Integration & Custom Html. As soon as Trigger Process page type is selected, two more fields namely Page Name & Page Description appears.
- Key in the appropriate name of menu & its tooltip in their respective Menu Name & Menu Tooltip boxes.
- Click the
 icon & select the menu icon you would wish to associate from the list of built-in icons displayed.
 - Key in the appropriate name of the page & its description in their respective Page Name and Page Description boxes.
- Select the Hide Page check box if you wish to as per requirements.
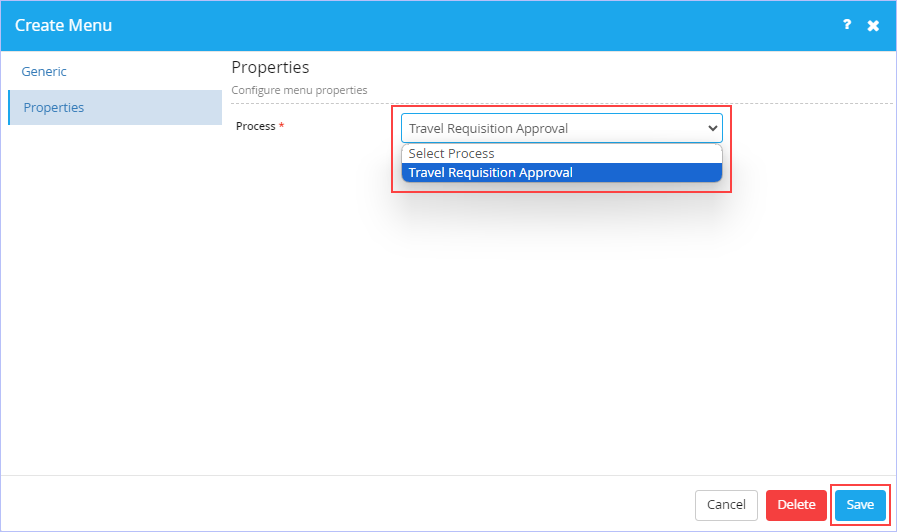
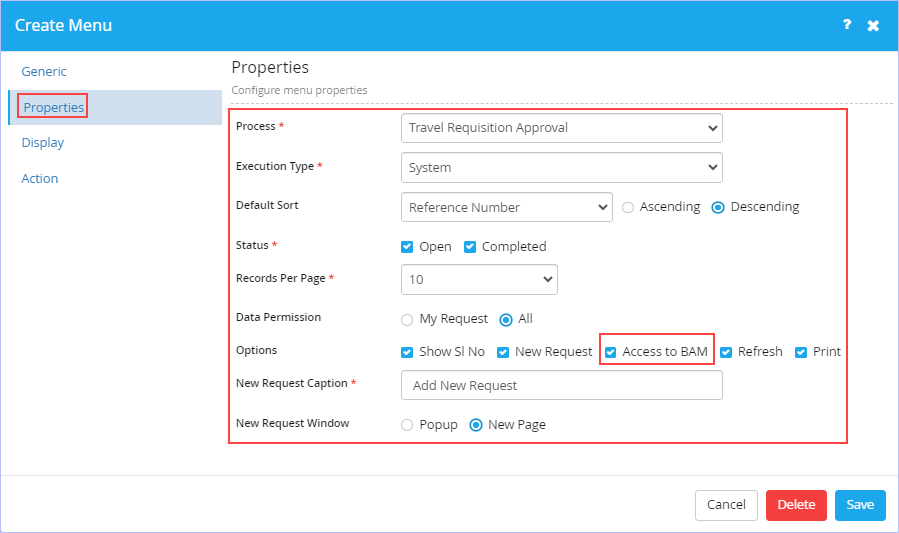
- On the Properties tab, select the Travel Requisition Approval process from the Process drop-down list. Only published process(es) are displayed in the Process drop-down list.
- Click Save to save the changes made.
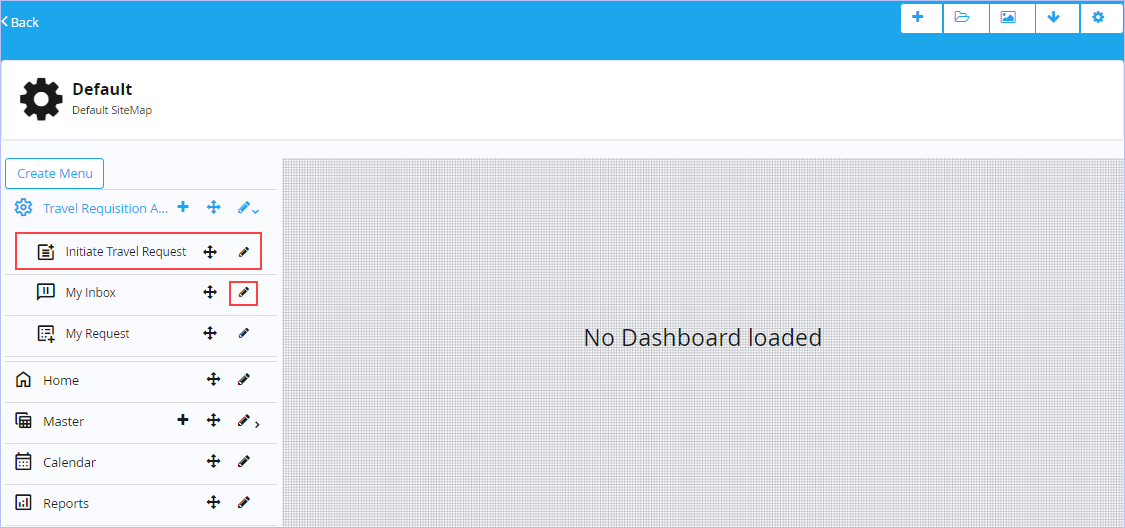
- Post save, the following page appears.

Notice that you can edit the Sitemap created. You can also save the modifications made & delete it as well.
- Click Back to navigate to the Sitemap page & view the sitemap we just created.
| We will now proceed ahead & illustrate the steps for creating/adding the second menu namely My Inbox (Inbox List – Page Type) for the same Sitemap ‘App Initiator – Sitemap’. |
| To create/add a second menu for the Sitemap (App Initiator – Sitemap), follow these steps: |
1. On the Sitemap page, click Create Sitemap.
2. The following page appears. Click Create Menu.
3. The Create Menu dialog box appears.
![]()
- On the Generic tab, Select Inbox List as the page type in Page Type drop-down list. The available page type options are: Dashboard, Trigger Process, My Request List, My Request Draft List, My Calendar, Inbox List, Create Master Record, Master Record List, Report List, Report, URL Integration & Custom Html. As soon as Inbox List page type is selected, two more fields namely Page Name & Page Description appears.
- Key in the appropriate name of menu & its tooltip in their respective Menu Name & Menu Tooltip boxes.
- Click the
 icon & select the menu icon you would wish to associate from the list of built-in icons displayed.
 - Key in the appropriate name of the page & its description in their respective Page Name and Page Description boxes.
- Select the Hide Page check box if you wish to as per requirements.
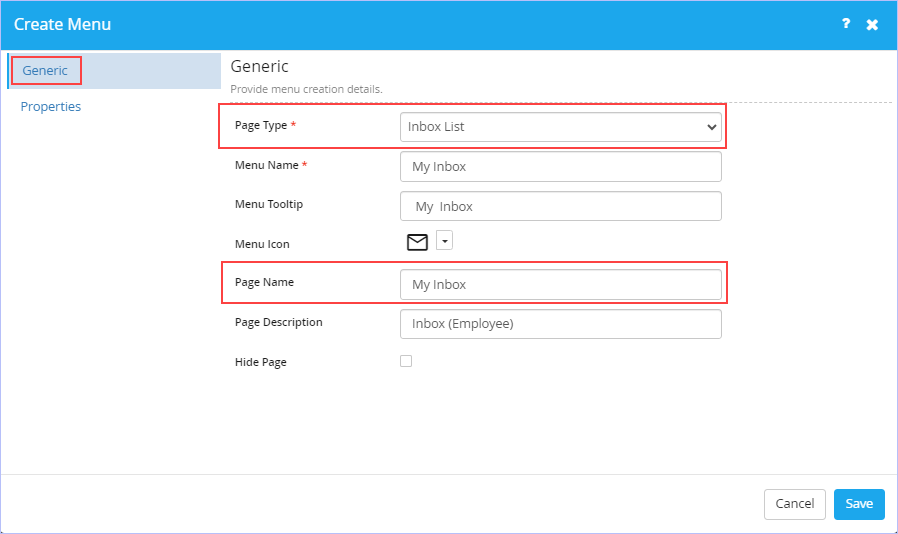
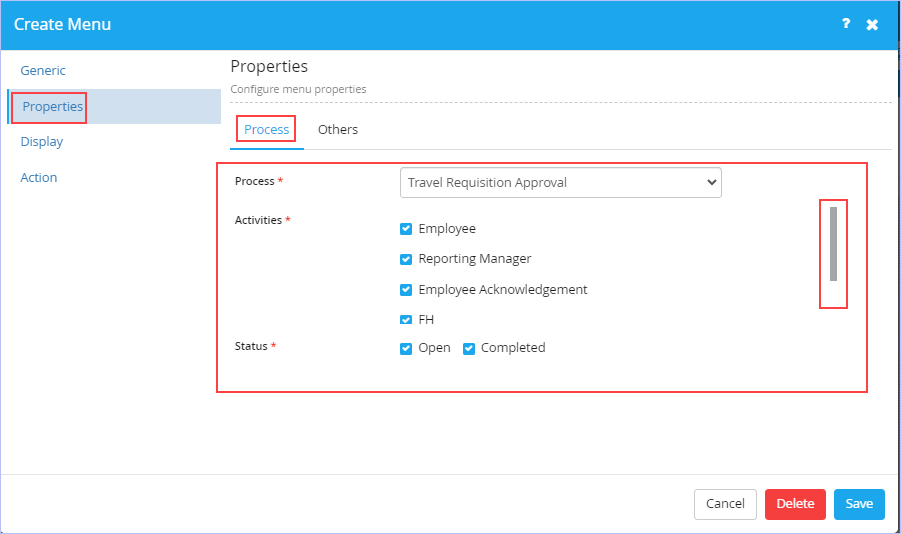
- On the Properties tab, Navigate to Process tab. Select the Travel Requisition Approval process from the Process drop-down list. Only published process(es) are displayed in the Process drop-down list.
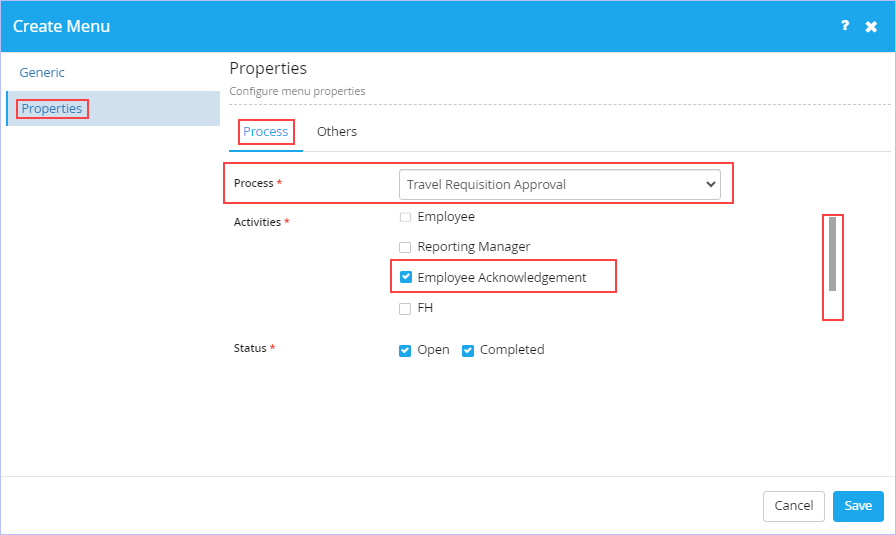
- Select the Employee Acknowledgment check box activity since we are configuring the sitemap for the App Initiator – Sitemap for Employee. This selection ensures that only workflow items that are routed to the Employee to view and act upon (like Travel Acknowledgement) in his/her Inbox.
- Select the Open and Completed Status check boxes so that the Employee’s Inbox is configured to display both Open (Pending) as well as Completed work items.
-
Navigate to the Others tab.
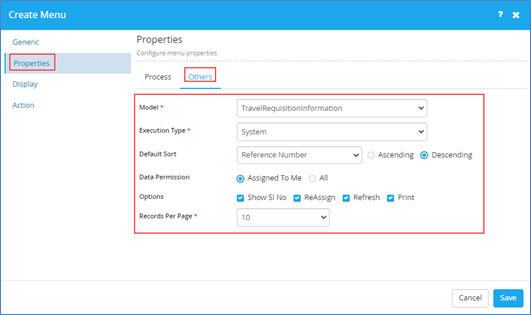
- Select the TravelRequisitionInformation Model from the Model drop-down list. Only published Model(es) are displayed in the Model drop-down list. As soon as the Model is selected from Model drop-down list, two more tabs namely Display and Action appear on the left pane that also need to be configured.
- Select System as type of execution from the Execution Type drop-down list. The available options are: System & Stored Procedure.
- Select Reference Number from the Default Sort drop-down list. All the fields/model attributes that are defined in the TravelRequisitionInformation model are displayed & available for selection in the Default Sort drop-down list. Click Ascending or Descending as the Default Sort Order as you wish to.
- Click Assigned To Me or All as the Data Permission you wish to set. Assigned To Me option only shows the Inbox work items that are assigned to the specified User Role (Reporting Manager) whereas as All option shows all the Inbox work items that are generic in nature & that needs to be acted upon.
- Select the options you wish to view in the end user app. Selecting the ReAssign check box allows you to reassign the routed inbox work item.
- Select the records you wish to display from Records Per Page drop-down list. The available options are: 5,10, 15, 20, 25, 50, 75, 100 & No Paging.
-
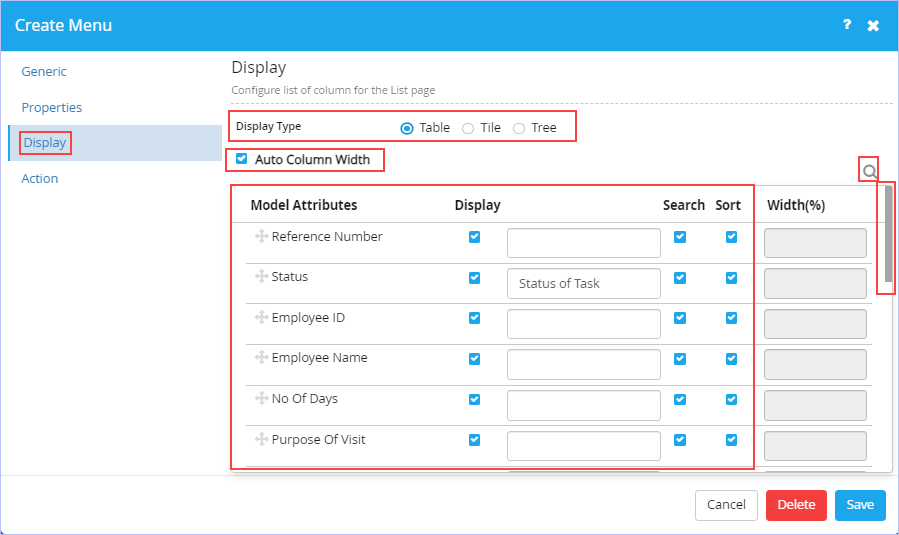
On the Display tab, configure list of columns to be displayed for the list page.
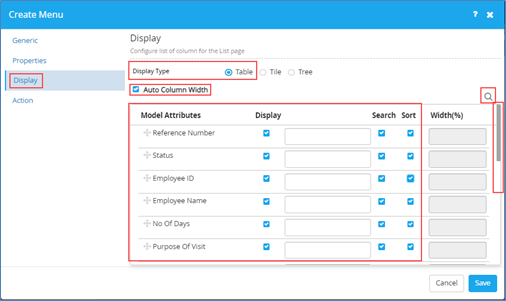
- Click Table as the Display Type for the columns to be displayed. You can choose Tile or Tree display type options as well.
- Notice that Auto Column Width check box is selected by default. Clear this check box if you wish to set the Width(%) column & key in the value as you wish to for your columns display.
- Select the Model attributes to be displayed from the Display check box. Notice that you can give a custom name you wish to for the selected model attributes in the empty box that appears next to Display check box.
- Select the Search and Sort check boxes for the displayed/selected model attributes as you wish to.
|
|
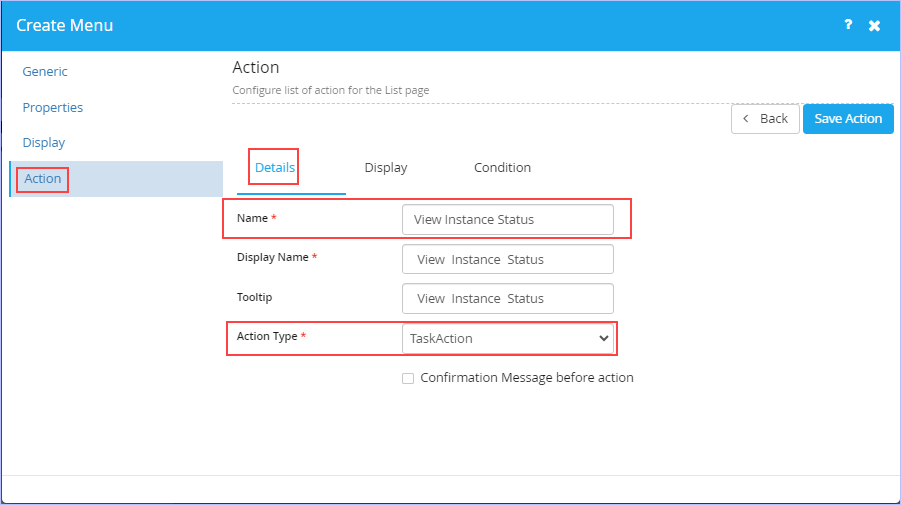
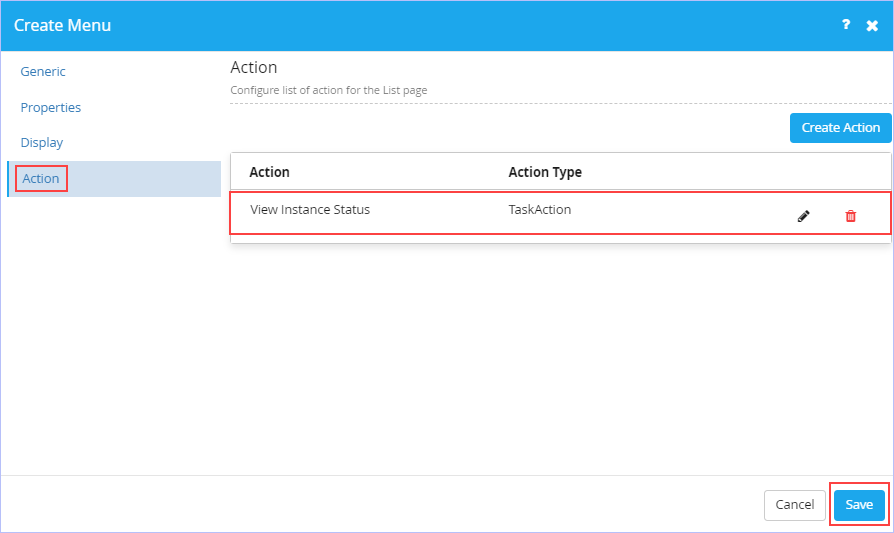
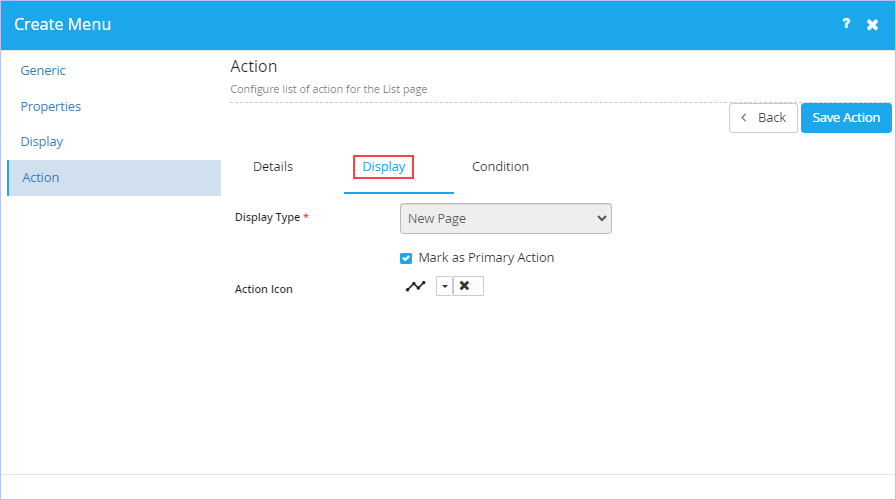
- On the Actions tab, you need to configure list of actions for the list page to be displayed.
- Click Create Action.
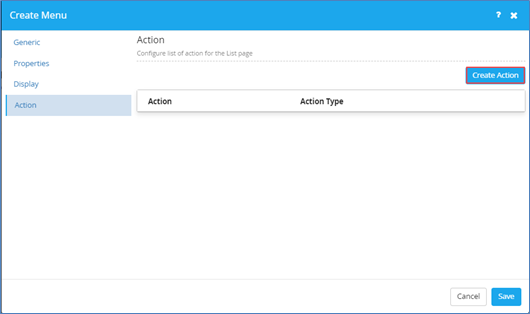
- On the Details tab, key in the appropriate name of the action you wish to in the Name box.
- Key in the appropriate action display name in the Display Name box.
- Key in the appropriate action tooltip in the Tooltip box.
- Select the appropriate type of action from the Action Type check box. The available options are: Edit, Trigger Process, TaskAction, ReAssign & Details. Each of the action type serve different requirements as needed & the fields to be configured varies accordingly. If you choose TaskAction as the action type, then select Confirmation Message before action check box if you wish to.

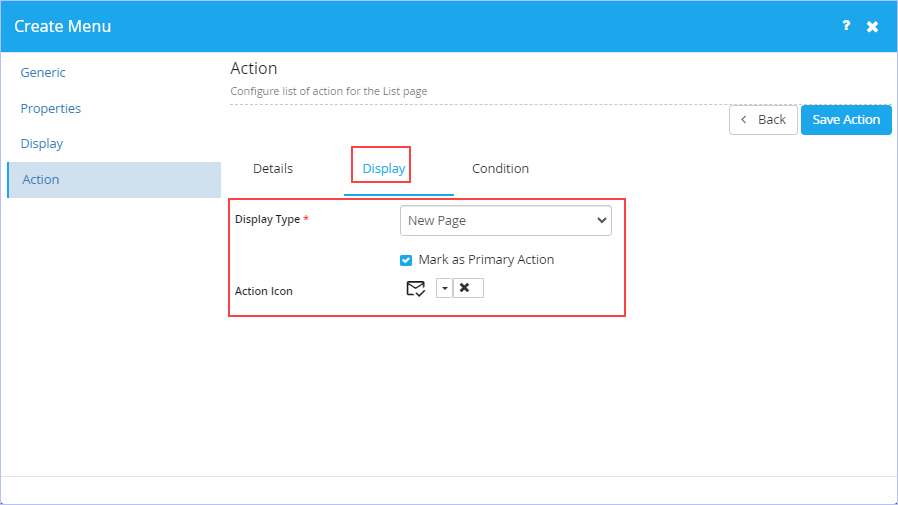
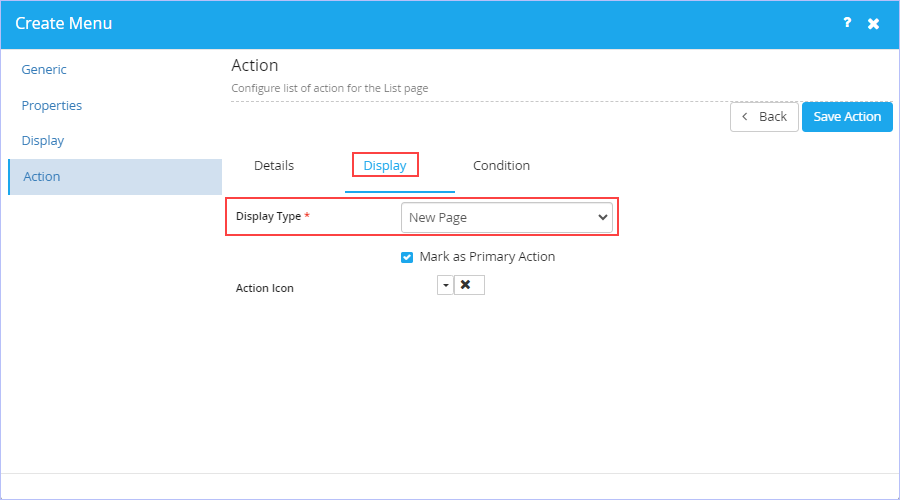
- On the Display tab, configure how you would wish the display type to be.
- Select New Page as the type of display in the Display Type drop-down list. The available options are: Popup, New Page & Inline. Select the Mark as Primary Action check box.
- Click the
 icon & select the Action icon you would wish to associate from the list of built-in icons displayed.
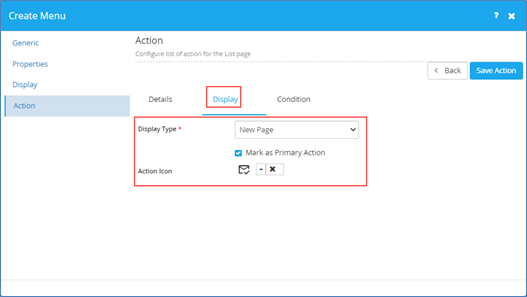
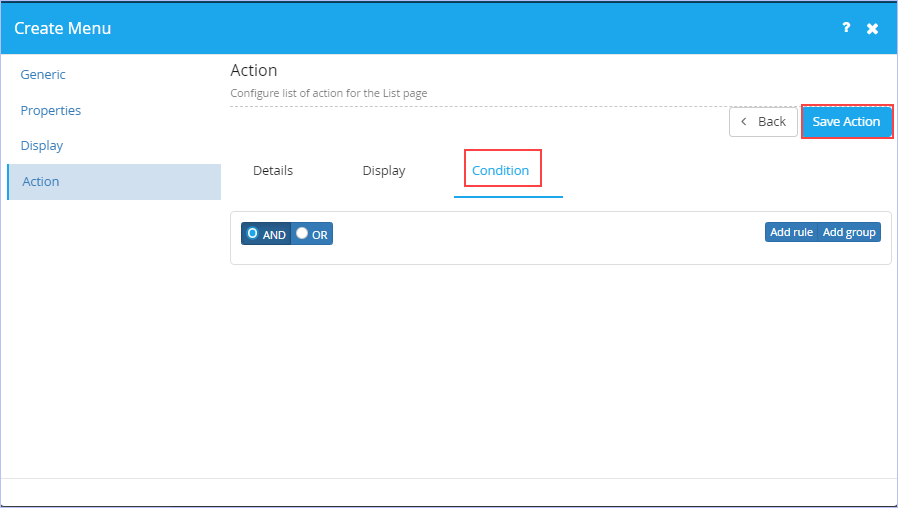
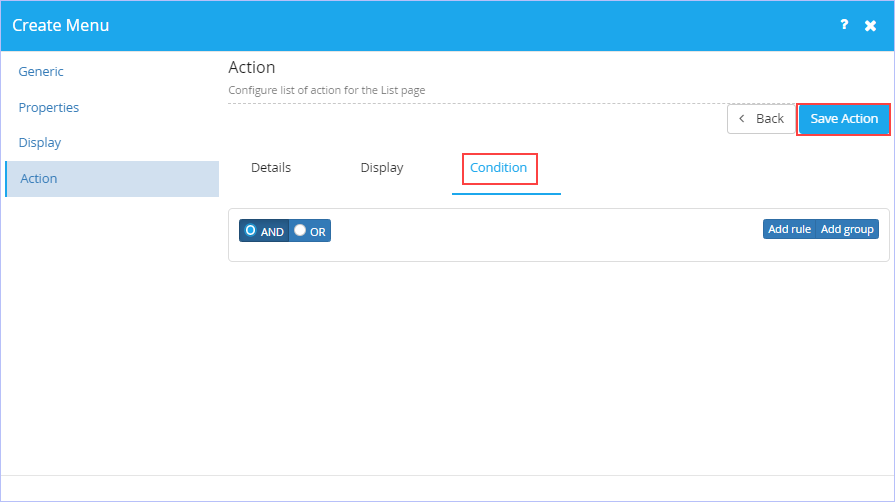
- On the Condition tab, configure the Condition you wish to set for the action defined.

- Click Save Action to save the changes made.

Notice that you can edit as well as delete the action properties that are set/configured.
- Click Save to save the changes made. The following page appears.
Notice that you can edit the new menu created. You can also save the modifications made & delete it as well.
| We will now move ahead & illustrate the steps for creating yet another sitemap named ‘Level 1 Approver – Sitemap’ and configure it. |
| To create and configure a new Sitemap for your App (Level 1 Approver – Sitemap), follow these steps: |
1. On the Sitemap page, click Create Sitemap.

2. The New Sitemap dialog box appears.
![]()
- Key in the appropriate name in the Name box. For example, Level 1 Approver – Sitemap.
- Key in the appropriate description in the Description box.
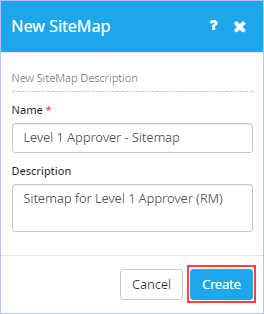
3. Click Create. The following page appears.
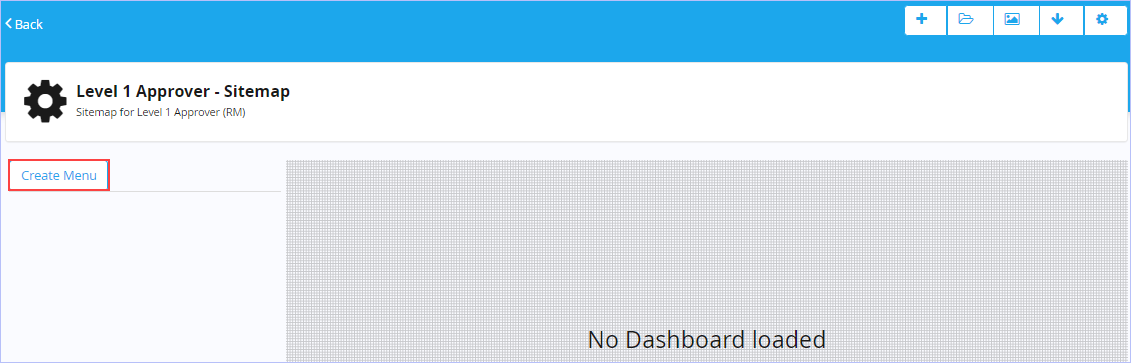
4. On the left pane, click Create Menu. The Create Menu dialog box appears.
![]()
- On the Generic tab, Select Inbox List as the page type in Page Type drop-down list. The available page type options are: Dashboard, Trigger Process, My Request List, My Request Draft List, My Calendar, Inbox List, Create Master Record, Master Record List, Report List, Report, URL Integration & Custom Html. As soon as Inbox List page type is selected, two more fields namely Page Name & Page Description appears.
- Key in the appropriate name of menu & its tooltip in their respective Menu Name & Menu Tooltip boxes.
- Click the icon & select the menu icon you would wish to associate from the list of built-in icons displayed.
- Key in the appropriate name of the page & its description in their respective Page Name and Page Description boxes.
- Select the Hide Page check box if you wish to as per requirements.
- On the Properties tab, navigate to Process tab. Select the Travel Requisition Approval process from the Process drop-down list. Only published process(es) are displayed in the Process drop-down list.
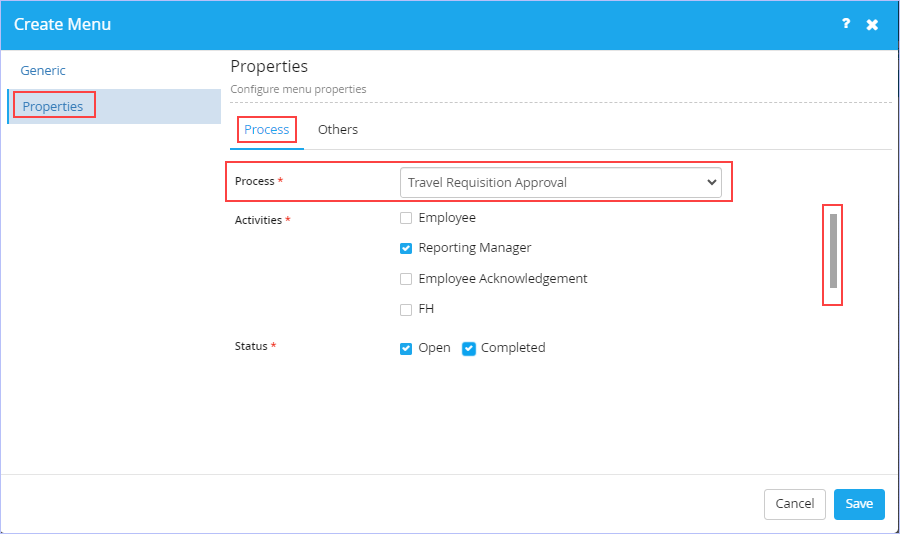
- Select the Reporting Manager check box activity since we are configuring the sitemap for the Level 1 Approver (RM). This selection ensures that only workflow items that are routed to the Reporting Manager to view and act upon in his/her Inbox.
- Select the Open and Completed Status check boxes so that the Reporting Manager’s Inbox is configured to display both Open (Pending) as well as Completed work items.
- Navigate to the Others tab.

- Select the TravelRequisitionInformation Model from the Model drop-down list. Only published Model(es) are displayed in the Model drop-down list. As soon as the Model is selected from Model drop-down list, two more tabs namely Display and Action appear on the left pane that also need to be configured.
- Select System as type of execution from the Execution Type drop-down list. The available options are: System & Stored Procedure.
- Select Reference Number from the Default Sort drop-down list. All the fields/model attributes that are defined in the TravelRequisitionInformation model are displayed & available for selection in the Default Sort drop-down list. Click Ascending or Descending as the Default Sort Order as you wish to.
- Click Assigned To Me or All as the Data Permission you wish to set. Assigned To Me option only shows the Inbox work items that are assigned to the specified User Role (Reporting Manager) whereas as All option shows all the Inbox work items that are generic in nature & that needs to be acted upon.
- Select the options you wish to view in the end user app. Selecting the ReAssign check box allows you to reassign the routed inbox work item.
- Select the records you wish to display from Records Per Page drop-down list. The available options are: 5,10, 15, 20, 25, 50, 75, 100 & No Paging.
- On the Display tab, configure list of columns to be displayed for the list page.

- Click Table as the Display Type for the columns to be displayed. You can choose Tile or Tree display type options as well.
- Notice that Auto Column Width check box is selected by default. Clear this check box if you wish to set the Width(%) column & key in the value as you wish to for your columns display.
- Select the Model attributes to be displayed from the Display check box. Notice that you can give a custom name you wish to for the selected model attributes in the empty box that appears next to Display check box.
- Select the Search and Sort check boxes for the displayed/selected model attributes as you wish to.
|
|
- On the Actions tab, you need to configure list of actions for the list page to be displayed.
- Click Create Action.

- On the Details tab, key in the appropriate name of the action you wish to in the Name box.
- Key in the appropriate action display name in the Display Name box.
- Key in the appropriate action tooltip in the Tooltip box.
- Select the appropriate type of action from the Action Type check box. The available options are: Edit, Trigger Process, TaskAction, ReAssign & Details. Each of the action type serve different requirements as needed & the fields to be configured varies accordingly. If you choose TaskAction as the action type, then select Confirmation Message before action check box if you wish to.
- On the Display tab, configure how you would wish the display type to be.
- Select New Page as the type of display in the Display Type drop-down list. The available options are: Popup, New Page & Inline. Select the Mark as Primary Action check box.
- Click the icon & select the Action icon you would wish to associate from the list of built-in icons displayed.
- On the Condition tab, configure the Condition you wish to set for the action defined.
- Click Save Action to save the changes made.
Notice that you can edit as well as delete the action properties that are set/configured.
- Click Save to save the changes made. The following page appears.
Notice that you can edit the sitemap created. You can also save the modifications made & delete it as well.
- Click Back to navigate to the Sitemap page & view the sitemap we just created.

|
Creation of Sitemaps for other actors such as Functional Head, Travel Desk Executive & Travel Desk Manager are very similar to the Level 1 Approver – Sitemap we just illustrated above. Hence, they are not repeated again. |
Sample Screenshot showing all the Sitemaps defined for all the actors (Employee, Reporting Manager, Functional Head, Travel Desk Executive & Travel Desk Manager) involved in our sample example ‘Travel Request Approval’ app.
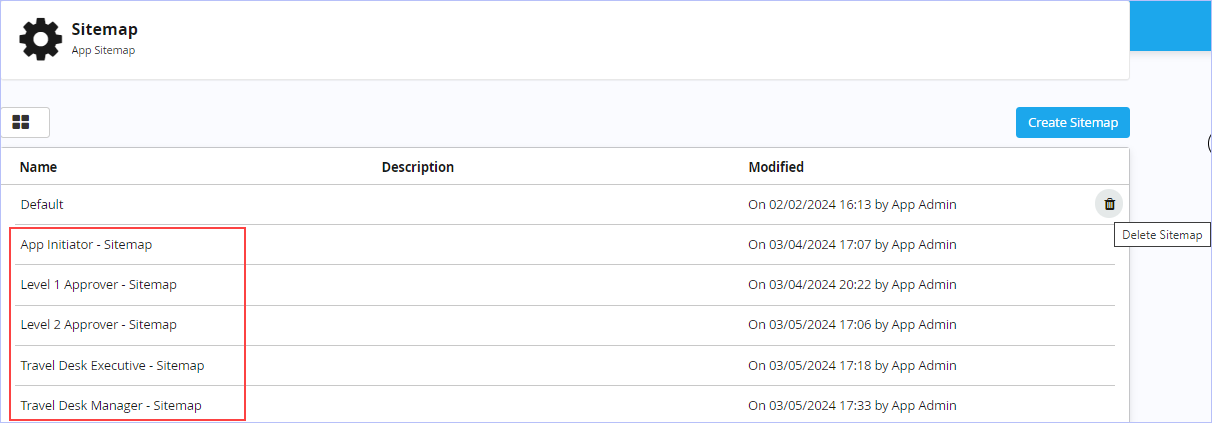
Hover on any Sitemap & click the ![]() icon to delete the Sitemap if you wish to. However, it is advisable not to delete any configured Sitemap unless you are absolutely sure of.
icon to delete the Sitemap if you wish to. However, it is advisable not to delete any configured Sitemap unless you are absolutely sure of.
|
|
| Previous | Back to Contents | Next |
Configuring a Default Sitemap
| To configure a default Sitemap for your App, follow these steps: |
1. Open the App for which you wish to set/configure its default Sitemap. Click Settings. Alternatively, hover on the chosen App (Recent Apps section) & click the ![]() icon to navigate directly to its Settings area as shown.
icon to navigate directly to its Settings area as shown.

2. In the Configuration section, click Sitemap. The following page appears.
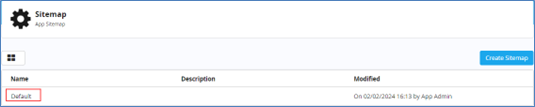
3. Click Default. The following page appears.
|
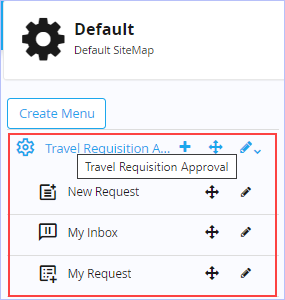
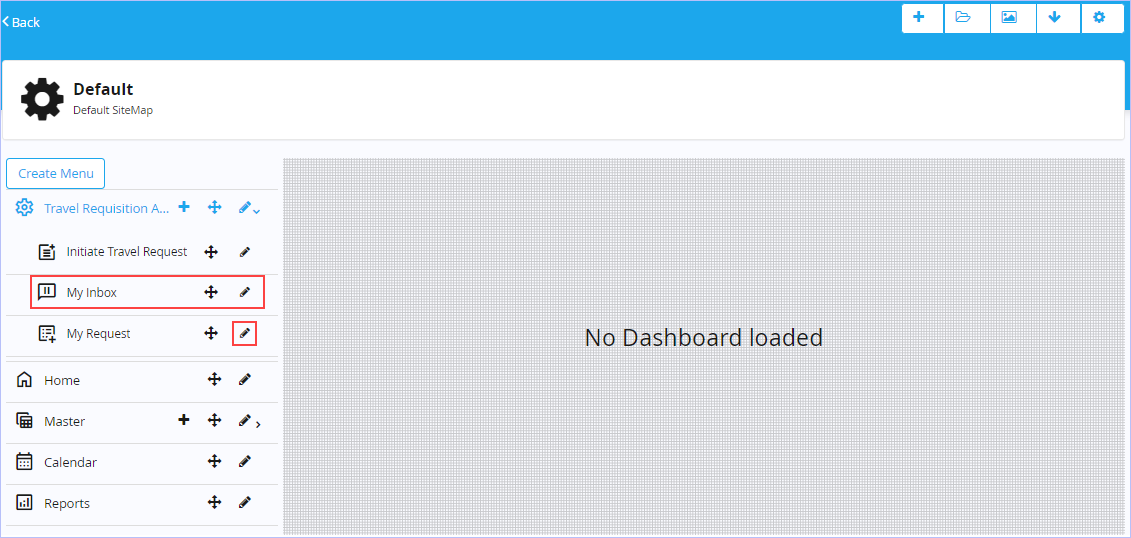
Notice the default menu options available on the left pane. You can also create new menu options if you wish to. The newly created menu options are displayed on the left pane. As stated earlier, we will first explore configuring the default menu options available (only the relevant ones) for our sample ‘Travel Requisition Approval’ app. Note that the first menu ‘Travel Requisition Approval’ carries the same name as the name given for the Process Name of the App. |
4. Click the Travel Requisition Approval menu. A shortcut menu appears as shown.
- Click the
 icon to create a new menu if you wish to. Opens up the Create Menu dialog box.
 - Drag the
 icon to move or re-order the menu options wherever you wish to.
 - Click the
 icon to edit the menu. The Create Menu dialog appears.
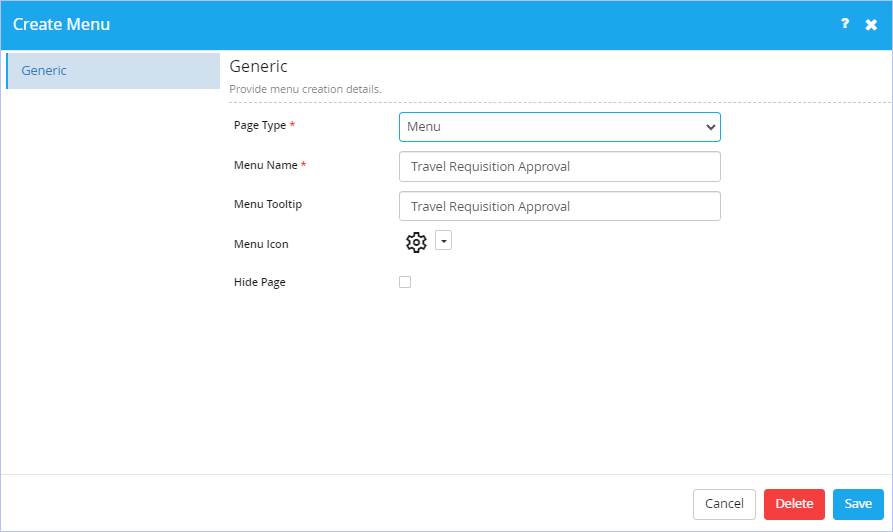
- On the Generic tab, notice that ‘Menu’ is chosen as the default page type in the Page Type drop-down list. The other available page type options are: Dashboard, Trigger Process, My Request List, My Request Draft List, My Calendar, Inbox List, Create Master Record, Master Record List, Report List, Report, URL Integration & Custom Html.
- Modify the default name of the menu in the Menu Name box if you wish to.
- Modify the default name of the menu tooltip in the Menu Tooltip box if you wish to.
- Modify the default menu icon if you wish to. Click the icon to display a list of icons to choose from.
- Select the Hide Page check box if you wish to as per requirements.
- Click Save to save the changes made.
- Click Delete to delete the menu if you wish to.
- On the New Request menu, click the icon to edit. The Create Menu dialog box appears.

- On the Generic tab, notice that the page type Trigger Process in Page Type drop-down list is selected by default. The available page type options are: Dashboard, Trigger Process, My Request List, My Request Draft List, My Calendar, Inbox List, Create Master Record, Master Record List, Report List, Report, URL Integration & Custom Html.
- Key in the appropriate name of menu & its tooltip in their respective Menu Name & Menu Tooltip boxes.
- Click the icon & select the menu icon you would wish to associate/change from the list of built-in icons displayed.
- Key in the appropriate name of the page & its description in their respective Page Name and Page Description boxes.
- Select the Hide Page check box if you wish to as per requirements.
- On the Properties tab, select the Travel Requisition Approval process from the Process drop-down list. Only published process(es) are displayed in the Process drop-down list.
- Click Save to save the changes made. The following page appears. Notice the configured menu name.
- Click Delete to delete the menu if you wish to.
- Click the
 icon to edit the My Inbox menu. The Create Menu dialog box appears.
- On the Generic tab, Select Inbox List as the page type in Page Type drop-down list. The available page type options are: Dashboard, Trigger Process, My Request List, My Request Draft List, My Calendar, Inbox List, Create Master Record, Master Record List, Report List, Report, URL Integration & Custom Html. As soon as Inbox List page type is selected, two more fields namely Page Name & Page Description appears.
- Key in the appropriate name of menu & its tooltip in their respective Menu Name & Menu Tooltip boxes.
- Click the icon & select the menu icon you would wish to associate from the list of built-in icons displayed.
- Key in the appropriate name of the page & its description in their respective Page Name and Page Description boxes.
- Select the Hide Page check box if you wish to as per requirements.
- On the Properties tab, navigate to Process tab. Select the Travel Requisition Approval process from the Process drop-down list. Only published process(es) are displayed in the Process drop-down list.
- Retain the default selections as is.
- Select the Open and Completed Status check boxes as well so as to display both Open (Pending) as well as Completed work items.
- Navigate to the Others tab. Modify the requisite changes as shown.

- On the Display tab, configure list of columns to be displayed for the list page as shown.

- On the Action tab, configure list of actions for the list page to be displayed as shown.

- Notice that action type ‘TaskAction’ is selected by default. Click the
 icon to edit the action. The following page appears.
- Retain the default configurations on all the tabs namely Details, Display & Condition as shown.


- Click Save Action to save the changes made.
- Click Save to save the changes made. The following page appears. Notice the default menu name.
- Click Delete to delete the menu if you wish to.
- Click the
 icon to edit the My Request menu. The Create Menu dialog box appears.
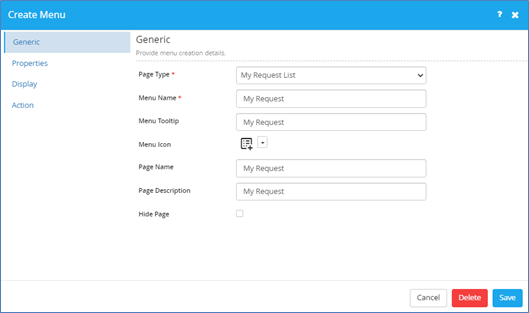
- On the Generic tab, notice that the page type My Request List in Page Type drop-down list is selected by default. The available page type options are: Dashboard, Trigger Process, My Request List, My Request Draft List, My Calendar, Inbox List, Create Master Record, Master Record List, Report List, Report, URL Integration & Custom Html.
- Key in/modify the appropriate name of menu & its tooltip in their respective Menu Name & Menu Tooltip boxes if you wish to.
- Click the icon & select the menu icon you would wish to associate/change from the list of built-in icons displayed.
- Key in/modify the appropriate name of the page & its description in their respective Page Name and Page Description boxes if you wish to.
- Select the Hide Page check box if you wish to as per requirements.
- On the Properties tab, notice that Travel Requisition Approval process is selected from the Process drop-down list by default. Only published process(es) are displayed in the Process drop-down list.
- Select System as type of execution from the Execution Type drop-down list. The available options are: System & Stored Procedure.
- Select Reference Number from the Default Sort drop-down list. All the fields/model attributes that are defined in the TravelRequisitionInformation model on which the Travel Requisition Process is defined are displayed & available for selection in the Default Sort drop-down list. Click Ascending or Descending as the Default Sort Order as you wish to.
- Select the Open and Completed Status check boxes as well so as to display both Open (Pending) as well as Completed work items.
- Select the records you wish to display from Records Per Page drop-down list. The available options are: 5,10, 15, 20, 25, 50, 75, 100 & No Paging.
- Click Assigned To Me or All as the Data Permission you wish to set. Assigned To Me option only shows the Inbox work items that are assigned to the specified User Role whereas as All option shows all the Inbox work items that are generic in nature & that needs to be acted upon.
- Select the options you wish to view in the end user app.
- Select the Show Sl No check box to display the Serial Number.
- Select the New Request check box to add a new request record to the app if you wish to.
- Select the Access to BAM check box to view & access the Business Activity Monitor through which you can view App Status Timeline (Complete), view and act on tasks in real time, view and change user assignments, view details of any process instance (process diagram), view log details for a current instance & instance duration report of any selected instance.
- Select the Refresh check box to refresh the page.
- Select the Print check box to print.
- Key in the appropriate caption in the New Request Caption box.
- Click how you would wish the new request window to appear either as a Popup or in a New Page as per your needs.
- On the Display tab, configure list of columns to be displayed for the list page as shown.
- On the Action tab, configure list of actions for the list page to be displayed as shown.
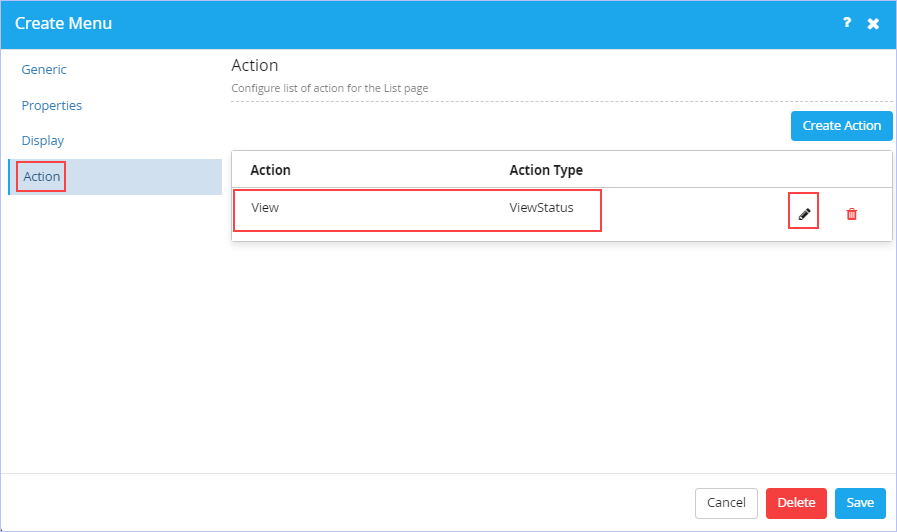
- Notice that action type ‘ViewStatus’ is selected by default. Click the icon to edit the action. The following page appears.
- Retain the default configurations on all the tabs namely Details, Display & Condition as shown.

- Click Save Action to save the changes made.
- Click Save to save the changes made. The following page appears. Notice the configured menu name.
- Click Delete to delete the menu if you wish to.
See also:
- Configuring Home Menu of a Default Sitemap
- Configuring Calendar of a Default Sitemap
- Configuring Reports Menu of a Default Sitemap
| Previous | Back to Contents | Next |
Accessing the App (End User – App Admin Login – Default Sitemap)
|
Now, we will access our sample ‘Travel Requisition Approval’ app with configured default sitemap & navigate through the App pages using the App Admin user login credentials. |
| To access the requisite app, follow these steps: |
1. Click to open the chosen App (Recent Apps section) you wish to access. Alternatively, hover on the chosen App (Recent Apps section) you wish to access & click the![]() icon to navigate directly to its Settings area.
icon to navigate directly to its Settings area.
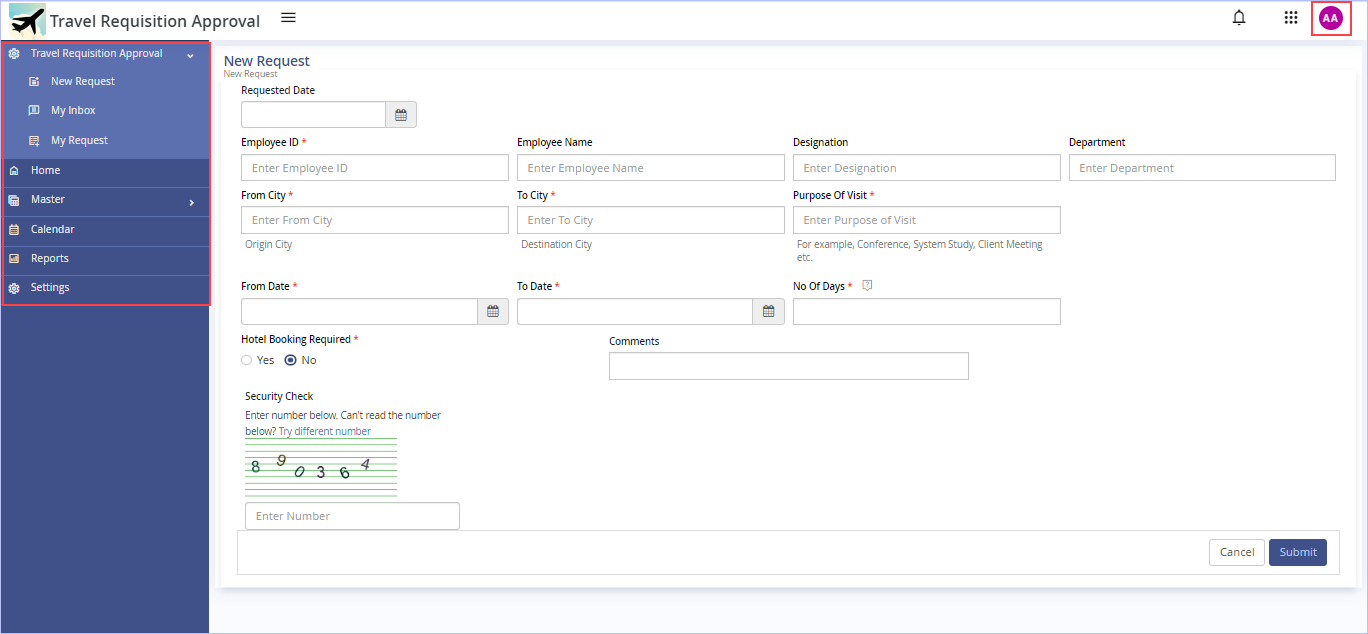
2. On the displayed iLeap developer interface page, click Access This App.

3. The following App page appears.
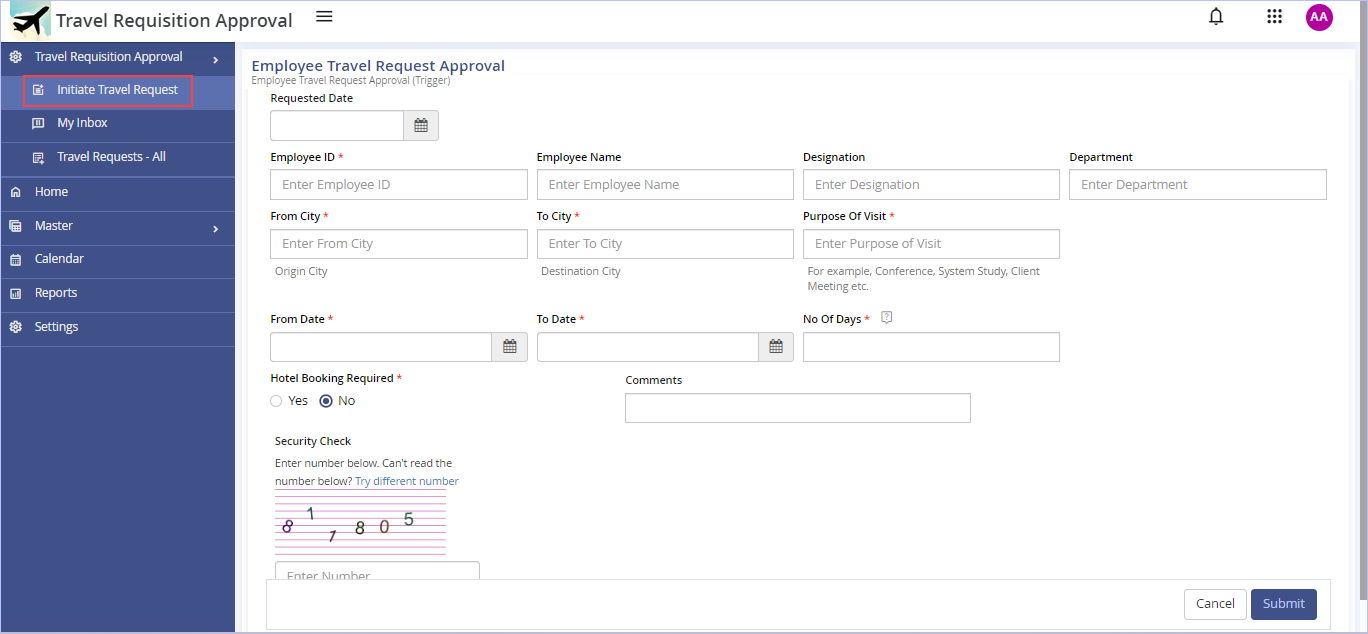
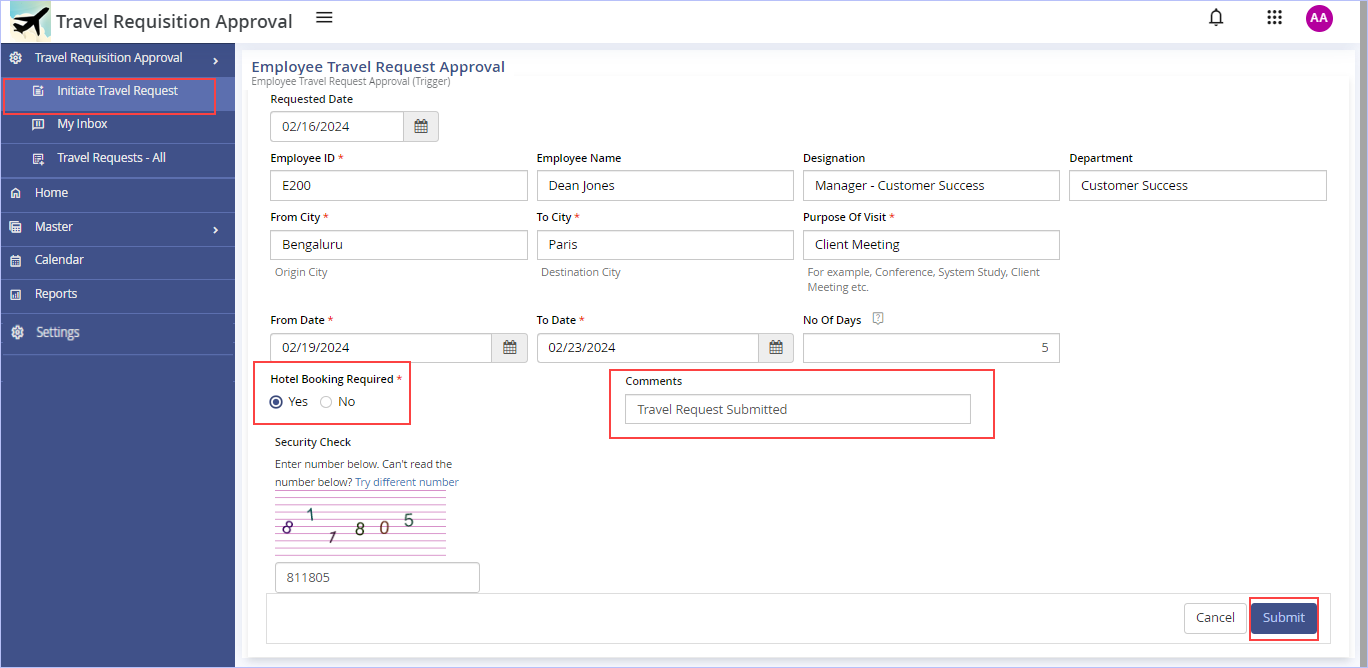
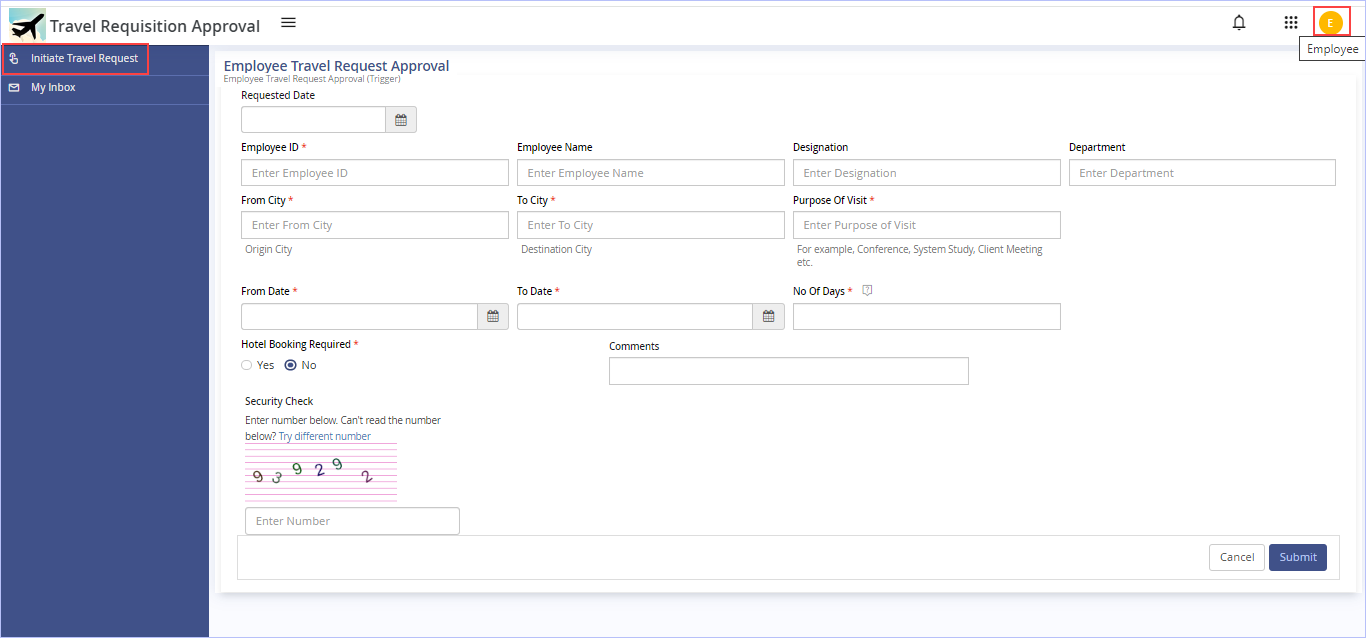
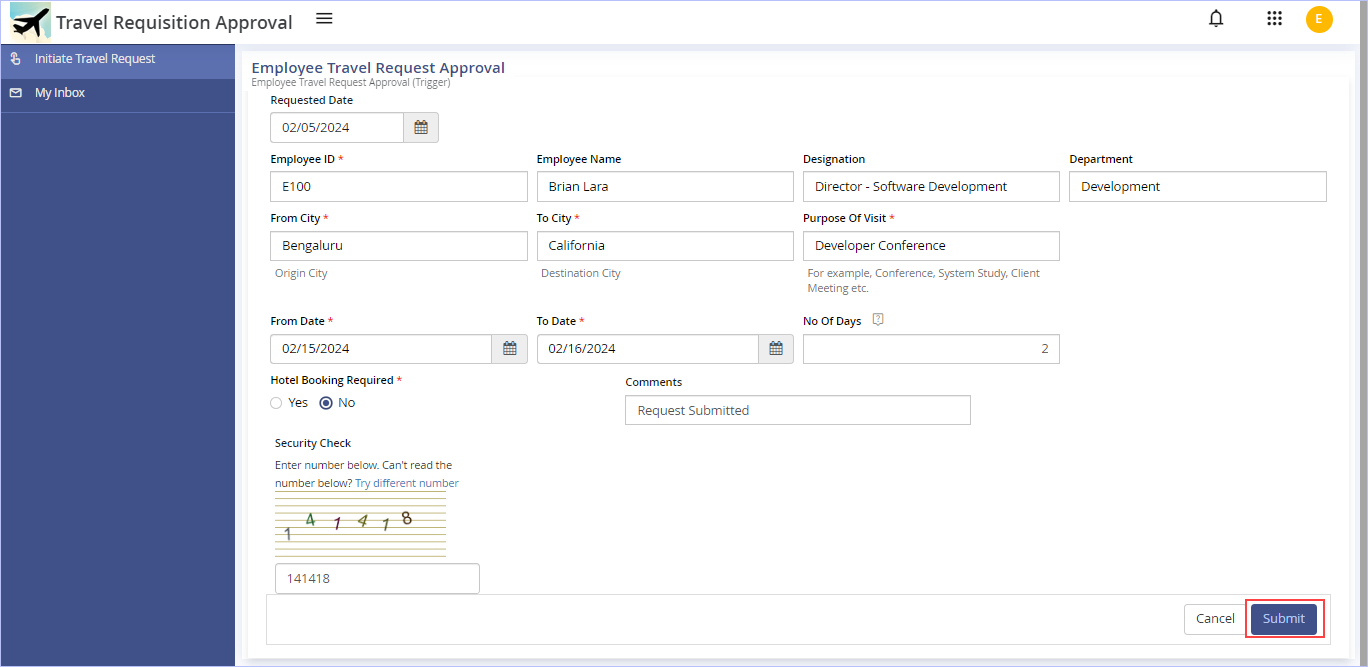
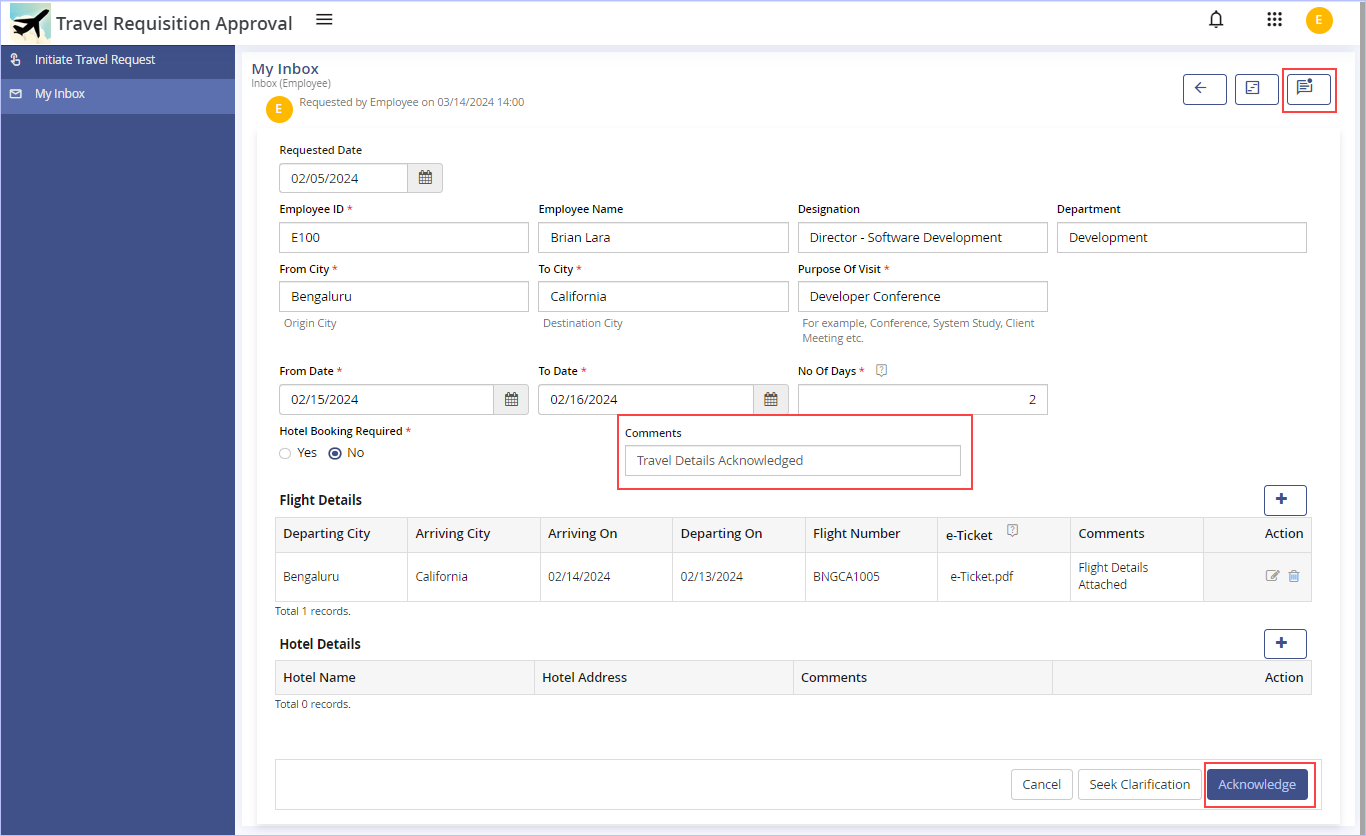
4. On the left pane, click Initiate Travel Request and key in all the requisite particulars of this Employee Travel Request Approval trigger form & click Submit to submit the Travel Request as shown.
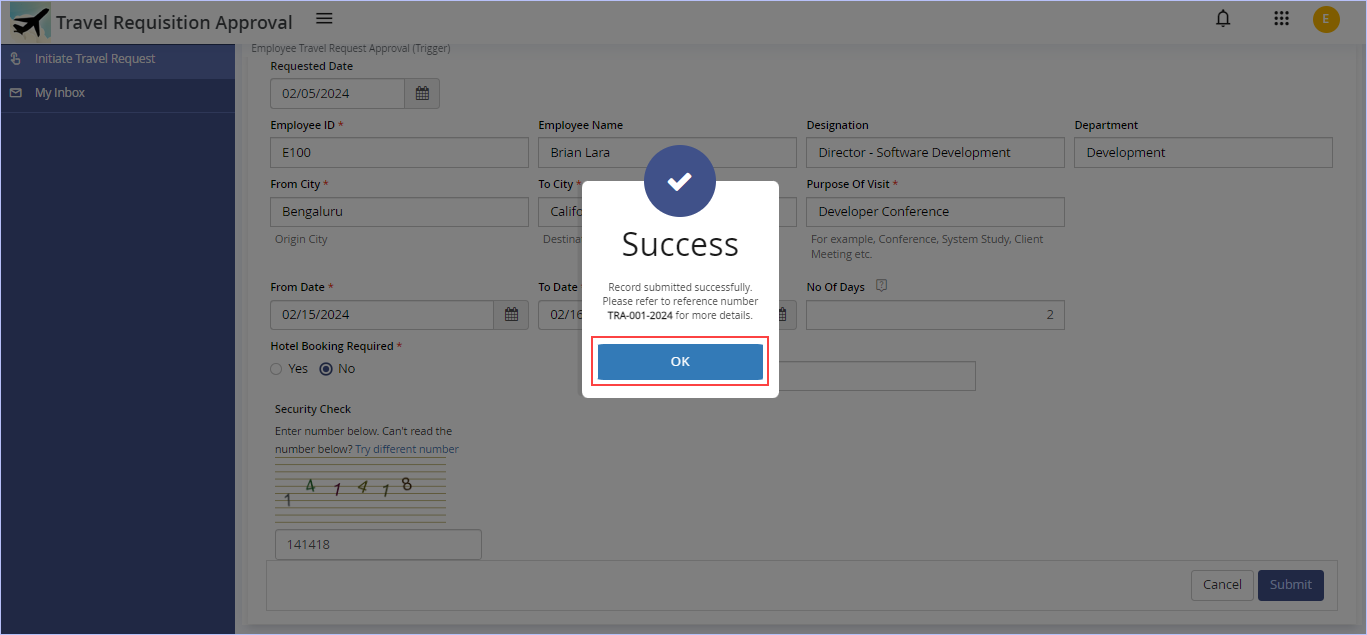
5. Immediately, the following dialog box appears. Click OK.
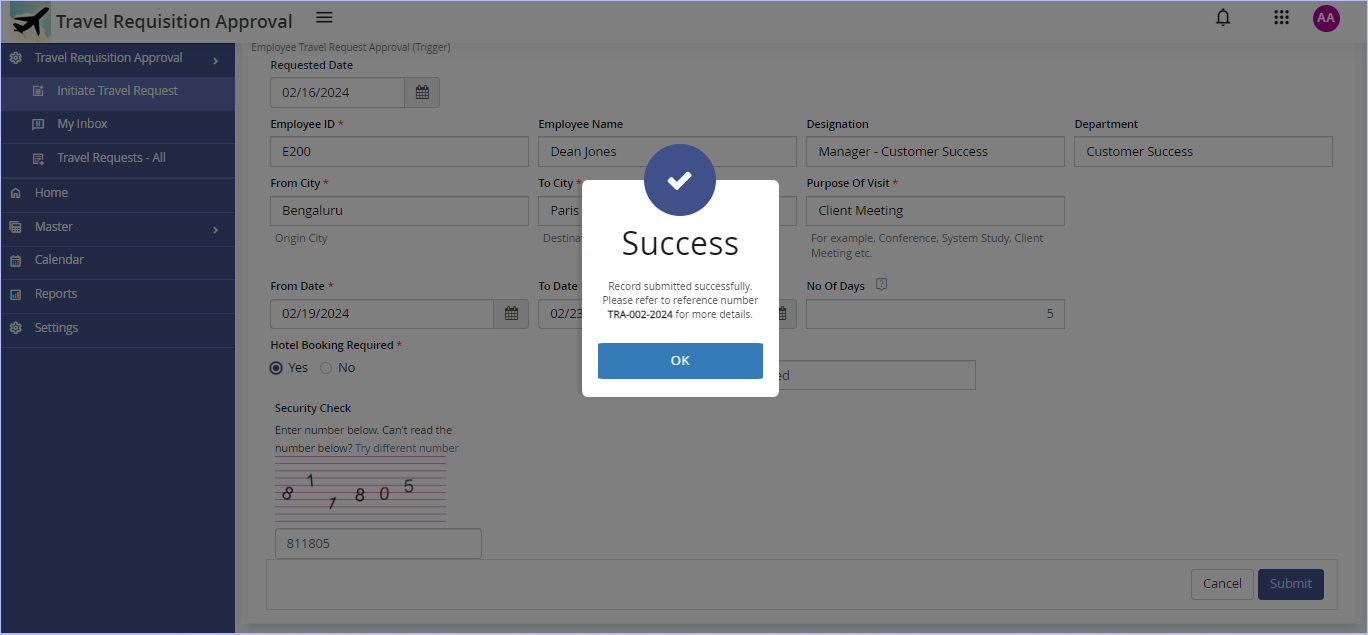
Notice the reference number displayed on this screen.
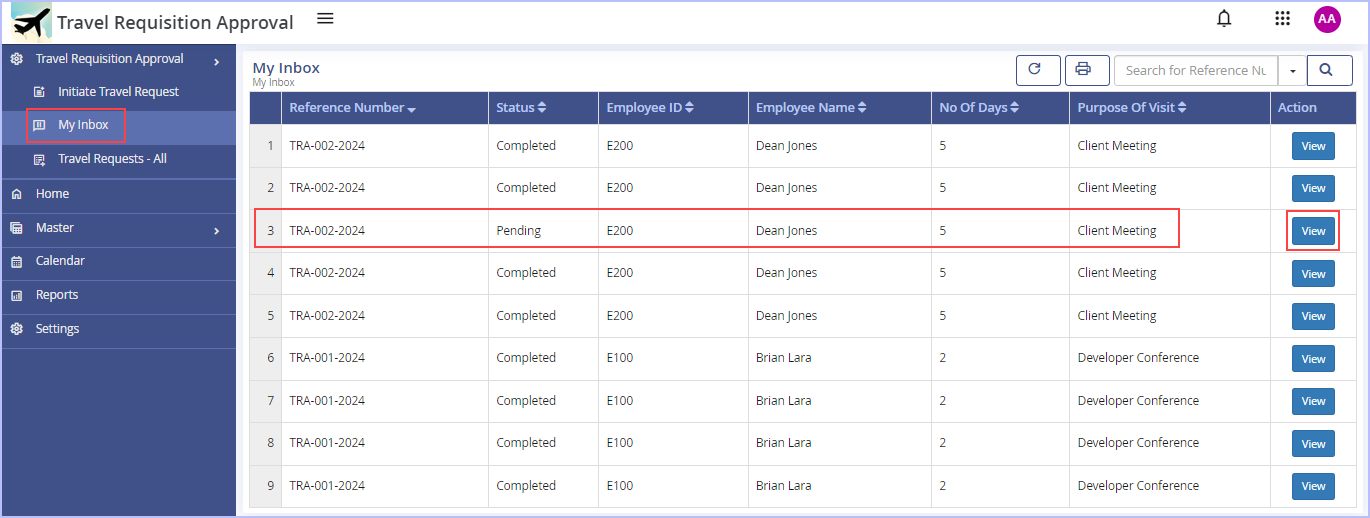
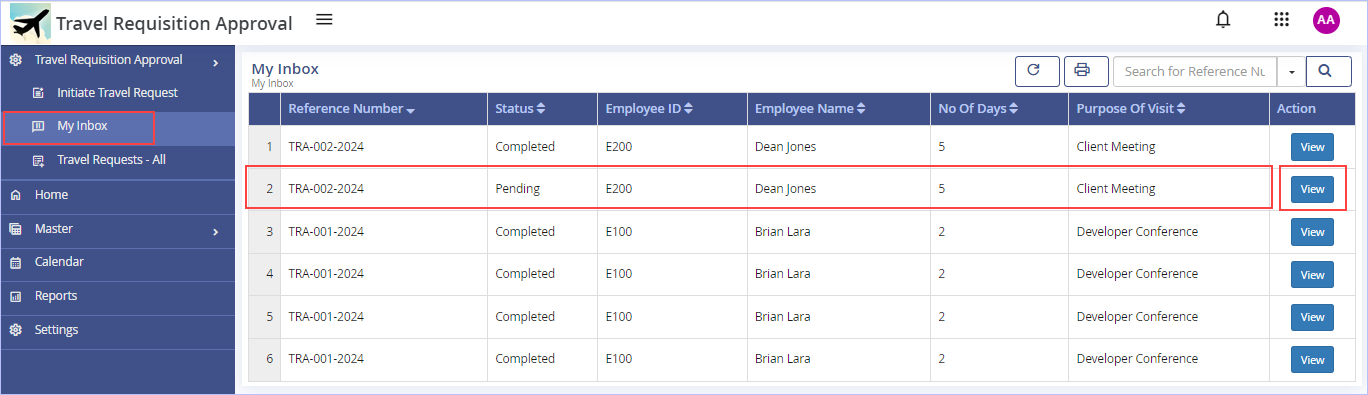
6. On the left pane, click My Inbox. The following page appears.

Notice the status of the record is still in ‘Pending’ state since it has been routed to the next level (RM) to act on it as per its process workflow.
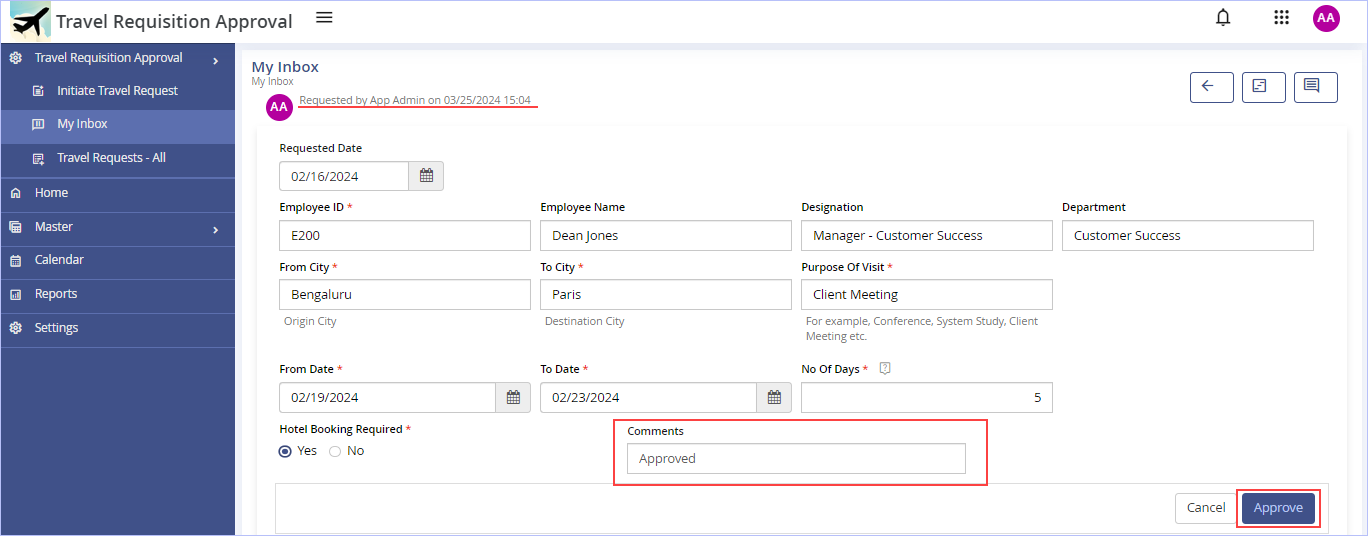
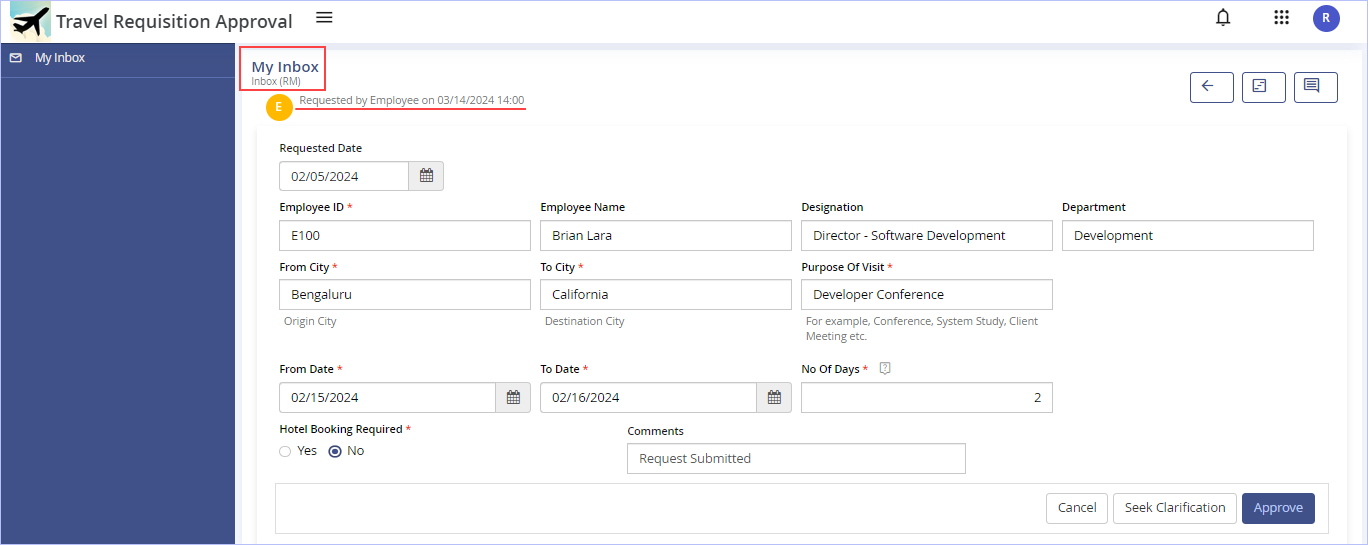
7. Hover on the record displayed (highlighted) & click View under the Action column. The following page appears showing the selected record’s details.
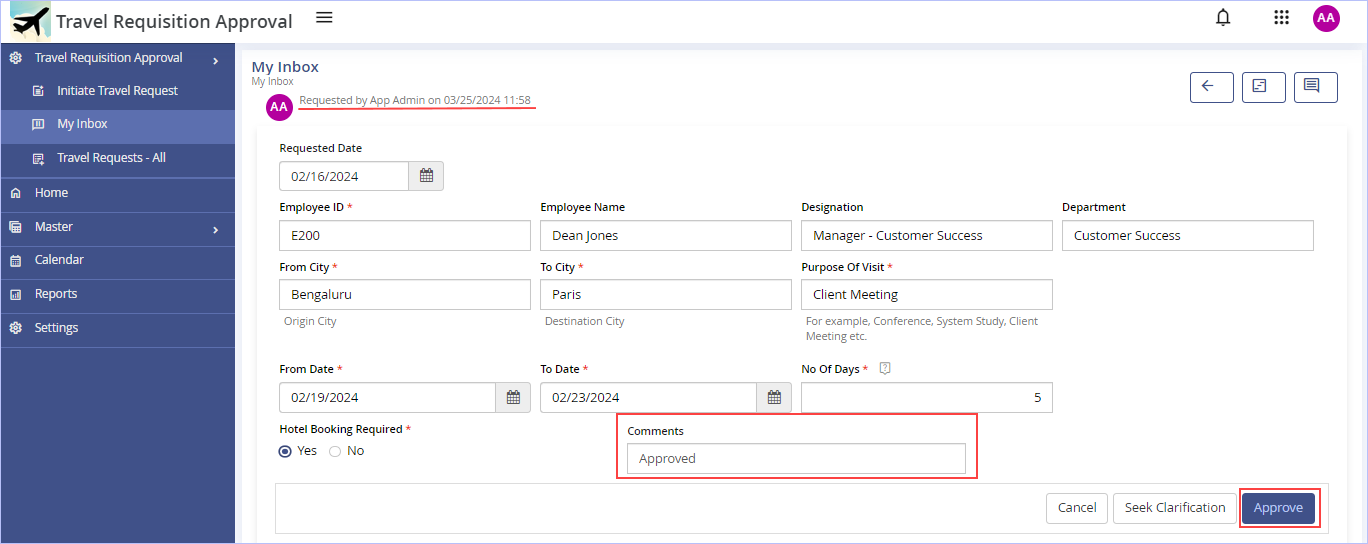
8. Key in the appropriate comments in the Comments box & click Approve. Else, click Seek Clarification if you wish to.
9. Immediately, ‘Success. Record submitted successfully’ message appears. Click OK. The following page appears.
Notice the status of the record is still in ‘Pending’ state since it has been routed to the next level (FH) to act on it as per its process workflow (Observe that the No of Days field is equal to 5 days here).
10. Click View to view the record details.

11. Key in the appropriate comments in the Comments box & click Approve.
12. Immediately, ‘Success. Record submitted successfully’ message appears. Click OK. The following page appears.
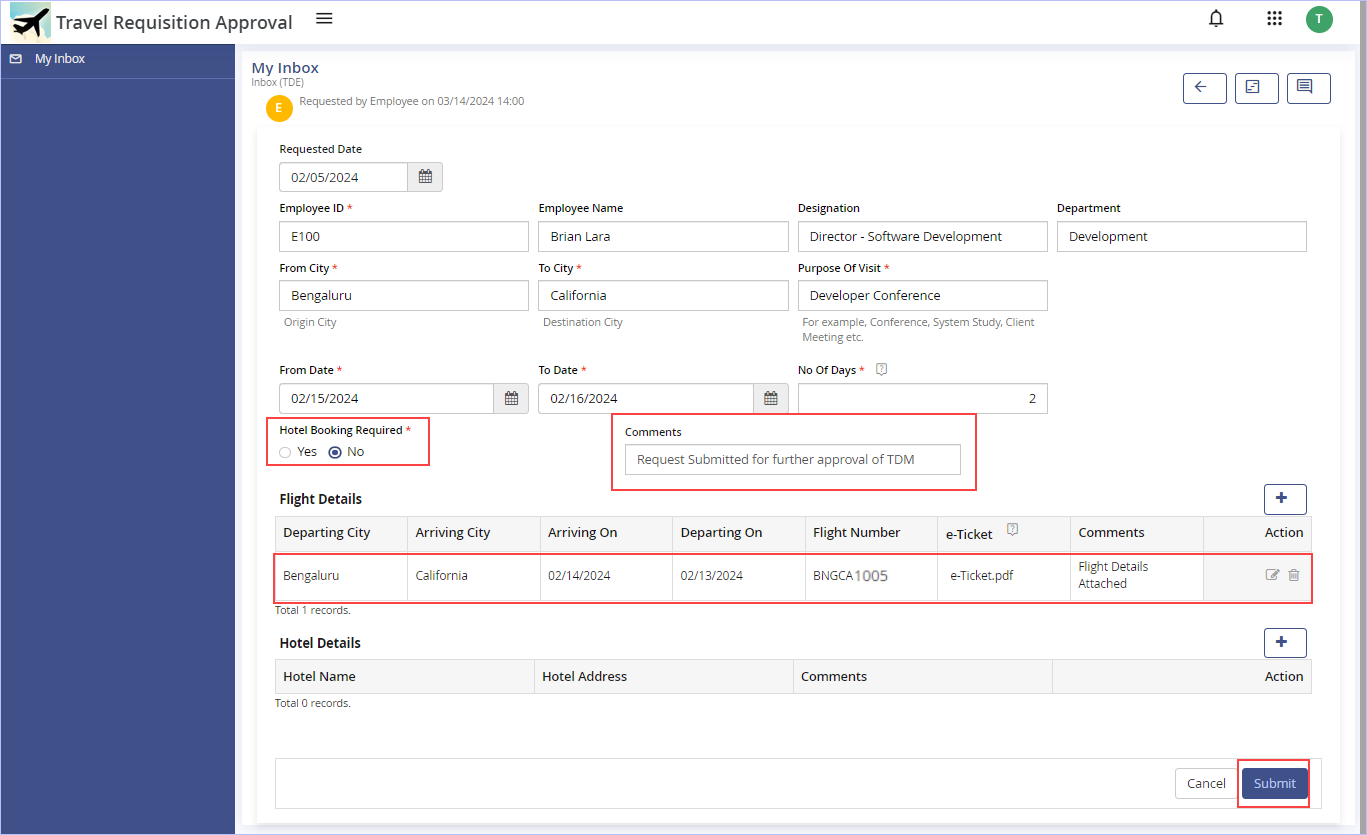
Notice the status of the record is still in ‘Pending’ state since it has been routed to the next level (TDE) to act on it as per its process workflow.
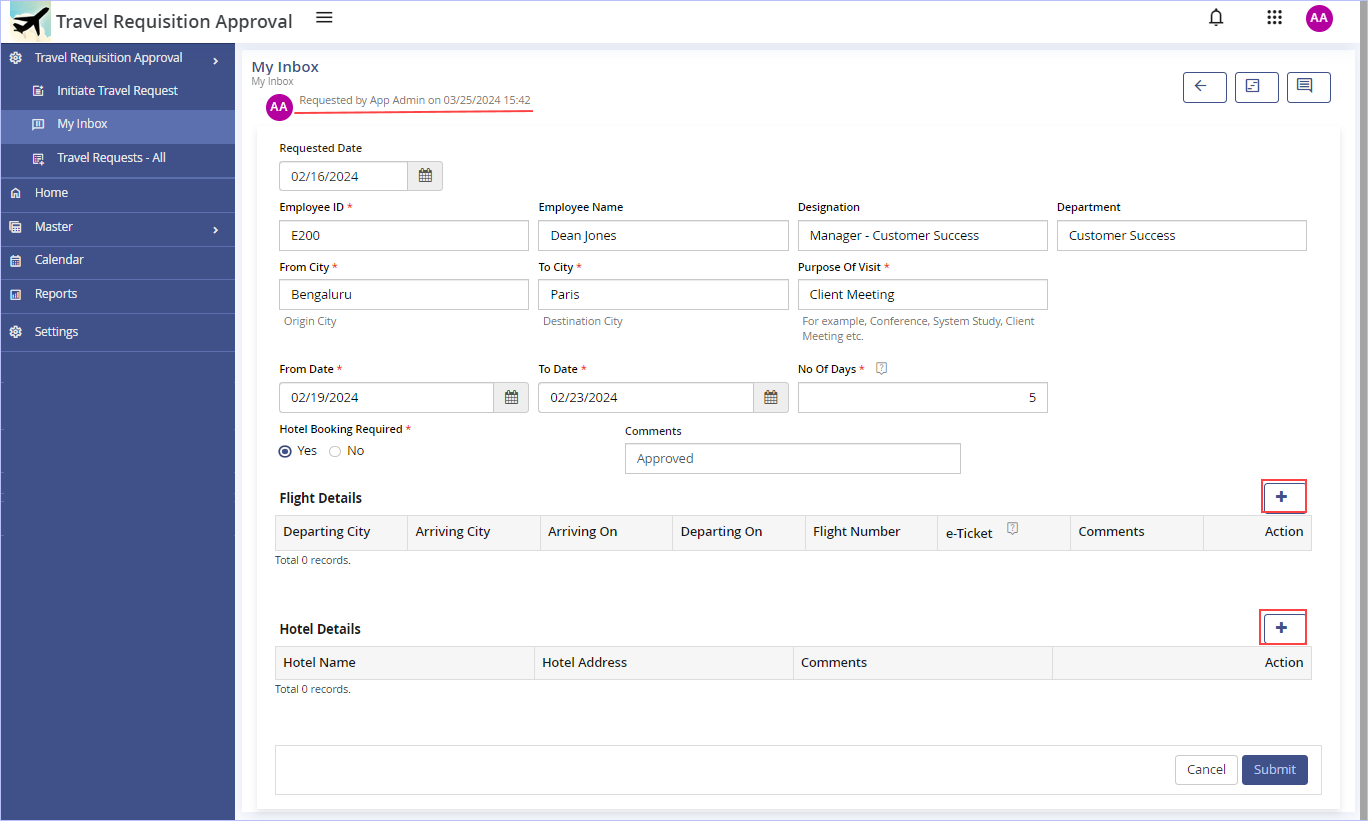
13. In the Flight Details section, click the ![]() icon to add a new record. The Add New Record to Flight Details dialog box appears.
icon to add a new record. The Add New Record to Flight Details dialog box appears.
![]()
- Key in the requisite particulars and click Add to add a new record. Else, click Add and Add New to clear all the fields on this dialog box and add records afresh. This would be handy if you wish to add multiple records at once instead of one after another from this dialog box.
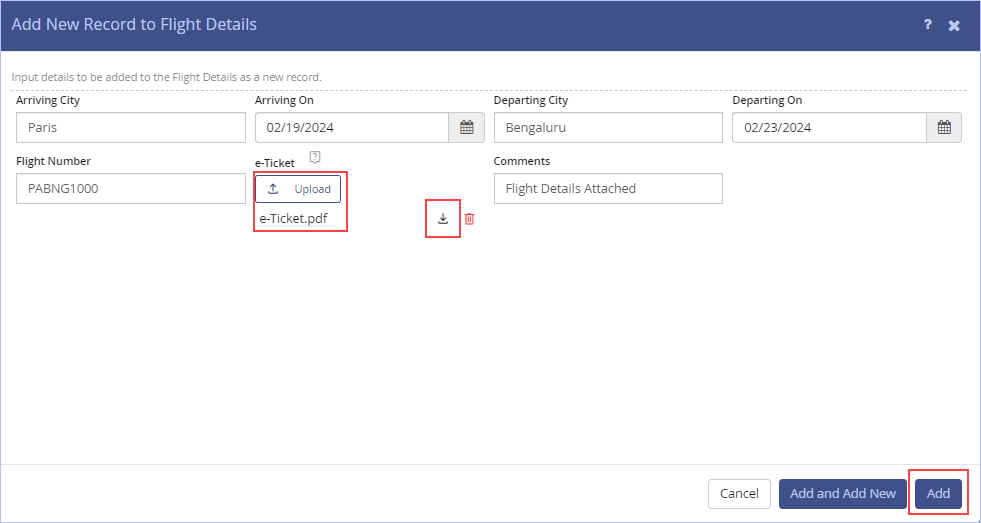
Notice that once you successfully upload the e-Ticket, two more options appear allowing you to download the e-Ticket as well as delete it too.
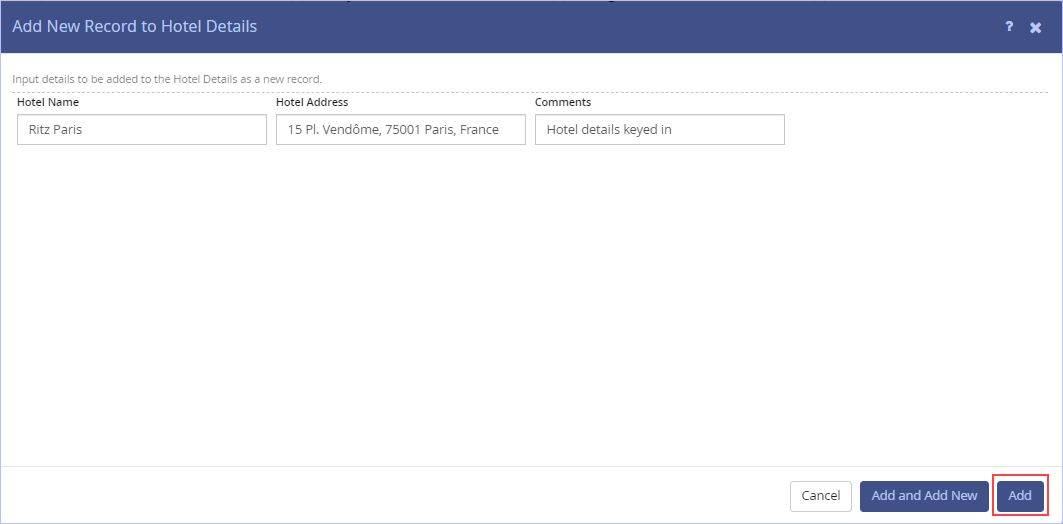
14. In the Hotel Details section, click the ![]() icon to add a new record. The Add New Record to Hotel Details dialog box appears.
icon to add a new record. The Add New Record to Hotel Details dialog box appears.
![]()
- Key in the requisite particulars and click Add to add a new record. Else, click Add and Add New to clear all the fields on this dialog box and add records afresh. This would be handy if you wish to add multiple records at once instead of one after another from this dialog box.
The following page appears post adding Flight and Hotel details.
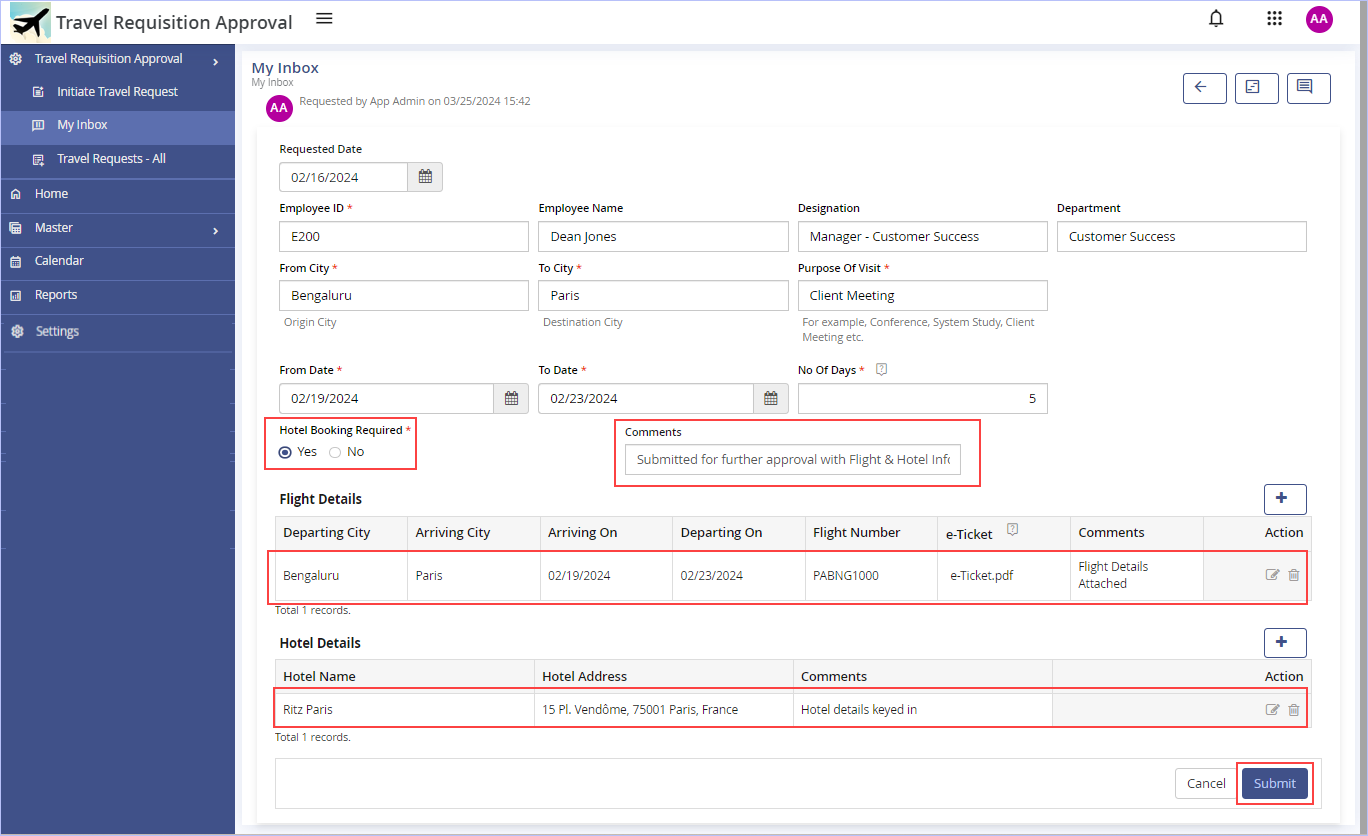
15. Key in the appropriate comments in the Comments box & click Submit.
16. Immediately, ‘Success. Record submitted successfully’ message appears. Click OK. The following page appears.
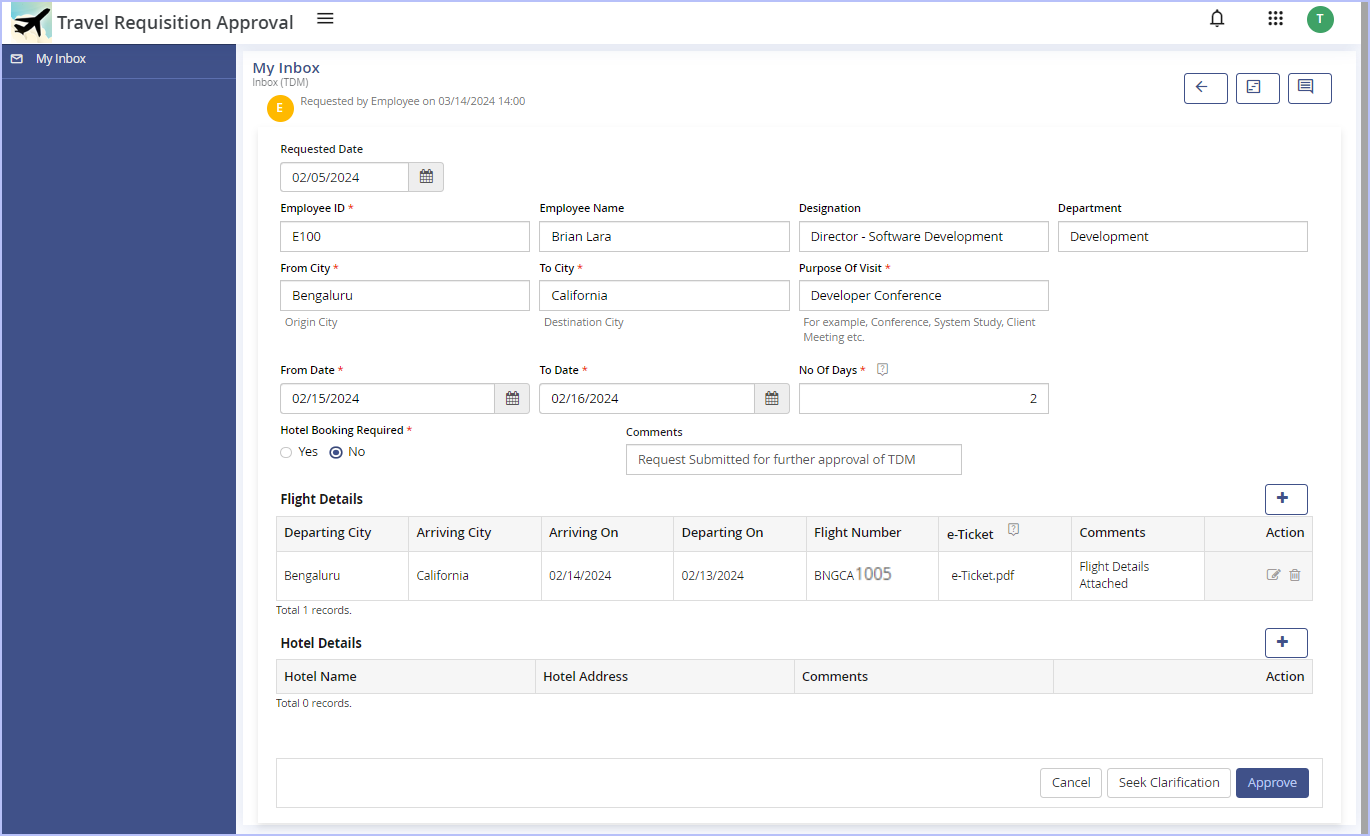
Notice the status of the record is still in ‘Pending’ state since it has been routed to the next level (TDM) to act on it as per its process workflow.
17. Click View to view the record details.
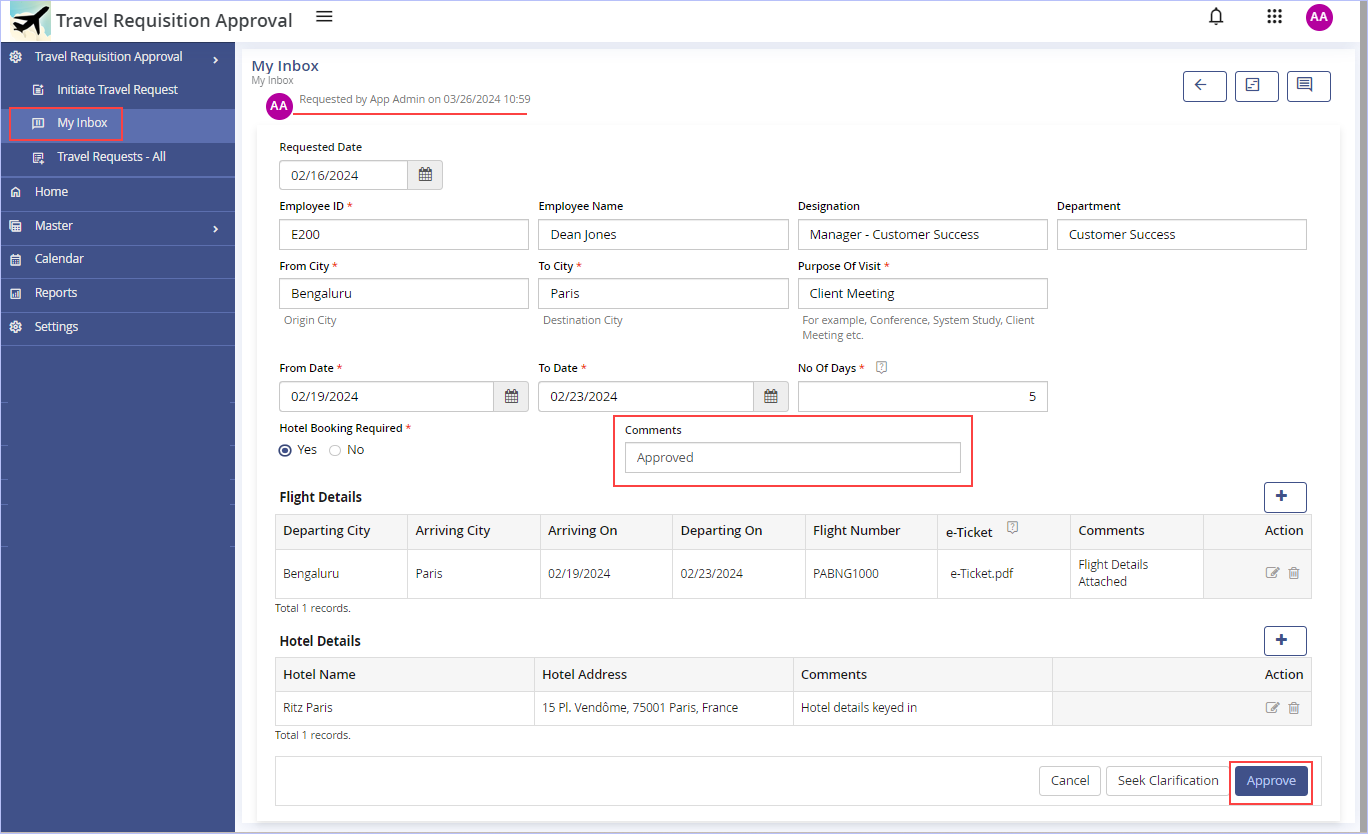
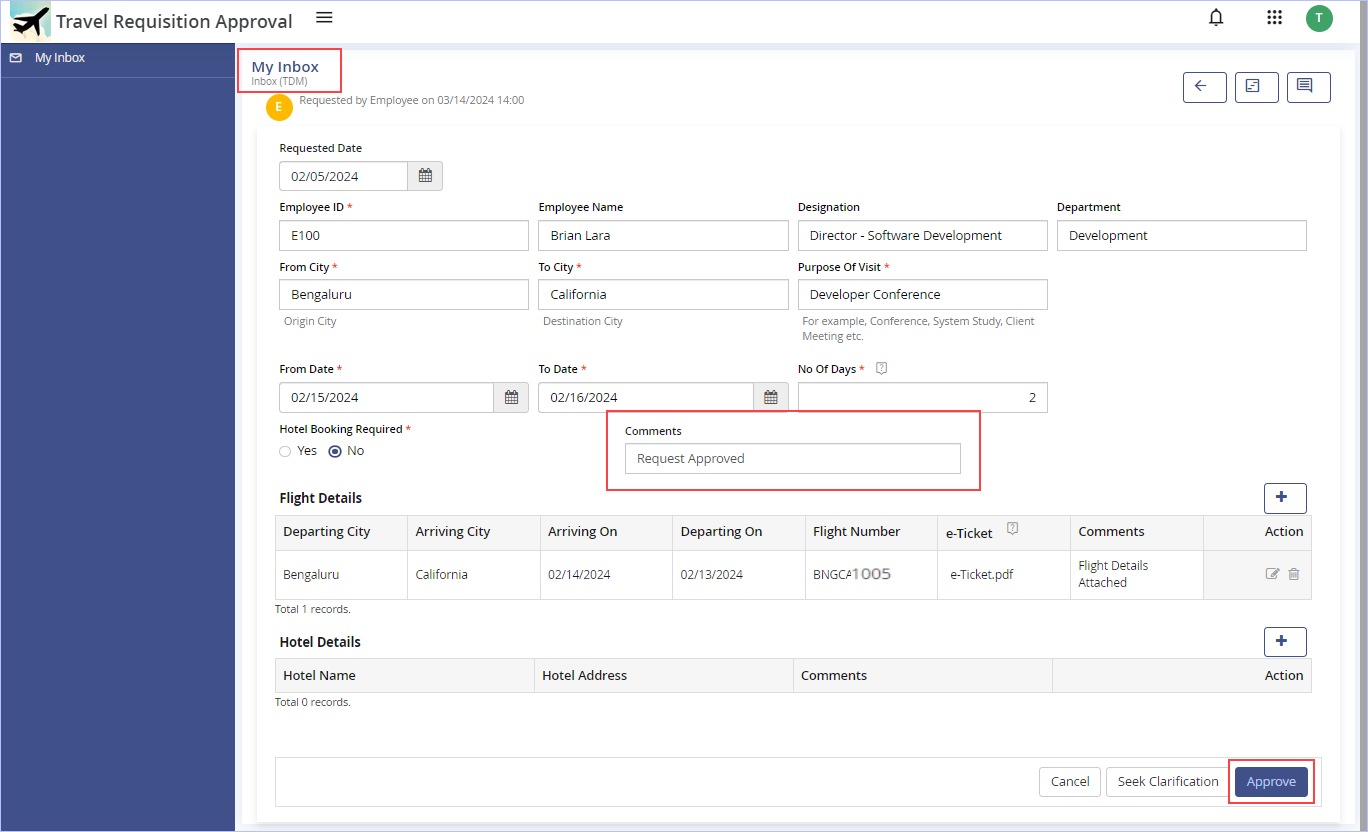
- Key in the appropriate comments in the Comments box & click Approve.
18. Immediately, ‘Success. Record submitted successfully’ message appears. Click OK. The following page appears.
Notice the status of the record is still in ‘Pending’ state since it has been routed to the last level (Employee) to act/acknowledge on it as per its process workflow.
19. Click View to view the record details.
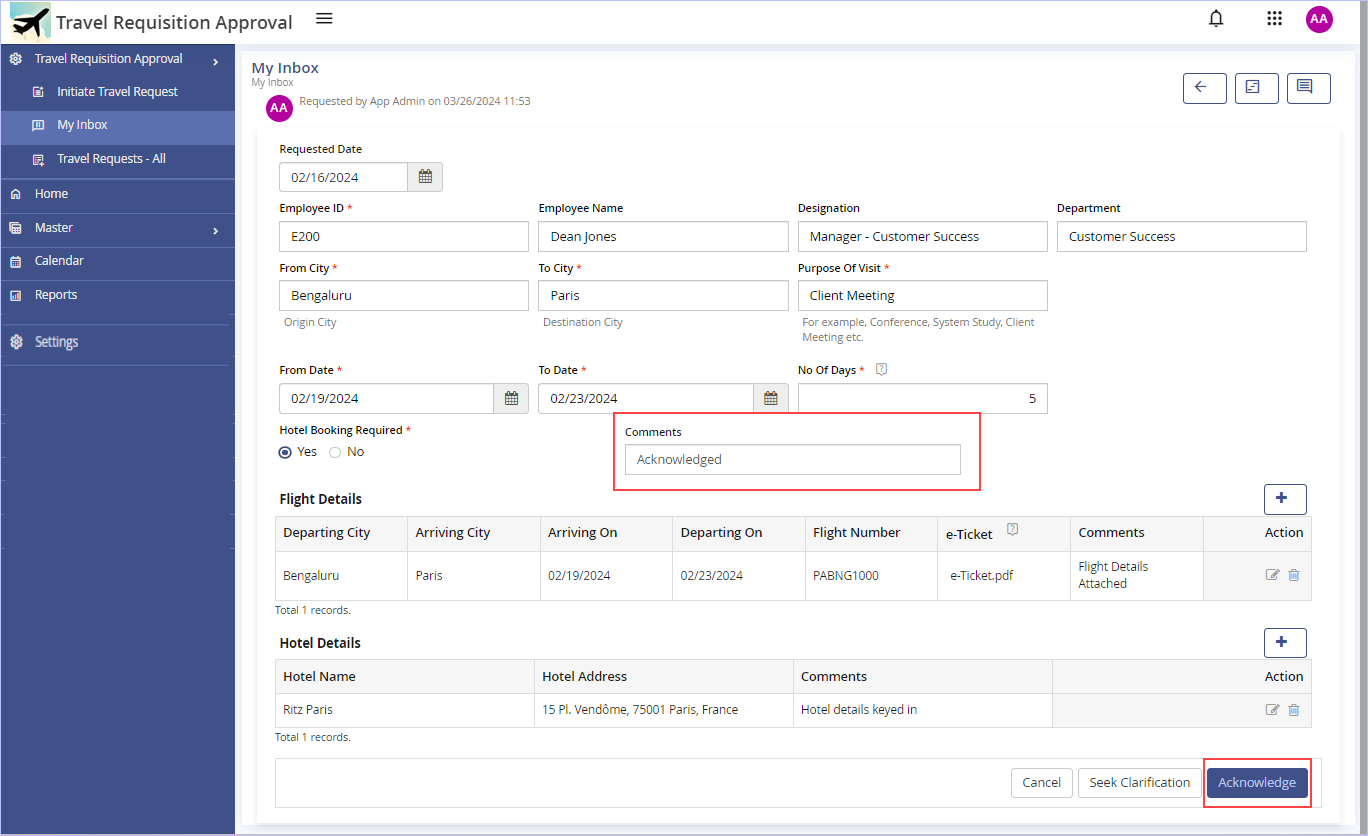
20. Key in the appropriate comments in the Comments box & click Acknowledge. Else, click Seek Clarification to route the record back to the Travel Desk Manager to seek clarification on the travel details, if any before acknowledgment.
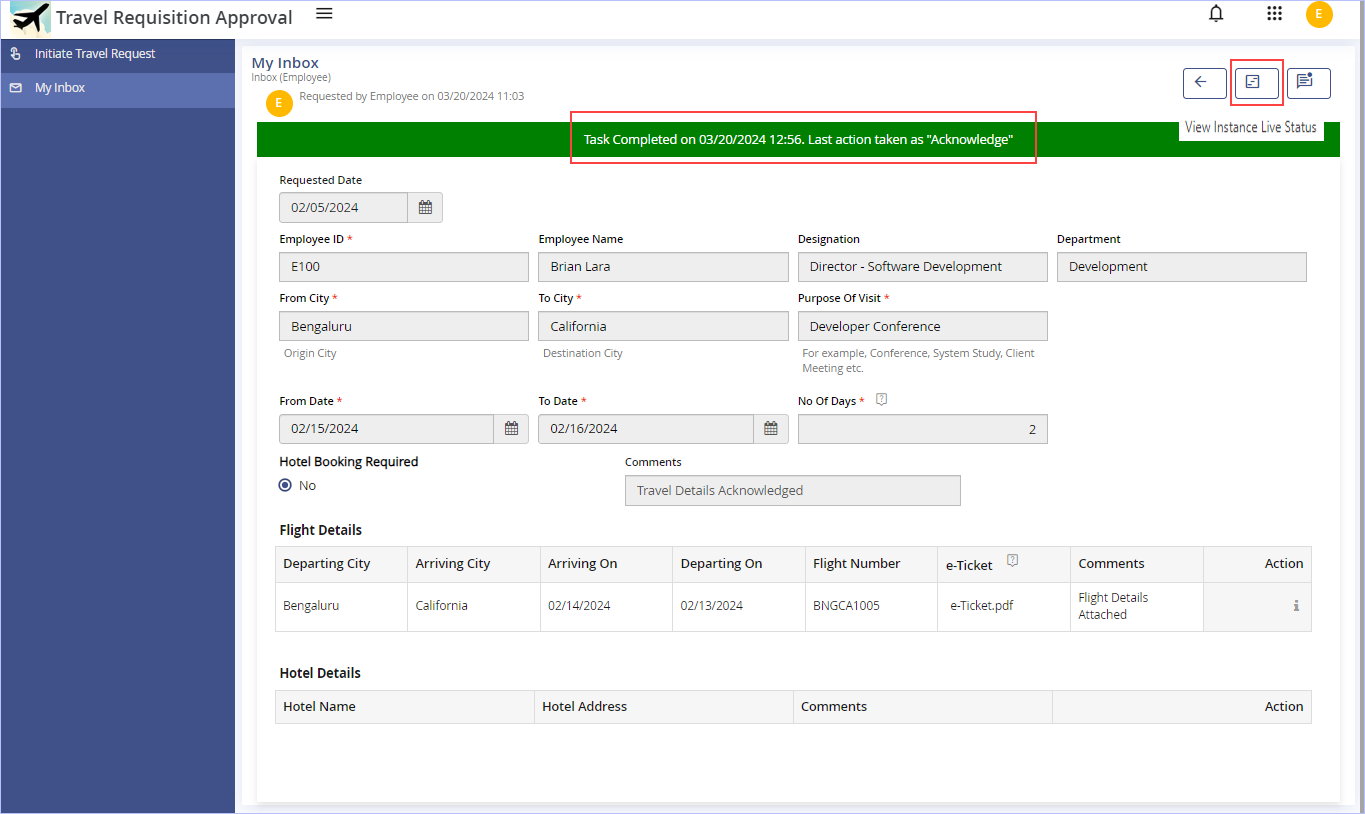
21. Immediately, ‘Success. Record submitted successfully’ message appears. Click OK. The following page appears.
- Notice that the status of the record is changed to ‘Completed’ since all the associated activities have been completed as per the process flow defined.
- Click View to view (read-only) the ‘Completed’ task record details/Last Action Taken on the Task record if you wish to.

- Click the
 icon to view the selected record (read-only) of the Flight Details/Hotel Details if you wish to.
 - Click the
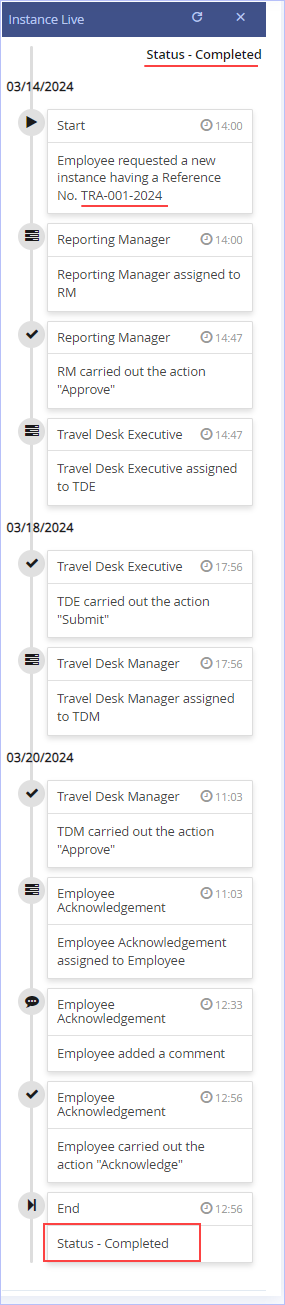
 icon (View Instance Live Status) to view the app instance real time status - Instance Live as shown.
 - Click the
 icon to refresh the task live status display.
 - Click the
 icon to navigate back to Inbox.

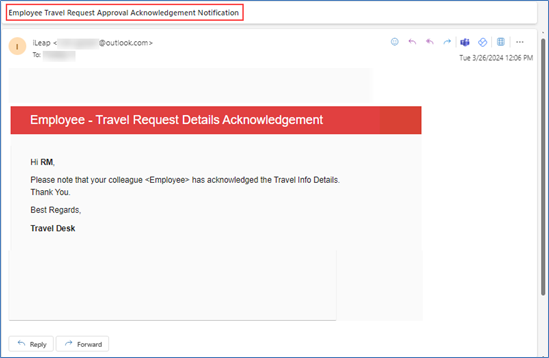
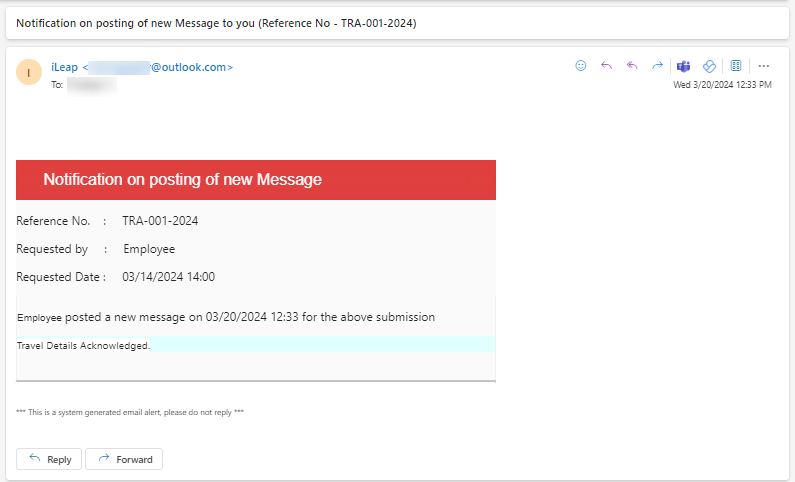
Here is the sample e-mail (auto generated) that would be immediately sent to Employee’s Reporting Manager (RM) post Employee Acknowledgement as per our designed sample ‘Travel Request Approval’ process workflow.
| Previous | Back to Contents | Next |
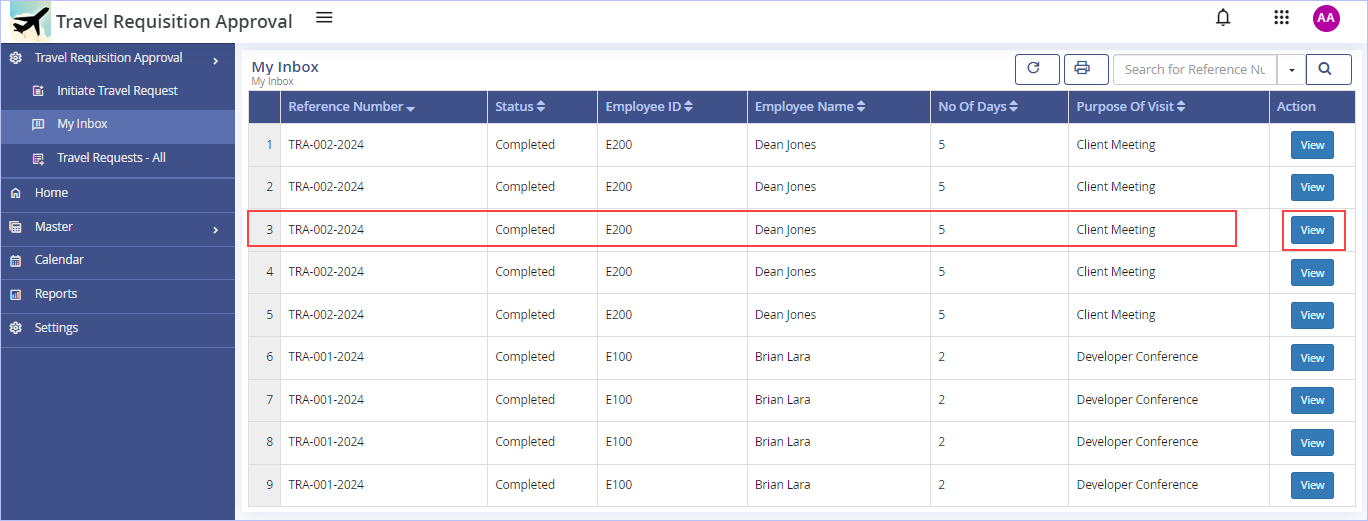
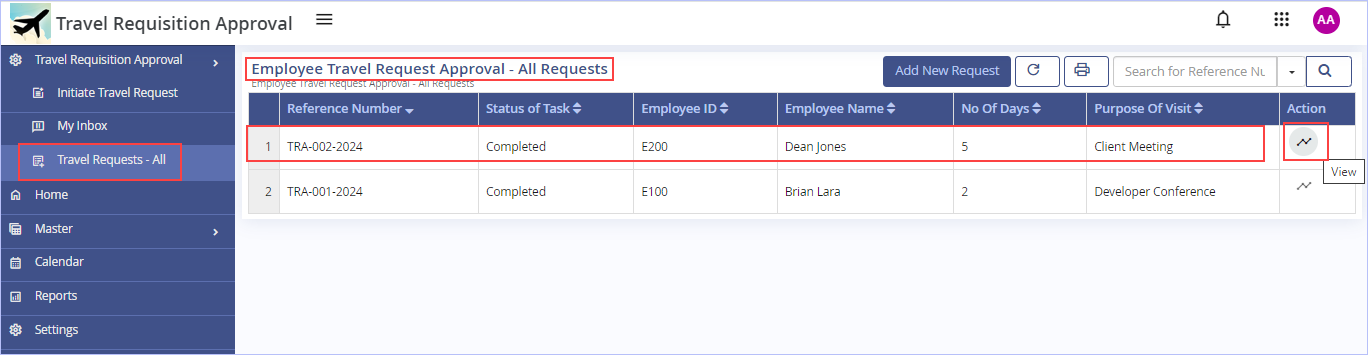
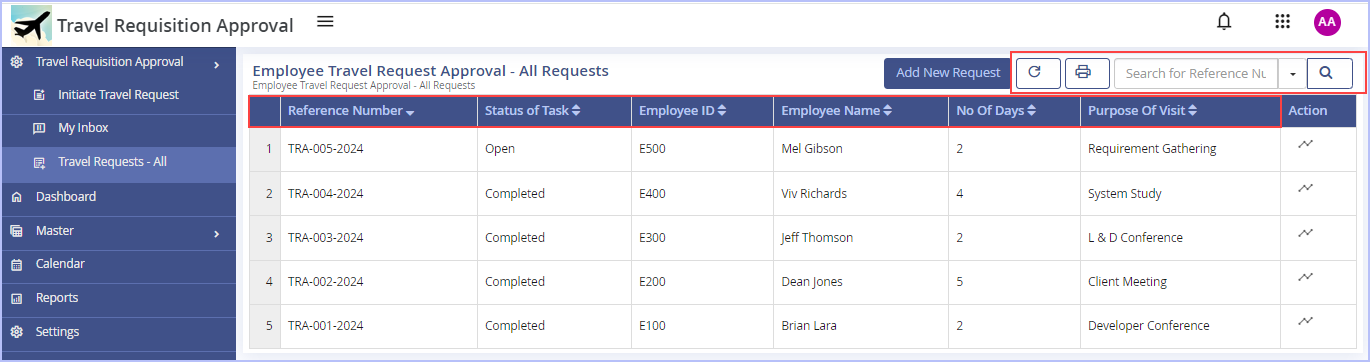
Viewing All Travel Requests – With Their Complete Timeline
| To view all travel requests along with their timeline of the sample app, follow these steps: |
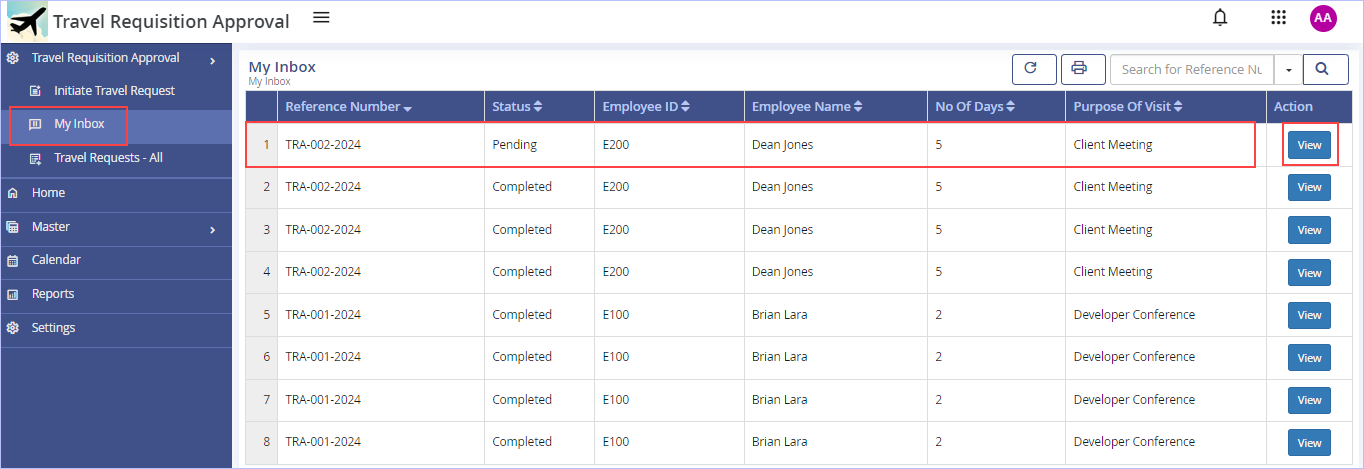
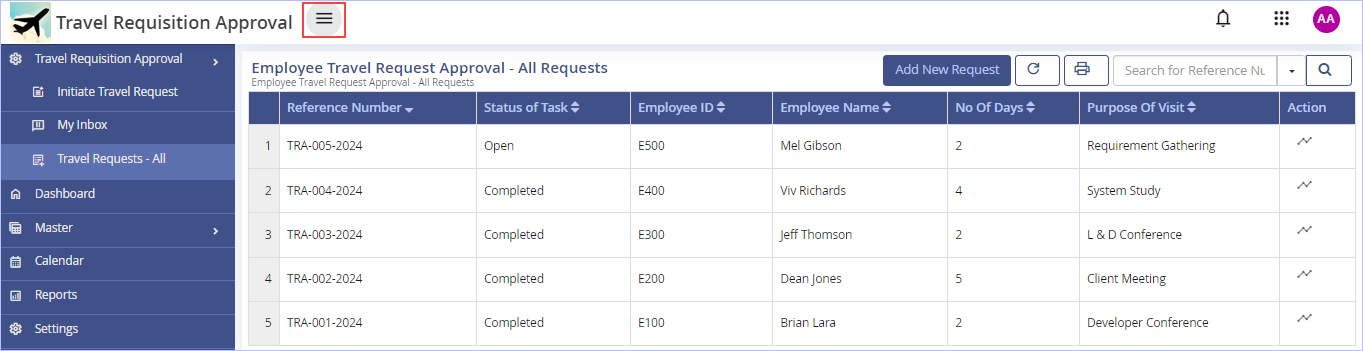
1. On the left pane, click Travel Requests – All. The following page appears.
2. On the highlighted record, click View. The following page appears showing the complete status timeline details (Instance report) of our sample ‘Travel Requisition Approval’ app (for Reference Number TRA-002-2024).
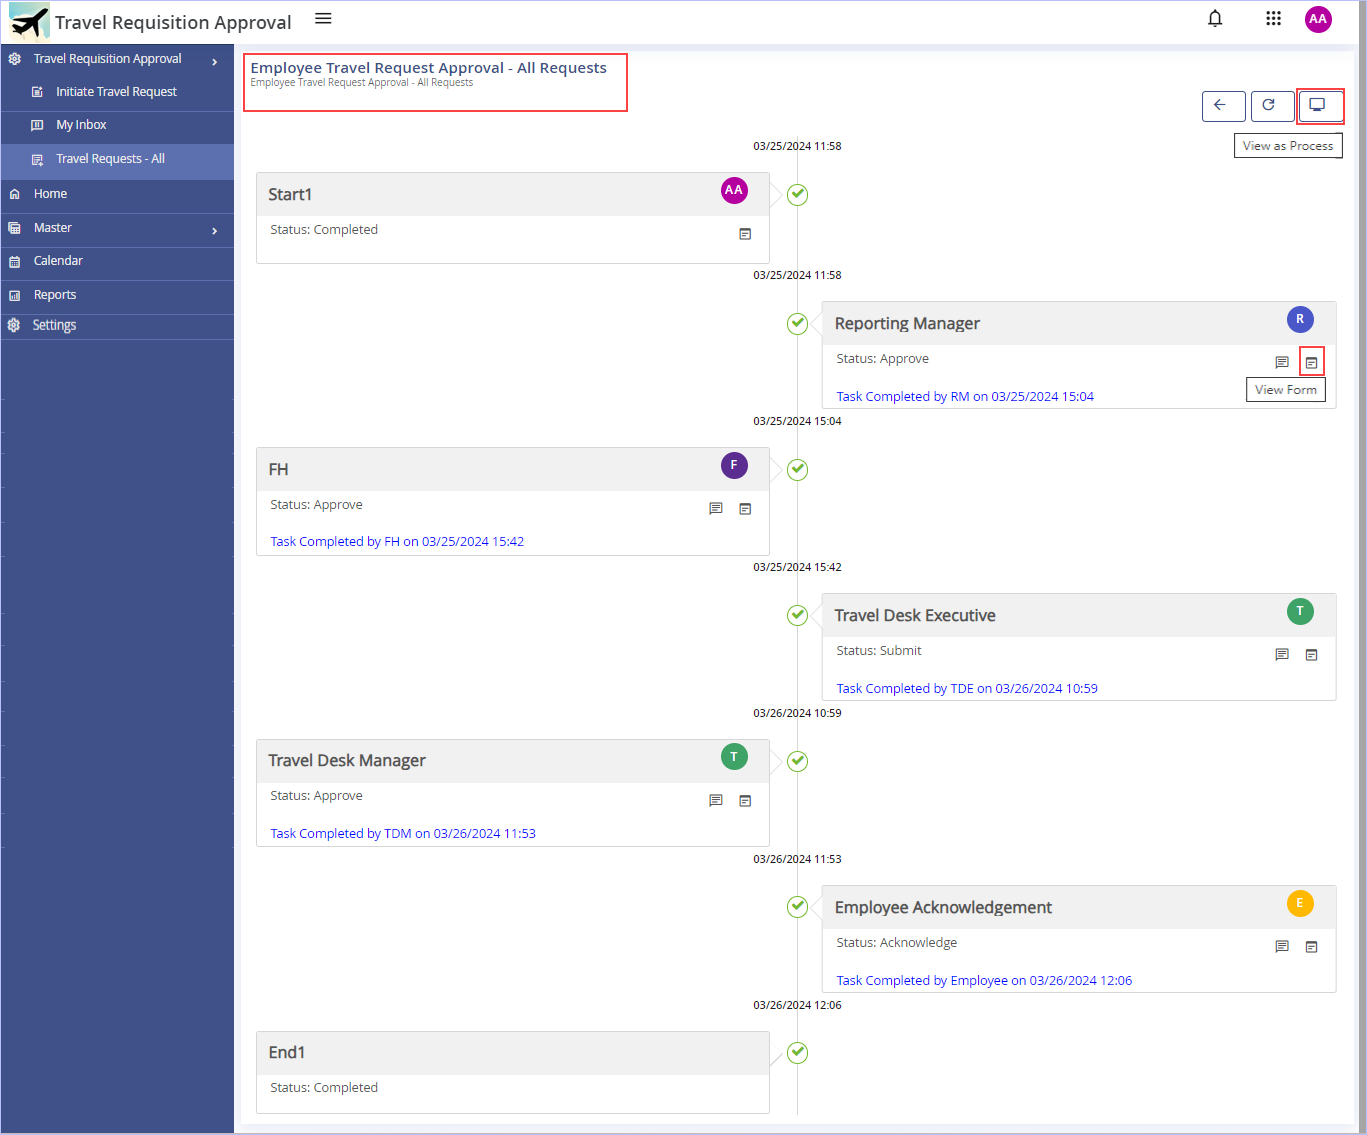
- Click the
 icon to view the corresponding form (read-only) as shown.
- On the Status Timeline page, click the
 icon to view the comments associated if any for the task. The
  icon denotes the comments available for the task.
| Previous | Back to Contents | Next |
Viewing Details of any Process Instance (Process Diagram) – Business Activity Monitor (BAM)
1. On the Status Timeline page, click the ![]() (View as Process) icon to view the displayed timeline as a Process. The following page appears.
(View as Process) icon to view the displayed timeline as a Process. The following page appears.
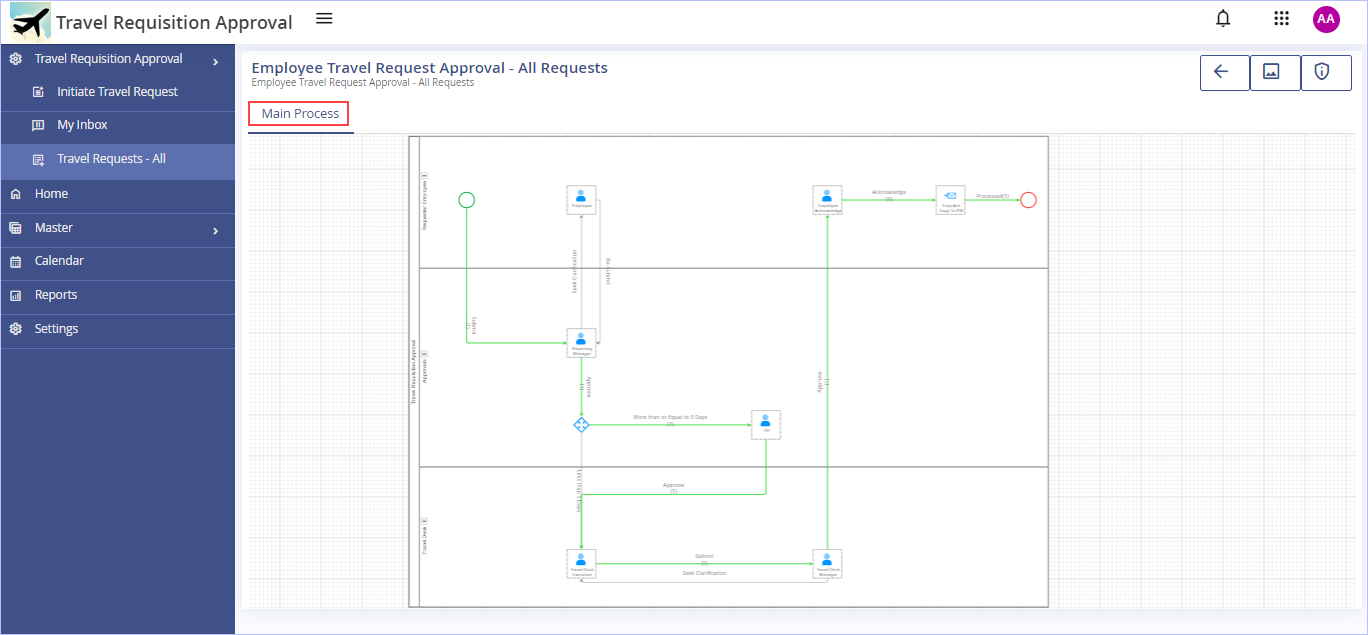
Notice that the progress path of the process is indicated by green colored lines.
Please note that the ![]() (View as Process) icon is displayed only if the Access to BAM check box is selected on the Properties tab while configuring the Page type My Request List (Travel Requests – All menu in our sample app).
(View as Process) icon is displayed only if the Access to BAM check box is selected on the Properties tab while configuring the Page type My Request List (Travel Requests – All menu in our sample app).
2. Click an activity in the Process diagram to view details of its current status on the details panel that appears on the right. You can view the generic activity details along with its attribute details (list of attributes updated in the current activity). The User Assignments tab is shown only if the selected activity is of type 'Human Task' in the details panel.
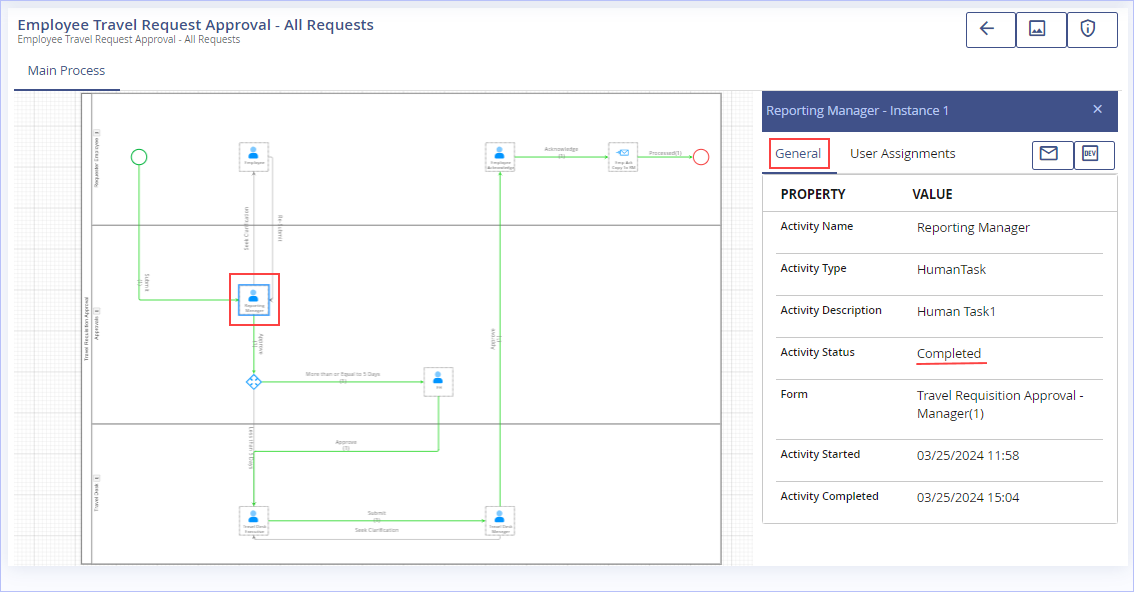
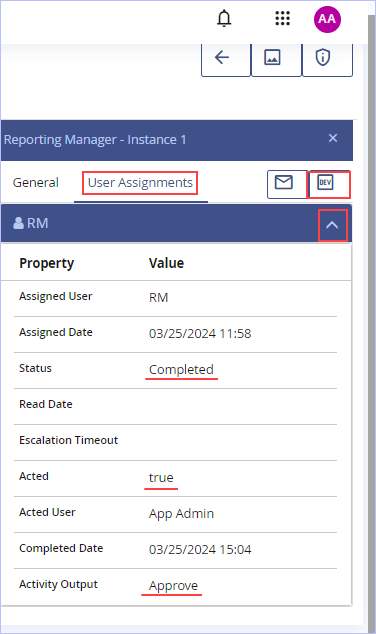
3. Click the User Assignments tab to view the user assignment details as shown.
|
Please note that if the Status is still ‘Open/Pending’ state, you can even act on the task directly in the User Assignments tab. Click the icon |
4. In the above user assignment details panel, click the ![]() icon (View Attribute Details) to view the list of attributes updated in the current activity as shown.
icon (View Attribute Details) to view the list of attributes updated in the current activity as shown.
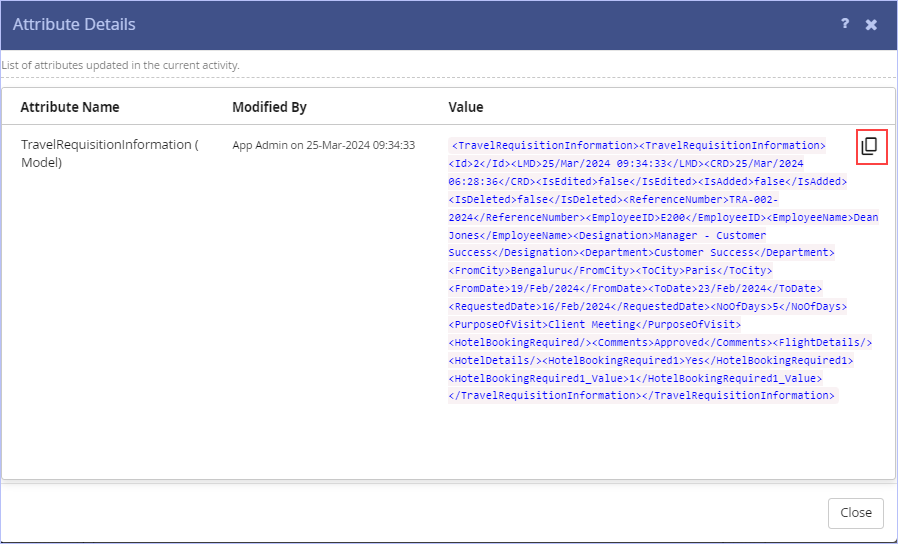
- Click the
 icon to (copy the Attribute Value) copied to the clipboard.
 - Click Close.
On the Status Timeline page, click the ![]() icon (Refresh) to refresh the instance report successfully.
icon (Refresh) to refresh the instance report successfully.
| Previous
<< Viewing All Travel Requests – With Their Complete Timeline |
Back to Contents | Next |
Exporting the Process Diagram
| iLeap allows you to export the Status Timeline (Process Diagram) to JPEG or PNG formats. |
1. On the Status Timeline page, click the ![]() (Export as) icon. The Export as dialog box appears.
(Export as) icon. The Export as dialog box appears.
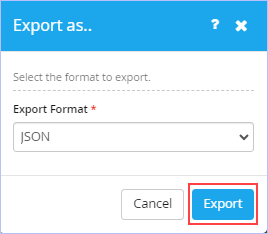
2. Select the format to which you wish to export the Process Diagram to from the Export Format drop-down list. The available options are: JPEG & PNG.
3. Click Export. The exported Process diagram can be found in your system’s Downloads folder having the Reference Number as its filename (for example, TRA-002-2024.png).
| Previous | Back to Contents | Next |
Viewing the Log Details for a Current Instance
- On the Status Timeline page, click the
 (View Log) icon to view the log details for the current instance on the Log Details dialog box. (The log details information appears only for the 'failed' instances of the process selected).
| Previous | Back to Contents | Next |
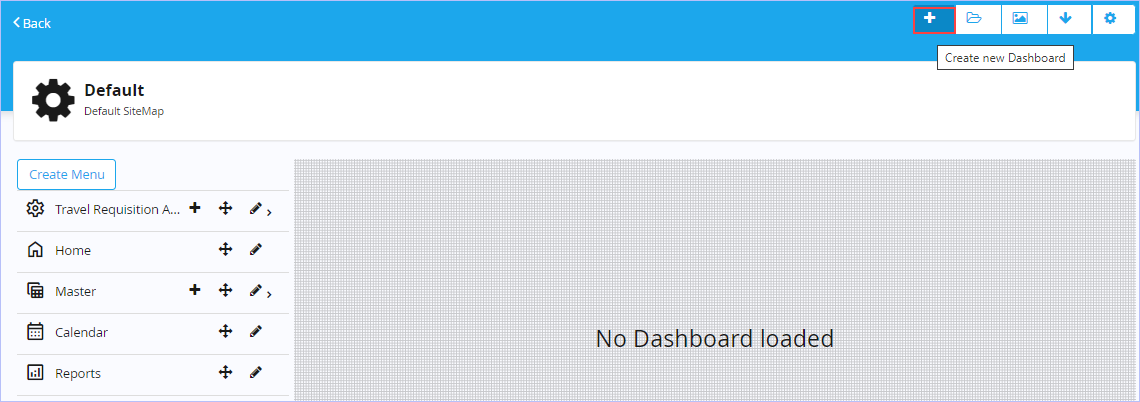
Toolbar Options (Sitemap):
| To | Action | |
| Create new Dashboard | Click
|
|
| Open Dashboard | Click
|
|
| Save Dashboard | Click
|
|
| Export Sitemap (Export as)
[To JSON format] |
Click
|
|
| Import Sitemap | Click
|
|
| Set Dashboard Properties | Click
|
|
| Add Widgets to Dashboard | Click |
|
| Clear Designer | Click
|
|
| Previous | Back to Contents | Next |
Dashboard - Overview
|
iLeap Platform offers a highly useful & visually appealing Dashboard interface that integrates data from various sources & provides a unified display of relevant & in-context information at all times. The Dashboard presents you a quick snapshot of business-critical information related to your processes through a single window. It houses multiple widgets of your choice that are crucial to your processes & needs to be accessed, monitored & controlled easily. You can customize your Dashboard as you wish by adding/arranging widgets which include categories like charts, pages, and tiles instantly with a simple drag & drop operation. You can resize the widgets on your Dashboard & create layouts of your choice for easy access & visual appeal. |
Creating a new Dashboard
| To create a New Dashboard, follow these steps: |
1. On the Default Sitemap’s toolbar, click the Create new Dashboard icon to create a new dashboard.
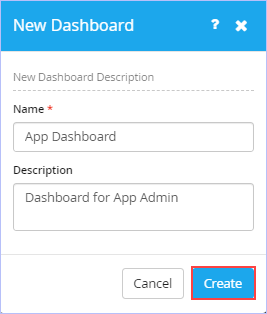
2. The New Dashboard dialog box appears.
![]()
- Key in the name of the new dashboard you wish to create in the mandatory Dashboard Name box. (For example, App Dashboard)
- Key in the appropriate description in the Description box.
- Click Create.
| Previous | Back to Contents | Next |
Once the new Dashboard is created, you must add widgets to it.
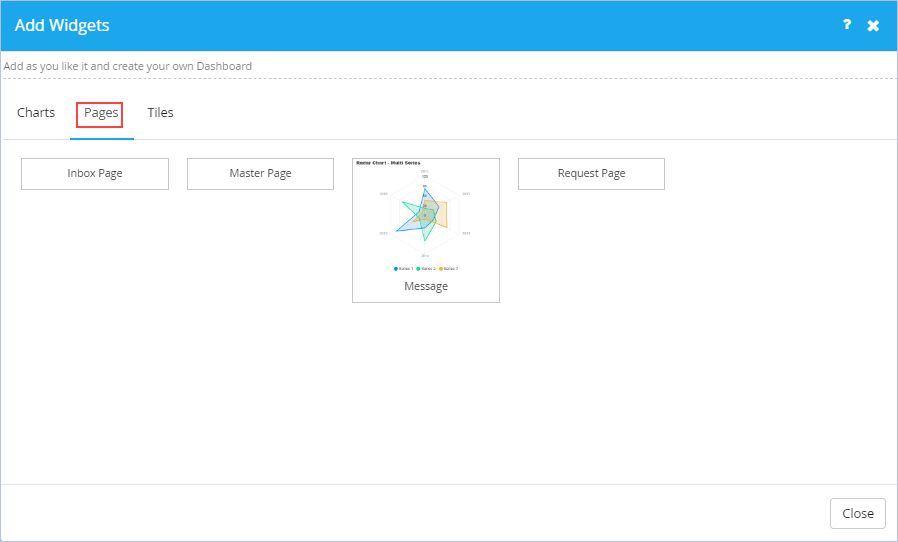
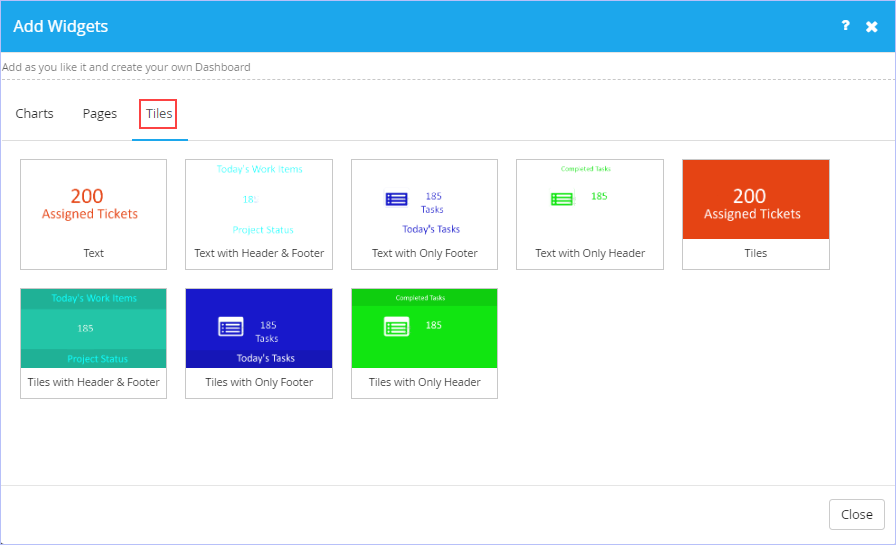
Adding Widgets to a Dashboard
| iLeap Platform allows you add many useful widgets to your Dashboard. You can completely customize your Dashboard as you wish by simply adding widgets that are categorized involving Charts, Pages, and Tiles. In addition, you can resize, arrange, delete & change background color of any widget on the dashboard as you wish. |
| To add widgets to a Dashboard, follow these steps: |
1. On the Default Sitemap’s toolbar, click the Add Widgets icon.

2. The Add Widgets dialog box appears.
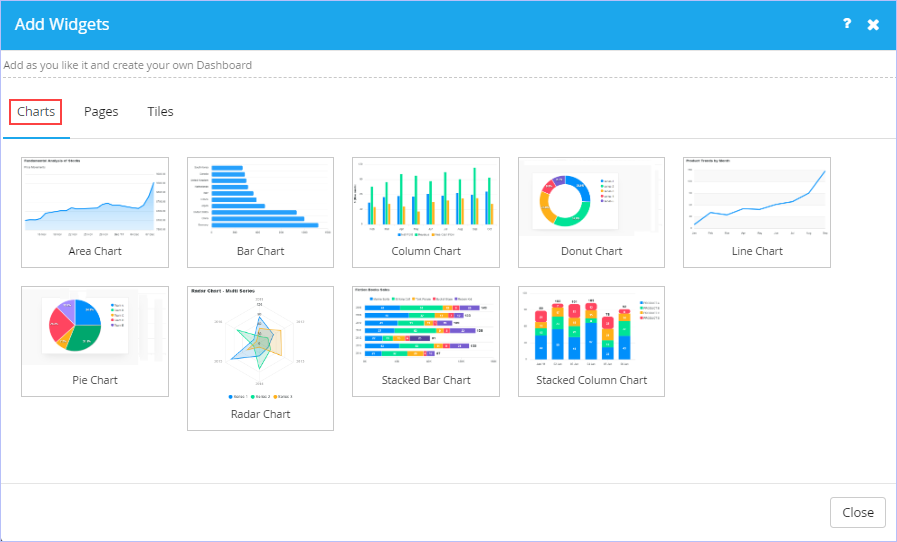
3. On the Charts tab, click any chart widget you wish to add to the Dashboard (for example, Bar Chart/Column Chart). Immediately, ‘Success! Widget added to designer area successfully’ message appears.
4. Similarly, you can select any of the widgets available on the Pages & Tiles tabs respectively to add to your Dashboard as you wish.
5. Click Close. Notice that the selected widgets are added instantly to the Dashboard. Once added, you can arrange the widgets on Dashboard as you like.
6. Click the Save icon on the toolbar to Save your Dashboard. Else, click the Clear Designer icon to clear all the widgets on your Dashboard & start adding widgets afresh.
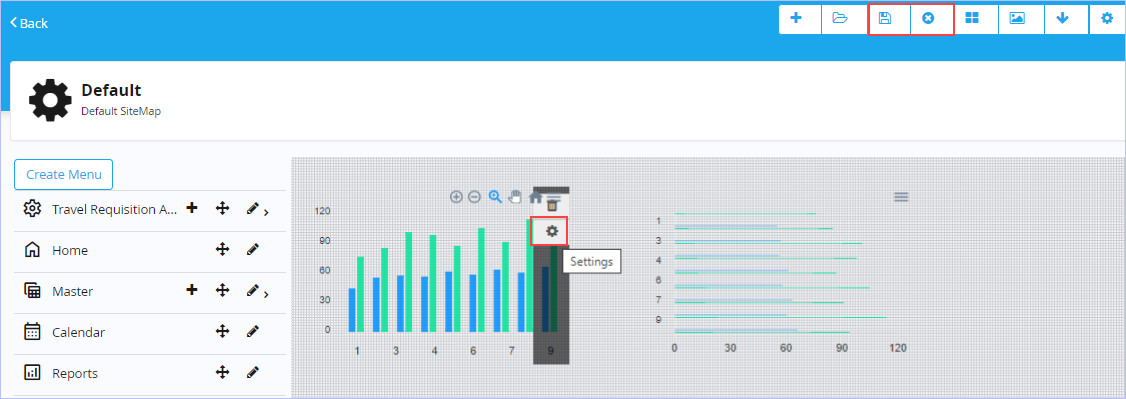
Widgets added to the Dashboard need to be configured. When you hover the mouse pointer over any widget, a shortcut menu appears displaying the options such as Settings, Delete Widget & a Menu allowing you to download the widget in SVG, PNG & CSV formats as well.
| Previous | Back to Contents | Next |
Configuring a Widget’s properties
| To set/configure a Widget’s properties, follow these steps: |
1. Hover the mouse pointer over the Widget you wish to configure & click Settings. The Properties dialog box appears. For example, Column Chart.
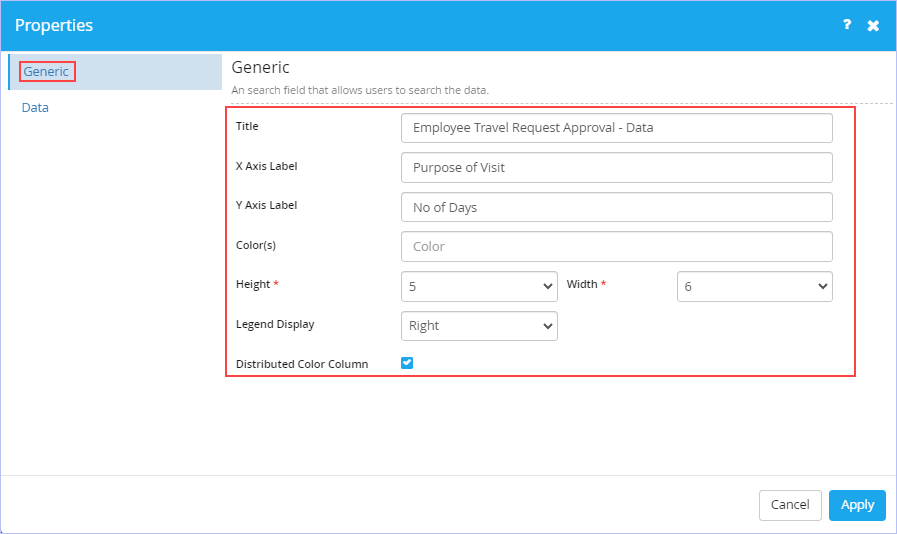
- On the Generic tab, key in all the requisite fields as shown.
- On the Data tab, set all the requisite fields to define the data source in the Execution, Parameter, & Result tabs as shown.
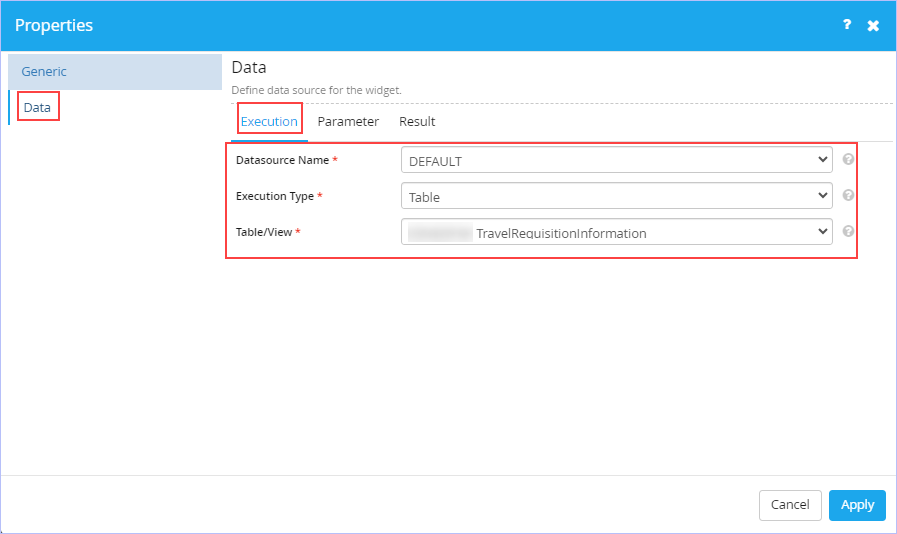
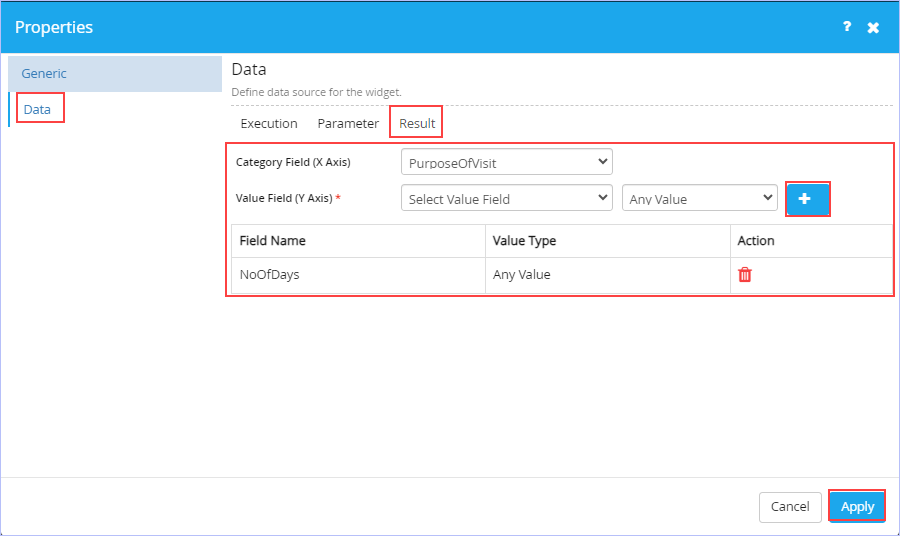
2. Click Apply to apply the changes made.
Similarly, configure/set the properties for the Bar Chart Widget as well. The steps are similar to the one illustrated for the Column Chart above and hence not repeated.
|
|
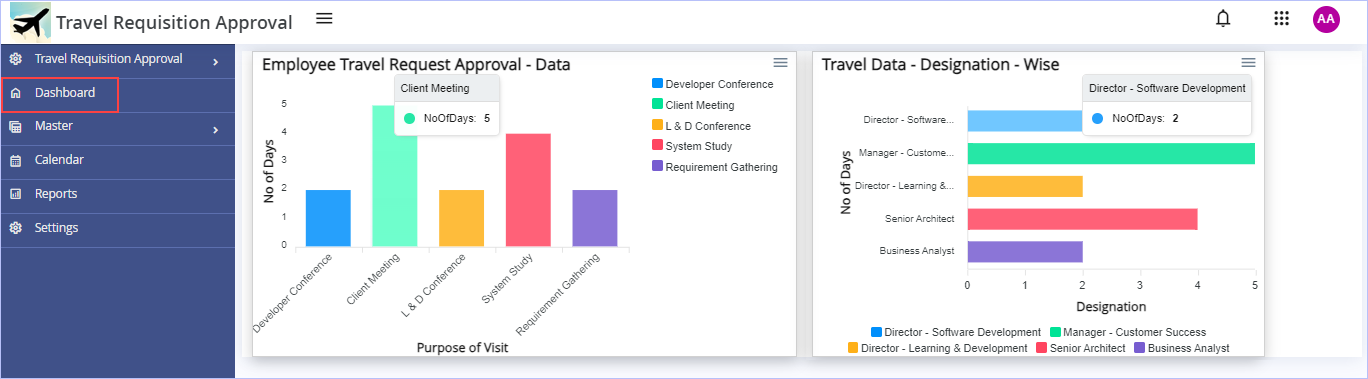
A Sample Dashboard configured with Bar Chart & Column Chart Display for End User (at run-time) is shown below.
| Previous | Back to Contents | Next |
Setting Dashboard Properties
| iLeap offers few default app layouts and themes that can be set for your Dashboard if you wish to. |
| To set or configure the properties of your Dashboard, follow these steps: |
1. On the Default Sitemap’s toolbar, click the ![]() icon. The Dashboard Properties dialog box appears.
icon. The Dashboard Properties dialog box appears.
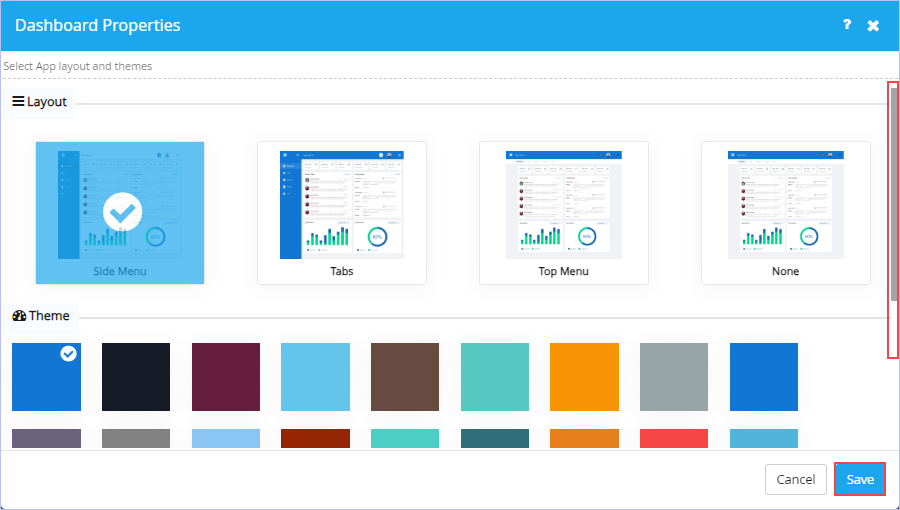
2. Notice the layout and theme options available. Click to select any of the layout & theme you wish to.
3. Click Save.
Once you create a Dashboard, you need to associate or map it with the App Sitemap so that it can be made available to the end user.
| Previous | Back to Contents | Next |
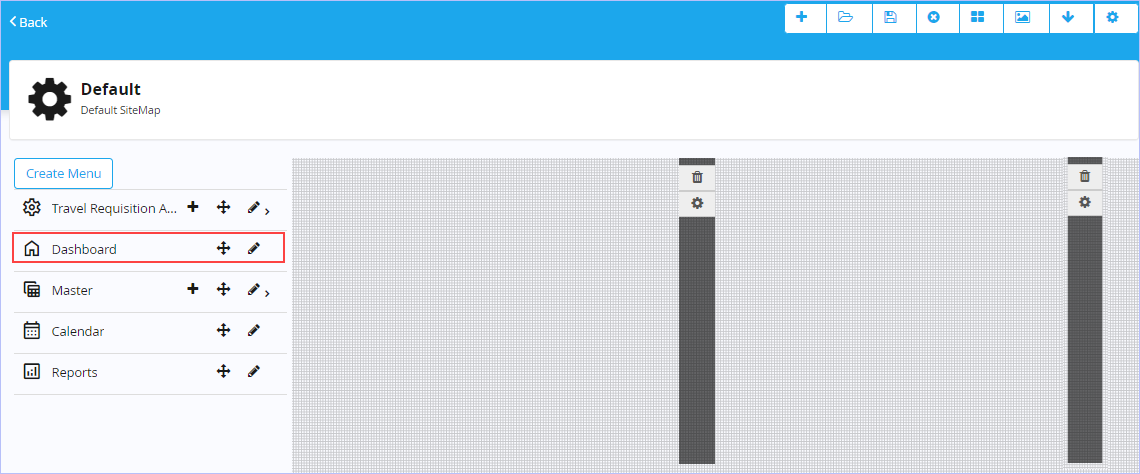
Configuring Home Menu of a Default Sitemap
| The Home menu on the Default Sitemap can be configured or mapped to represent an App’s Dashboard. You can also associate any new Dashboard to any new Sitemap as well. |
| To associate a Dashboard to the Default Sitemap of an App, follow these steps: |
1. Click the ![]() icon to edit the Home menu.
icon to edit the Home menu.

2. The Create Menu dialog box appears.
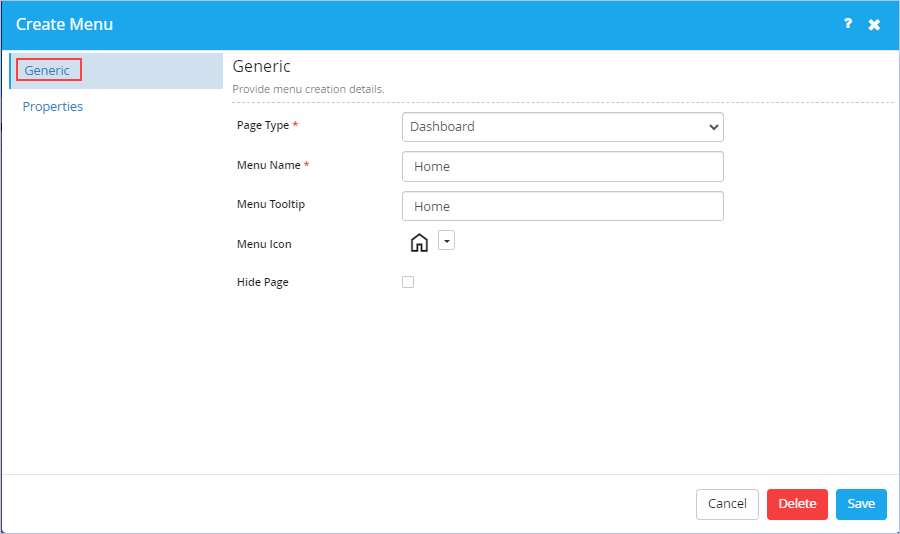
- On the Generic tab, notice that the page type Dashboard in Page Type drop-down list is selected by default. The available page type options are: Dashboard, Menu, Trigger Process, My Request List, My Request Draft List, My Calendar, Inbox List, Create Master Record, Master Record List, Report List, Report, URL Integration & Custom Html.
- Key in/modify the appropriate name of menu & its tooltip in their respective Menu Name & Menu Tooltip boxes if you wish to.
- Click the
 icon & select the menu icon you would wish to associate/change from the list of built-in icons displayed.
 - Key in/modify the appropriate name of the page & its description in their respective Page Name and Page Description boxes if you wish to.
- Select the Hide Page check box if you wish to as per requirements.
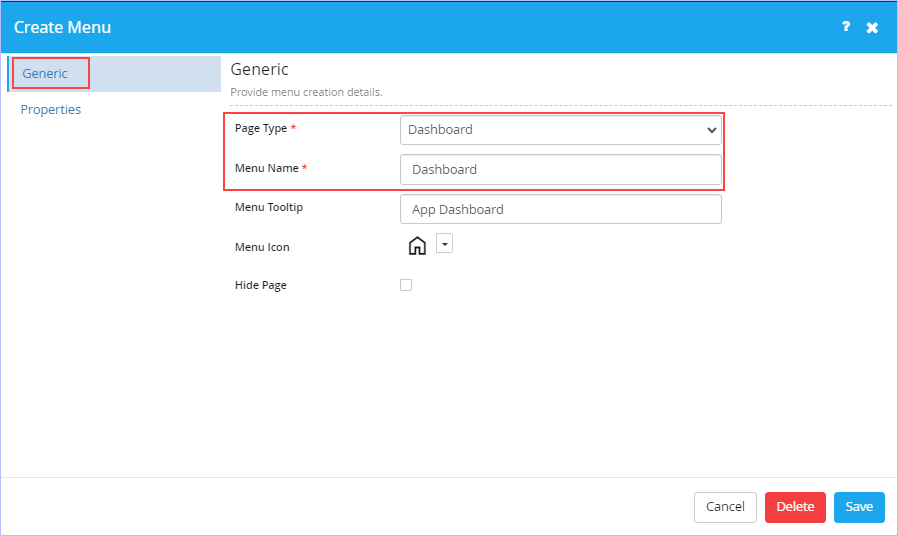
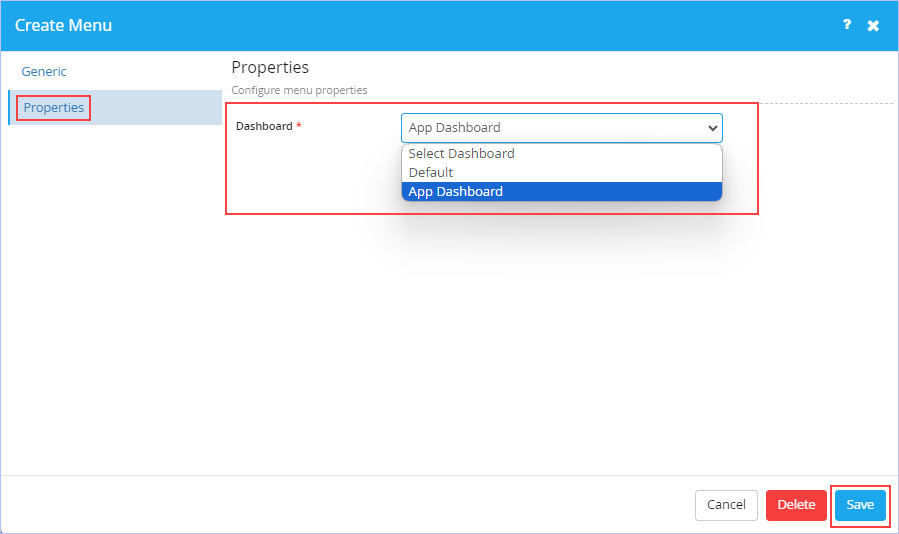
- On the Properties tab, select the Dashboard you wish to associate from the Dashboard drop-down list. See Creating a New Dashboard.
3. Click Save to save the changes. The following page appears. Notice the configured menu name.
4. Click Delete to delete the menu if you wish to.
![]()
5. On the Sitemap’s toolbar, click the ![]() icon to open the Dashboard you wish to associate. The Dashboards dialog box appears.
icon to open the Dashboard you wish to associate. The Dashboards dialog box appears.
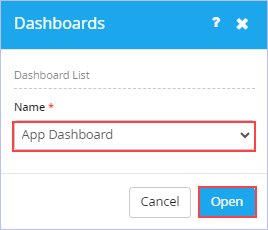
6. Select the name of the Dashboard you wish to from the Dashboard Name drop-down list. The available options are Default & App Dashboard.
7. Click Open. The following page appears with the widgets of the Dashboard selected in the Designer area.
Hover on the designer area to access the options to configure the widgets of the Dashboard. Notice that widgets are designed to appear to the end user at run-time (while accessing the Dashboard’s App). See Configuring any Widget’s Properties.
| Previous | Back to Contents | Next |
Configuring Reports Menu of a Default Sitemap
| The Reports menu on the default sitemap is pre-configured to the Report List page type by default. This setting allows you to display all the published App reports to an end user. |
| To configure the Reports menu of a default Sitemap of an App, follow these steps: |
1. Click the ![]() icon to edit the Reports menu.
icon to edit the Reports menu.

2. The Create Menu dialog box appears.

- On the Generic tab, notice that the page type Report List in Page Type drop-down list is selected by default. The available page type options are: Dashboard, Menu, Trigger Process, My Request List, My Request Draft List, My Calendar, Inbox List, Create Master Record, Master Record List, Report List, Report, URL Integration & Custom Html.
- Key in/modify the appropriate name of menu & its tooltip in their respective Menu Name & Menu Tooltip boxes if you wish to.
- Click the icon & select the menu icon you would wish to associate/change from the list of built-in icons displayed.
- Key in/modify the appropriate name of the page & its description in their respective Page Name and Page Description boxes if you wish to.
- Select the Hide Page check box if you wish to as per requirements.
- If you select Report as the Page Type from the Page Type drop-down list, immediately additional fields such as Page Name, Page Description appears. Notice the display of Properties tab as well.

- Navigate to the Properties tab. Select the specific report you wish to be made available to the end user from the Report drop-down list.
- Click Save to save the changes made.
- Click Delete to delete the menu if you wish to.

For more details, see Reports.
| Previous | Back to Contents | Next |
Exporting a Sitemap
| iLeap allows you to export any App’s Sitemap you wish to into a JSON format file. |
| To export an App’s Sitemap, follow these steps: |
1. On the Status Timeline page, click the ![]() (Export as) icon. The Export as dialog box appears.
(Export as) icon. The Export as dialog box appears.
2. Select JSON as the format from the Export Format drop-down list.
3. Click Export. The exported Sitemap can be found in your system’s Downloads folder having the
filename (default.json).
| Previous | Back to Contents | Next |
Importing a Sitemap
| iLeap allows you to import any App’s Sitemap you wish to. |
| To import an App’s Sitemap, follow these steps: |
1. On the Sitemap’s toolbar, click the ![]() icon to import the Sitemap.
icon to import the Sitemap.
2. Browse & select the JSON file (in .json format) from the location in which it is found on your system.
| Previous | Back to Contents | Next |
Configuring App Reference Number
| iLeap allows you to set a unique reference number or a sequence number as an identifier for each data record produced by your app. You can also set few formatting options on the way the reference number needs to be displayed. |
| To configure a unique reference number for your App, follow these steps: |
1. Open the App for which you wish to set a unique reference number. Click Settings. Alternatively, hover on the chosen App & click the![]() icon to navigate directly to its Settings area. The following page appears.
icon to navigate directly to its Settings area. The following page appears.

2. In the Configuration section, click Reference Number. The following page appears.
![]()
- Hover the mouse pointer over the Process name displayed and click the
 icon. The Reference Number dialog box appears.

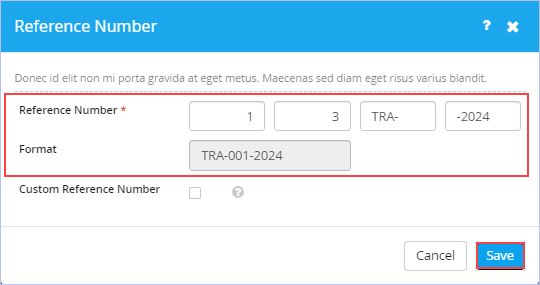
Key in the values in the Reference Number & Format (of the reference number) boxes as required.
- Key in a unique number you wish to in the Reference Number box. It represents the starting of the sequence number. You can provide a value to make the auto number start from either 100 or 1000 as you wish. However, the maximum allowed is 10 characters.
- Enter the number of Preceding zeros you wish your auto number to be displayed with. For example, 3.
- Enter a Prefix text you wish to have before the sequence number. For example, TRA-
- Enter a Postfix text you wish to have after the sequence number. For example, -2024. Observe that the Format field is unavailable to key in your input. It just displays the format of the starting reference number.
- Select the Custom Reference Number check box, if you wish to create your own custom reference number.
- Click Save to save the entries made.
For example, in the Process Flow Sequence Number having a format TRA-001-2024
- TRA- specifies the Prefix
- 00 specifies the sequence preceding your auto number 1 to the left (If you wish to pad your auto number to display in 3 digits as per example)
- 1 specifies the actual starting sequence number itself
- -2024 specifies the Postfix

| Previous | Back to Contents | Next |
Configuring App Access Privileges and Permissions
| iLeap allows you to configure the default privilege(s) or permission(s) defined in iLeap platform to access a particular App. You can set both the Developer as well as User Access privileges to provide access to the selected App, if you wish to. |
| To set or configure developer access privileges for the app, follow these steps: |
1. In the Access and Permission section, click Developer.

2. On the Developer Access dialog box, select the group so as to provide access for the app. Notice that a default group by name ‘Developer’ is displayed & available for selection.
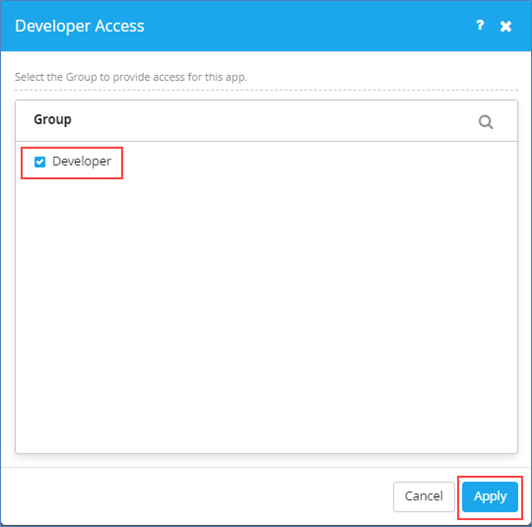
- Select the Developer check box.
3. Click Apply. Immediately, "Success! Privilege applied successfully" message appears.
|
|
| Previous | Back to Contents | Next |
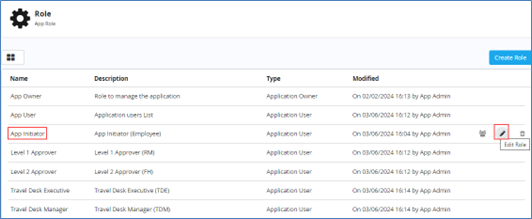
Managing App Roles
|
We need to create few new roles matching the actors of our sample example ‘Travel Requisition Approval’ App. The new App roles are: App Initiator (Employee), Level 1 Approver (RM), Level 2 Approver (FH), Travel Desk Executive (TDE) and Travel Desk Manager (TDM). These new roles must be associated with their respective Sitemaps as well. |
|
|
Adding a New App Role
| To create new App role, follow these steps: |
1. In the Access and Permission section, click User.

2. The following Role page appears.
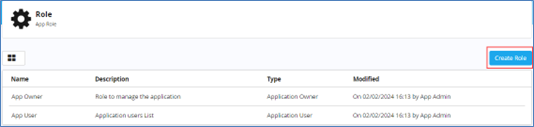
3. Click Create Role. The New Role dialog box appears.
![]()
- Key in the name of the role you wish to create in the Name box. For example, Employee.
- Key in an appropriate description for the role name in the Description box.
- Click the role type you would wish to assign to this role. Click User.
- Select the appropriate Sitemap you wish to associate for the role from the Sitemap drop-down list. The available options are: Default, App Initiator – Sitemap, Level 1 Approver – Sitemap, Level 2 Approver – Sitemap, Travel Desk Executive – Sitemap, & Travel Desk Manager – Sitemap. Select App Initiator – Sitemap.
- Select whom this role is reporting to from the Reporting To drop-down list. The available options are: App Owner & App User.

- Click Create. The following page appears.
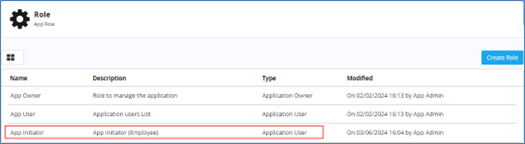
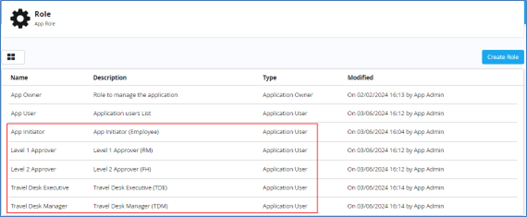
Similarly, you need to create the other requisite App roles (listed earlier) as well. Since the creation of other requisite App roles is very much similar to the one described above, it is not repeated again here.
Sample screenshot showing all the requisite App roles created.
|
|
| Previous | Back to Contents | Next |
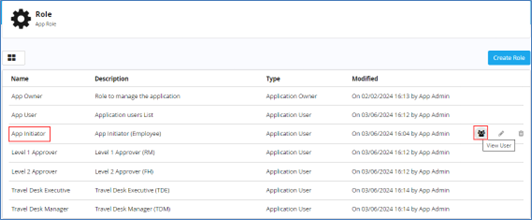
Adding Users to the App Role
| Now, we need to add the actors/users of our sample example ‘Travel Requisition Approval’ App to their respective App Roles that have been created. |
| To add/view users to their respective App User role, follow these steps: |
1. On the Role page, hover on the App User Role for which you would wish to add the user. Click the ![]() icon.
icon.
2. The Users page appears. Click Add User.

3. The Add User dialog box appears. Select the users you wish to add to the App User role by clicking the ![]() icon to select it (the icon changes to
icon to select it (the icon changes to ![]() icon on selection).
icon on selection).
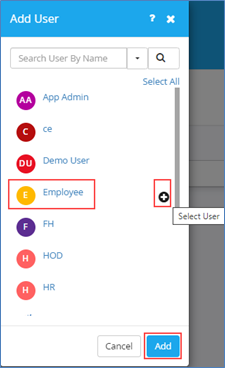
Notice that you can also quickly Search for the users & use the Select All option to select/deselect all the users displayed at once as well. Only users who have been created in the user source are displayed here.
- Click on any user to view its user details before adding if you wish to.
4. Click Add to add the selected user. The following page appears.

Similarly, add all the other users you wish to add to their respective app role & assign the user to their respective Sitemap too.
| RM user to be added to the Level 1 Approver Role, FH user to be added to the Level 2 Approver Role, TDE user to be added to Travel Desk Executive Role & TDM user to be added to the Travel Desk Manager Role. |
- You can also delete the role by clicking the
 icon on hovering your mouse over the role.
 - Notice that you can instantly search for the user name & retrieve the results on this page.
| Previous | Back to Contents | Next |
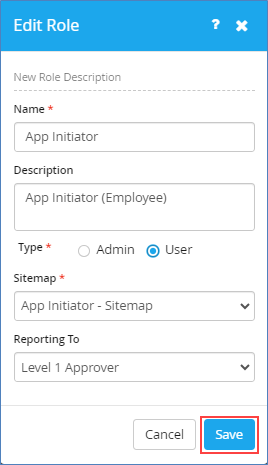
Editing an App Role
| To edit an App role, follow these steps: |
1. On the Role page, hover the mouse pointer on the App role you would wish to edit. Click the ![]() icon.
icon.
2. The Edit Role dialog box appears. Make the requisite modifications you wish to & click Save to save the changes made.
|
|
| Previous | Back to Contents | Next |
Clearing Data
| iLeap allows you to delete all the run-time data associated with the App. |
| To clear the run-time App data, follow these steps: |
1. Open the App whose run-time App data you wish to delete. Click Settings. Alternatively, hover on the chosen App (Recent Apps section) & click the![]() icon to navigate directly to its Settings area as shown.
icon to navigate directly to its Settings area as shown.
![]()
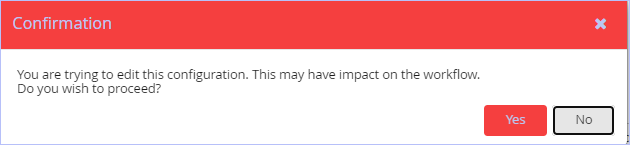
2. In the Clear Data section, click Clear. The following Confirmation dialog box appears.
![]()
3. Click Yes.
|
It is recommended to ensure that your app testing requirements are completed before you proceed further deleting your app run-time data. |
| Previous | Back to Contents | Next |
Accessing the App (End User - Role Based Login)
| Now that all the requisite App Sitemap configurations and other settings have been done for our sample ‘Travel Requisition Approval’ app, it is time to access this app as an end user. We will illustrate how this sample app is displayed to the end user as per their configured Sitemap when they login with their valid user credentials.
Please note that the Access This App button is visible to you (App developer), only if you have the end user access credentials. |
| To access the requisite app, follow these steps: |
1. Click to open the chosen App ( Recent Apps section) you wish to access. Click Settings.Alternatively, hover on the chosen App (Recent Apps section) & click the ![]() icon to navigate directly to its Settings area.
icon to navigate directly to its Settings area.
2. On the displayed iLeap developer interface page, click Access This App.
3. The following App page appears.
|
Please note that the above page is the default page displayed for the user named App Admin. However, we need to login separately with each, and every actor/user associated with our sample ‘Travel Requisition Approval’ App. Users would be accessing a separate end user App URL to login to the App with their app login credentials. Now, we will illustrate how the App appears to the respective end user based on their associated Sitemap when they successfully login. |
Employee (Requestor) login:
1. Login with Employee user credentials. On successful login, the following page appears.
2. On the left pane, click Initiate Travel Request and key in the requisite particulars of this trigger form & click Submit to submit the Travel Request as shown.
3. Immediately, the following dialog box appears. Click OK.
Notice the reference number displayed on this screen.
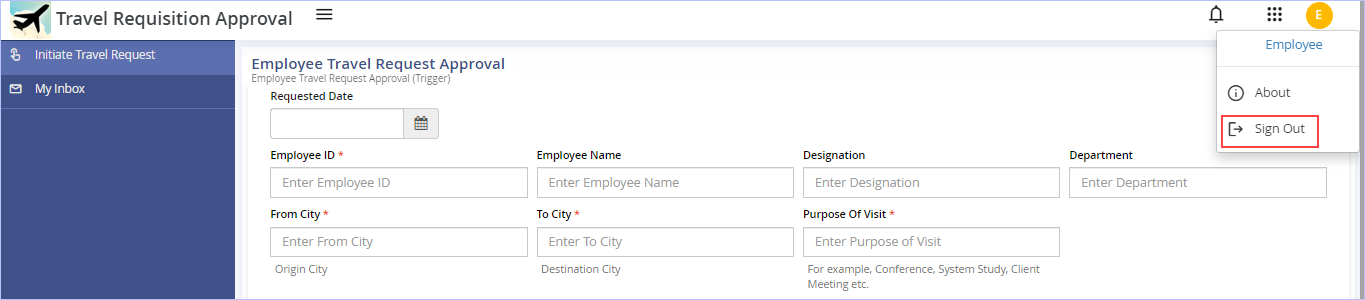
4. Click Sign Out to sign out of this user account page.
Level 1 Approver (RM) – login:
1. Login with Level 1 Approver (RM) user credentials. On successful login, the following page appears.

Notice the status of the record which is in ‘Pending’ state since it is yet to be acted upon.
2. Hover on the record displayed & click the ![]() icon (View Instance Status) under the Action column. The following page appears showing the selected record’s details.
icon (View Instance Status) under the Action column. The following page appears showing the selected record’s details.
3. Key in the appropriate comments in the Comments box & click Approve. Else, click Seek Clarification if you wish to.
4. Immediately, ‘Success. Record submitted successfully’ message appears. Click OK. The following page appears.

Notice the status of the record changing to ‘Completed’ state since it has been acted upon.
5. Click Sign Out to sign out of this user account page.

Travel Desk Executive (TDE) – login:
1. Login with Travel Desk Executive (TDE) user credentials. On successful login, the following page appears.

Notice the status of the record which is in ‘Pending’ state since it is yet to be acted upon.
2. Hover on the record displayed & click the ![]() icon (View Instance Status) under the Action column. The following page appears showing the selected record’s details.
icon (View Instance Status) under the Action column. The following page appears showing the selected record’s details.
![]()
3. In the Flight Details section, click the ![]() icon to add a new record. The Add New Record to Flight Details dialog box appears.
icon to add a new record. The Add New Record to Flight Details dialog box appears.
![]()
- Key in the requisite particulars and click Add to add a new record. Else, click Add and Add New to clear all the fields on this dialog box and add records afresh. This would be handy if you wish to add multiple records at once instead of one after another from this dialog box.
Notice that once you successfully upload the e-Ticket, two more options appear allowing you to download the e-Ticket as well as delete it too.
Notice that employee has not requested for hotel booking and hence the Hotel Details section has not been keyed in.
4. Click Submit.
5. Immediately, ‘Success. Record submitted successfully’ message appears. Click OK. The following page appears.

Notice the status of the record changing to ‘Completed’ state since it has been acted upon.
6. Click Sign Out to sign out of this user account page.

Travel Desk Manager (TDM) – login:
1. Login with Travel Desk Manager (TDM) user credentials. On successful login, the following page appears.

Notice the status of the record which is in ‘Pending’ state since it is yet to be acted upon.
2. Hover on the record displayed & click the ![]() icon (View Instance Status) under the Action column. The following page appears showing the selected record’s details.
icon (View Instance Status) under the Action column. The following page appears showing the selected record’s details.
Notice the display of all the fields routed from the Travel Desk Executive for Travel Desk Manager’s further review and approval.
- Review the submitted form, make the requisite modifications if any & key in the appropriate comments in the Comments box.
3. Click Approve. Else, click Seek Clarification to route the record back to the Travel Desk Executive to seek clarification before approval, if need be.
4. Immediately, ‘Success. Record submitted successfully’ message appears. Click OK. The following page appears.
Notice the status of the record changing to ‘Completed’ state since it has been acted upon.
5. Click Sign Out to sign out of this user account page.

Employee (Requestor) login:
Lastly, the employee has to acknowledge the travel details routed to complete the ‘Travel Requisition Approval’ cycle.
1. Login with Employee user credentials. On the left pane, click My Inbox.

Notice the status of the record which is in ‘Pending’ state since it is yet to be acted upon.
2. Hover on the record displayed & click the ![]() icon (View Instance Status) under the Action column. The following page appears showing the selected record’s details.
icon (View Instance Status) under the Action column. The following page appears showing the selected record’s details.
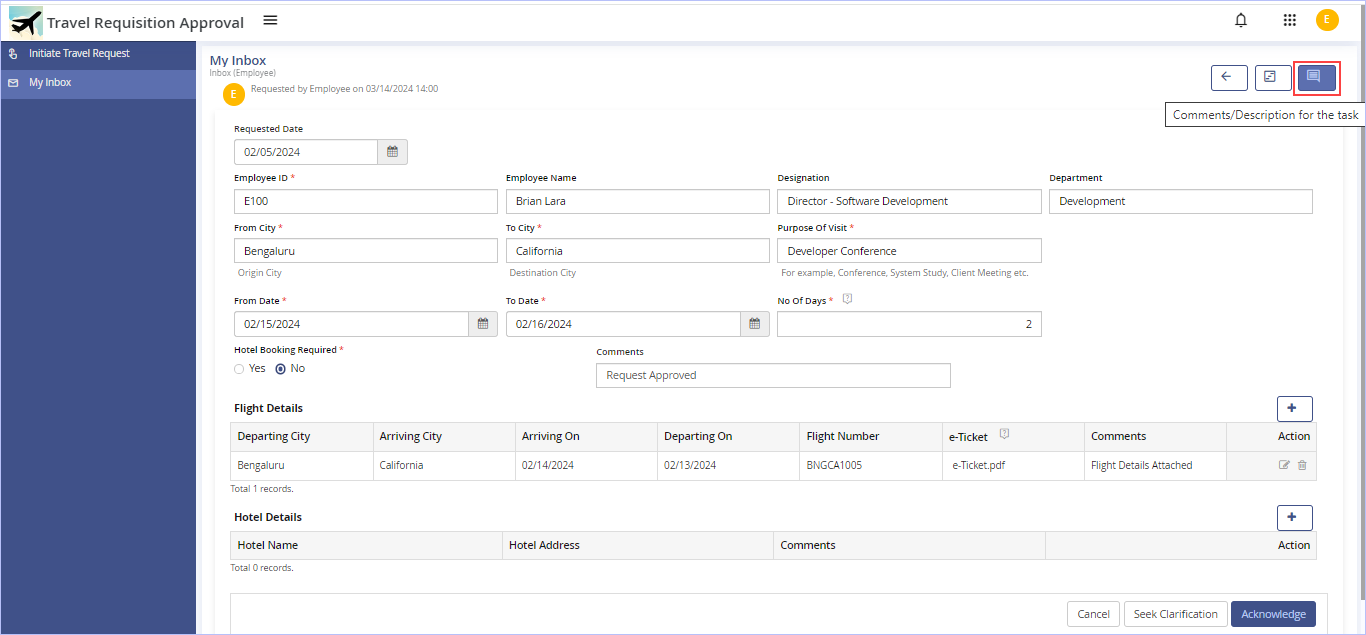
- Click the Comments/Description for the task to view any comments provided by the designated previous level approver(s)/user(s) of this task here.
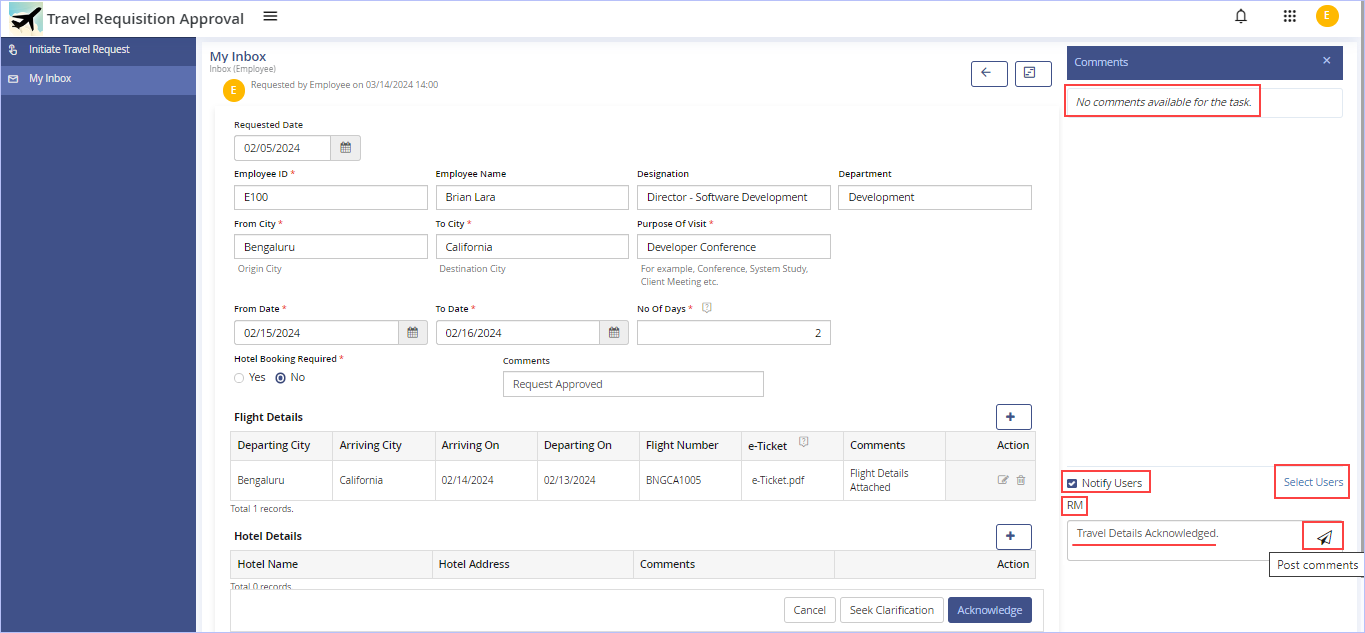
- You can also post your comments about the task assigned from here. In addition, you can send an email notification to the selected user about the comments posted.
Click Notify Users check box. Click Select Users link to display a pop-up list of users from which select the user(s) to whom you wish to send the email notification to (To Reporting Manager (RM) in this case). You can even search for the user you wish to select in the available search box.
Once the user is selected, the name of the selected user appears above the Comments box.
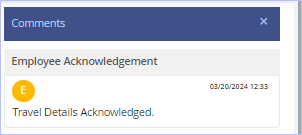
Enter your comments or description as appropriate in the box available & click the Post Comments to post your comments. The selected user gets an email notification on the comments you posted for the task. Immediately, notice the display of the posted comments.
Sample e-mail notification (auto generated) sent to the selected user (RM) is shown below.
- Review the form before acknowledging it, make the requisite modifications if any & key in the appropriate comments in the Comments box.
3. Click Acknowledge. Else, click Seek Clarification to route the record back to the Travel Desk Manager to seek clarification on the travel details, if any before acknowledgment.
4. Immediately, ‘Success. Record submitted successfully’ message appears. Click OK. The following page appears.

Notice the status of the record changing to ‘Completed’ state since it has been acted upon.
- Click the
 icon (View Instance Status) to view (read-only) the ‘Completed’ task record details/Last Action Taken on the Task record if you wish to.
- Click the
 icon (View Instance Live Status) to view the app instance real time status - Instance Live as shown.
 - Click the icon to refresh the task live status display.
- Click the icon to navigate back to Inbox.
Here is the sample e-mail (auto generated) that would be immediately sent to Employee’s Reporting Manager (RM) post Employee Acknowledgment as per our designed sample ‘Travel Request Approval’ process workflow.

| Previous | Back to Contents | Next |
Search, Print & Sort options
| iLeap allows you to effectively search, sort/re-order the display of the app records on the end-user app. These options appear as exactly as configured in the App’s Sitemap. |
Sample Screenshot:
- Click the
 icon next to the name of the column/record you wish to re-order.
Searching App records – Advanced Search
| iLeap allows you to do a basic search based on the reference number by default. However, you can quickly find app records you intend to search for using a combination of the search fields specifically as well. |
- To quickly search any App record specifically, you can select the search criteria involving App Record Status, Columns you have chosen to be searched for along with the Reference Number in their respective fields (as configured in the App’s Sitemap) & click Search.

Following screenshot shows the display of Searched App record with a specific App parameter ‘Reference Number’.

- Click the
 icon to print the display screen as it appears.
 - Click the icon to refresh the displayed page.
If the app records exceeds the number set per page (usually 10 records per page), you can make use of the pagination feature (displayed at the bottom of the page) to navigate between records easily.
- Click the
 icon to toggle or switch the sidebar to display their respective menu names as well.
Post toggle display:
| Previous | Back to Contents | Next |
Choosing an App as Favorite
| iLeap allows you to choose or designate your desired iLeap app as your primary or favourite app to log in to on your next app login. |
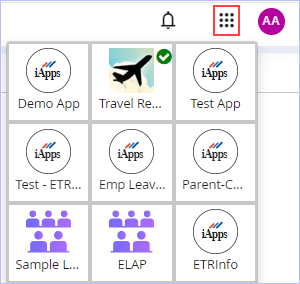
- Click the
 icon (iLeap apps) to view the other iLeap apps for which you have access privileges.
- Hover the mouse pointer over the app icon you wish to make it as your favourite & click the
 icon. Immediately, ‘Success! Favourite app updated successfully’ message appears. Notice the display of the tick-mark on your chosen favourite app.
 - Click on any app icon to directly navigate to that app’s default page.
| Previous | Back to Contents | Next |
Switching between other App Roles
| iLeap allows you to switch between your other defined App roles straight away. In addition, you can navigate to the logged in user’s profile page directly as well. Note that this feature is available only to users with App Administrator privileges. |
| To switch between your other App roles, follow these steps: |
1. Click the logged in user name icon. A shortcut menu appears as shown.
![]()
Notice the display of all the user roles created for our sample ‘Travel Requisition Approval’ app.
2. Click on any app user role you wish to switch to. You are navigated to that app user role’s page directly from which you may wish to act further.
- Click on the logged in user name link (App Admin) to navigate to its profile page directly as shown.
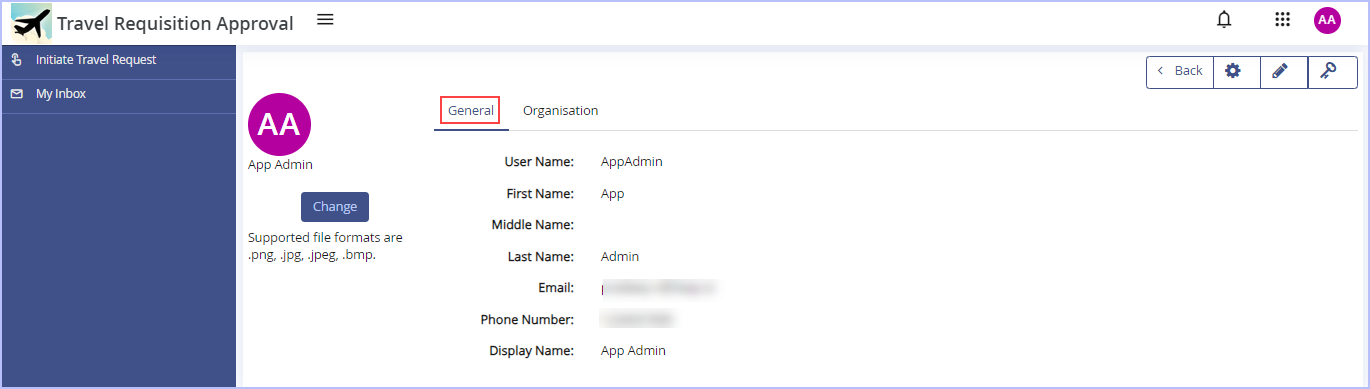
For more details, see Modifying Profile Information.
| Previous | Back to Contents | Next |
Managing Master Records
| You can add new master record(s) to any app you wish to. You can edit as well as delete them too. |
| To add a new master record to the requisite app, follow these steps: |
1. On the left pane, expand Master menu. Click CountryInfoMaster. The following page appears. Notice that it is the only master data model we created earlier for our sample ‘Travel Requisition Approval’ app.
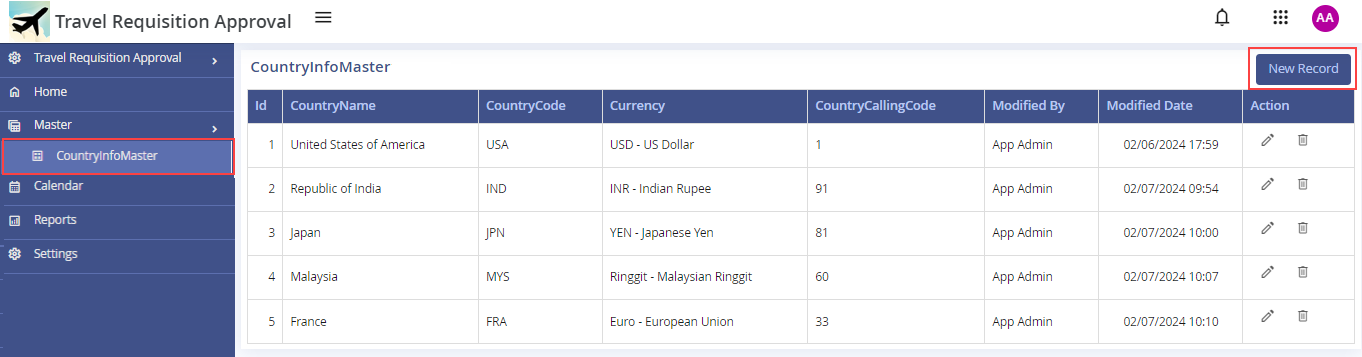
Observe that there already exists many records that were added earlier. See Entering Master Model Data.
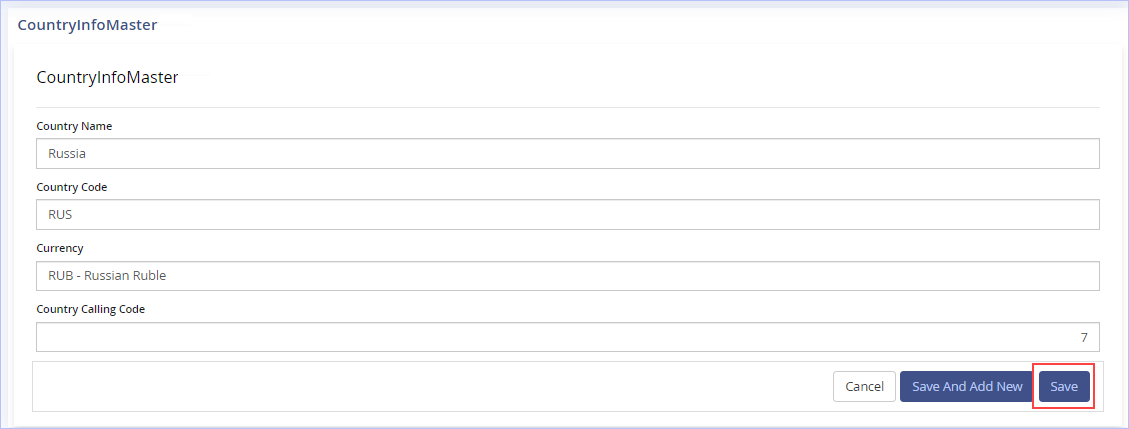
2. Click New Record to add a new master record entry.
![]()
- Enter the name of Country in the Country Name field.
- Enter the Country Code in the Country Code field.
- Enter the Currency of the Country in the Currency field.
- Enter the Calling Code of the Country in the Country Calling Code field.
- Click Save to save the entries made. Immediately, ‘Success. Record saved successfully’ message appears. Click OK. Else, Click Save And Add New to save the entries made and clear the fields in the dialog box to make additional new entries.
Notice the display of the new master record added.
- Click the
 icon to edit the record you wish to. Modify the changes in the Edit dialog box & click Save.
 - Click the
 icon to delete the record you wish to. Immediately, ‘Are you sure to delete this record’ confirmation message appears. Click Yes.
| Previous | Back to Contents | Next |
Settings - End User (App)
|
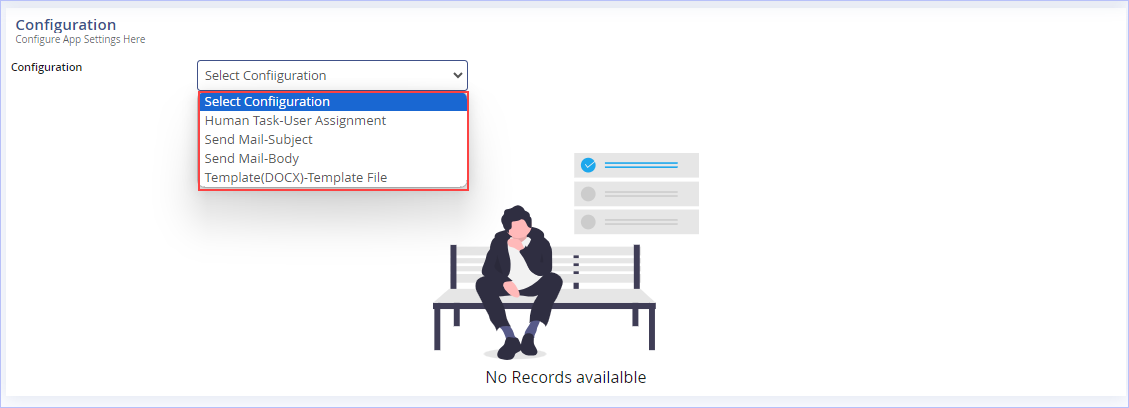
iLeap allows you to directly manage the configuration settings related to certain process components used in the application developed such as Human Task - User Assignment, Send Mail - Subject, Send Mail-Body, Template(DOCX) - Template File in addition to the reference number set as well as manage the roles defined for the app. Note that this feature is available only to users with App Administrator privileges. |
| To manage the configuration settings of the end user app, follow these steps: |
1. Access the App for which you wish to change the settings. The following page appears.
2. On the left pane, click Settings & then click Configuration. The following page appears.
3. Select the Configuration option you would wish to from the Configuration drop-down list. For example, Human Task-User Assignment.
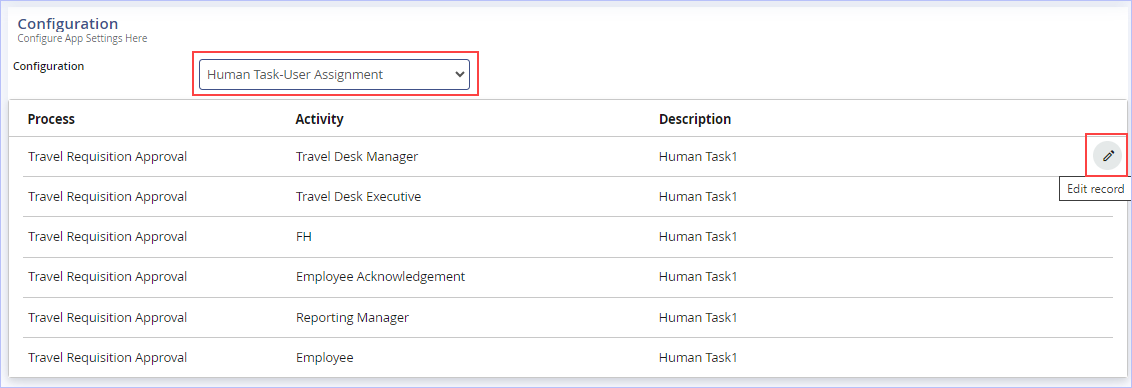
Notice the display of all the human task activities defined in our sample 'Travel Requisition Approval' app.
4. Hover the mouse cursor over any of the human task record you wish to edit as shown. The Edit Property dialog box appears.
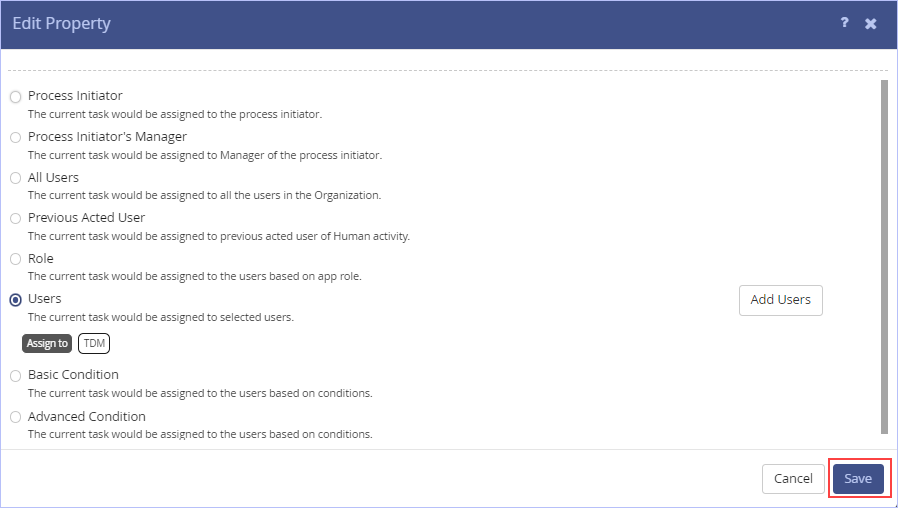
5. Make the requisite edits you wish to on this dialog box and click Save to save the changes. Immediately, the Confirmation dialog box appears prompting you for a response.
6. Click Yes. Immediately, ' Success! Property data saved successfully.' message appears reflecting the edits you have made.
|
The steps for the other configuration options such as Send Mail - Subject & Send Mail - Body & Template(DOCX) - Template File are very much similar to the one explained above and hence are not repeated again. |
Similarly, you can edit the reference number set for your app as well.
1. In the Configuration section, click Reference Number. Hover the mouse pointer over the record shown & click edit reference number as shown.

See Configuring App Reference Number for details.
2. Click Save.
Similarly, you can edit the roles defined for the app as well.
1. In the Access and Permission section, click User. The following page appears.
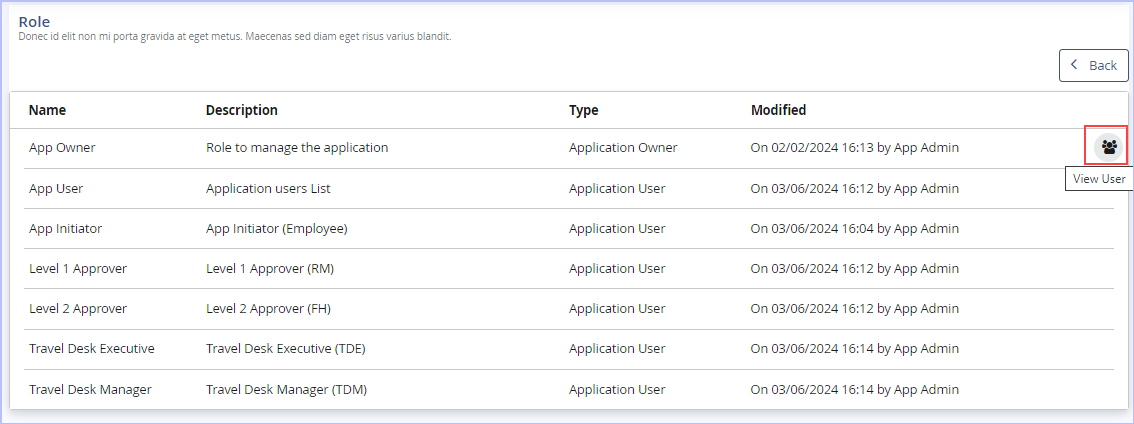
Notice the display of all roles we defined for our sample 'Travel Requisition Approval' app.
2. Hover the mouse cursor over any of the role record you wish to edit & click View User.
3. Make the requisite edits you wish to and click Save to save the changes.
See App Roles for details.
4. Click Back to navigate back to the Settings page.
| Previous | Back to Contents | Next |
Calendar - Overview
|
iLeap Platform's Calendar offers a comprehensive view of your schedule. It helps you stay organised & efficient by allowing you to assign/designate an alternate resource to manage your work even in your absence!, if need be. This in turn, avoids bottlenecks & unnecessary delays when you are not around on any given date & assists in smooth functioning of the assigned work. Through the Calendar, you can set the following for the end user:
|
Configuring Calendar Menu of a Default Sitemap
|
To configure Calendar Menu associated with a Default Sitemap, follow these steps: |
1. On the Default Sitemap of our Sample Travel Requisition Approval App, click the ![]() icon to edit the Calendar menu as shown.
icon to edit the Calendar menu as shown.

2. The Create Menu dialog box appears.

- On the Generic tab, notice that the page type My Calendar in Page Type drop-down list is selected by default. The available page type options are: Dashboard, Menu, Trigger Process, My Request List, My Request Draft List, My Calendar, Inbox List, Create Master Record, Master Record List, Report List, Report, URL Integration & Custom Html.
- Key in/modify the appropriate name of menu & its tooltip in their respective Menu Name & Menu Tooltip boxes if you wish to.
- Click the icon & select the menu icon you would wish to associate/change from the list of built-in icons displayed.
- Key in/modify the appropriate name of the page & its description in their respective Page Name and Page Description boxes if you wish to.
- Select the Hide Page check box if you wish to as per requirements.

- Navigate to the Properties tab. Notice that the check boxes Allow Leave Apply & Allow to assign Alternate User are already selected by default. Modify if you wish to as per your requirements.
-
Click Save to save the changes made.
- Click Delete to delete the menu if you wish to.

- The following page appears. Notice the configured Calendar Menu name.

To view Calendar on end user app, click Calendar - All Employees .

|
The Calendar displays your schedule for the current month (by default). This Month view also displays indicators for days on which you have applied for leave, days on which another person is assigned your tasks as a substitute, the day on which another resource person's tasks assigned to you etc. You can also switch to a Week view or Day view to look at data for a single week or day. The legends at the left of the page indicate different types of data represented in the Calendar. |
| Previous | Back to Contents | Next |
Calendar Settings - End User
|
The Calendar module allows you to view your current calendar & timezone. You can also manage your resources' calendar if you have the requisite privileges. With respect to your current location, you can also view your current shift timings assigned to you work & the list of holidays followed by your organization. Additionally, you can view the other location specific calendars you have followed in the past (from My Calendar History tab). |
Viewing Current Calendar and Timezone
|
To view your current calendar & timezone, follow these steps: |
1. On the toolbar (end user app), click the ![]() icon. The Calendar Setting dialog box appears.
icon. The Calendar Setting dialog box appears.

2. On the Current Calendar tab, your current calendar & its pre-set timezone is shown.
If you are a designated manager with resources reporting to you, you can manage your resource calendars as well.
- Select the name of the resource for whom you wish to manage calendar for from the Resource list.
- Select the name of the calendar you wish to configure for the selected resource from the User Calendar list. This list displays all the available calendars created by the system administrator at the Organisation level (via the Control Panel). The selected calendar's time-zone reflects accordingly.
- Click the
 icon to map/apply the selected calendar to the resource selected. On successful association, 'Success! Calendar associated successfully' message appears.

|
This feature comes in handy when your resource(s) change locations within your organization. You can pick & assign a calendar that matches their current location from here. Ensure that you have the requisite privilege to access the required calendar. |
3. Click the Shift tab to view the current shift timings assigned to you at work in your current location.

4. Click the Holidaytab to view the list of holidays followed by your organization in your current location.

5. Click the Historytab to view the history of other location specific calendars you have followed in the past, if any (As configured by your organisation's system administrator).

6. Click Close.
| Previous | Back to Contents | Next |
Applying Leave and keeping a track of Applied Leaves
|
To apply leave & keep a track of history of your applied leaves, follow these steps: |
1. On the toolbar(end user app), click the ![]() (Add Leave) icon. The Leaves dialog box appears.
(Add Leave) icon. The Leaves dialog box appears.

2. On the Apply Leave tab,
- Select the start date & end date of your leave in the respective calendars displayed along with From & To lists.
- Enter an appropriate reason for your leave in the Reason box.
- Click Apply. Immediately, 'Success! Resource Leave details saved successfully' message appears.

3. Click the Leave History tab to view the history of your past applied leaves.

| Previous | Back to Contents | Next |
Assigning an Alternate Resource
|
To assign an alternate resource person as a substitute to manage your role on a given date, follow these steps: |
1. On the toolbar (end user app), click the ![]() icon to add an alternate resource. The Alternate Resource dialog box appears.
icon to add an alternate resource. The Alternate Resource dialog box appears.
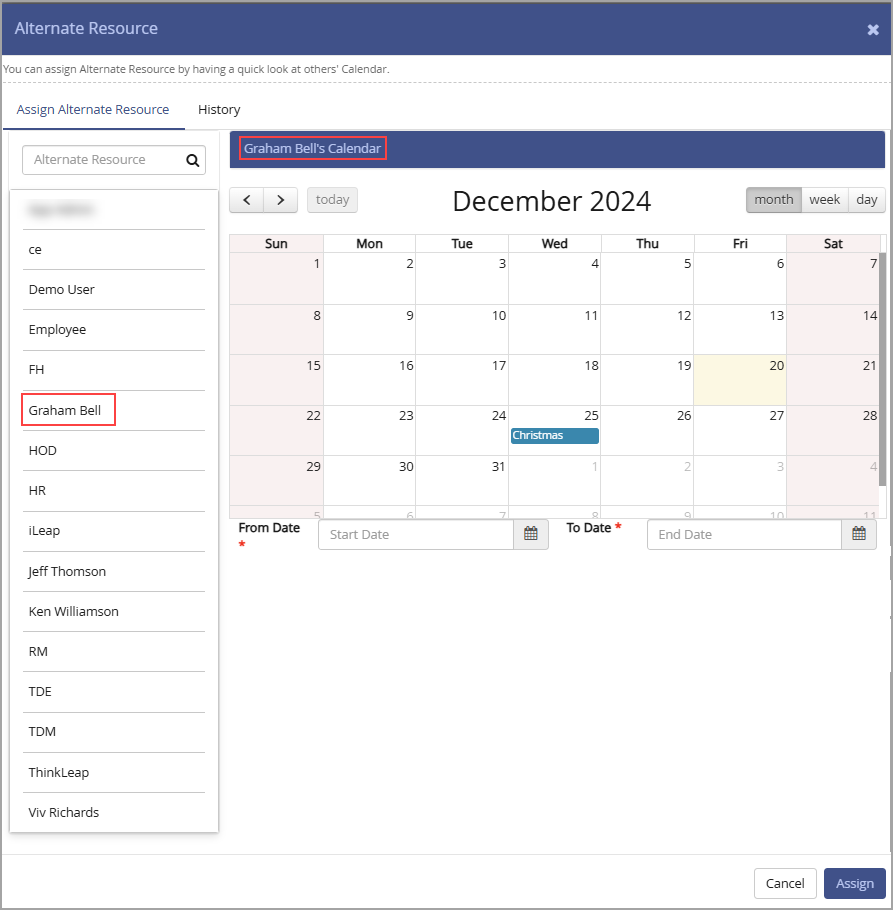
In our example, you (for example, user 'Graham Bell') are on leave on 30th of current month. You would like to assign an alternate resource 'Jeff Thomson' on that day as a substitute to manage all of your assigned work processes, inputs & outputs.
2. Click the Assign Alternate Resource tab. Search for the alternate resource for whom you want to assign your work from the search box (for example, Jeff Thomson). You can have a quick look at the alternate resource's calendar before assigning your work for the day you would be on leave.
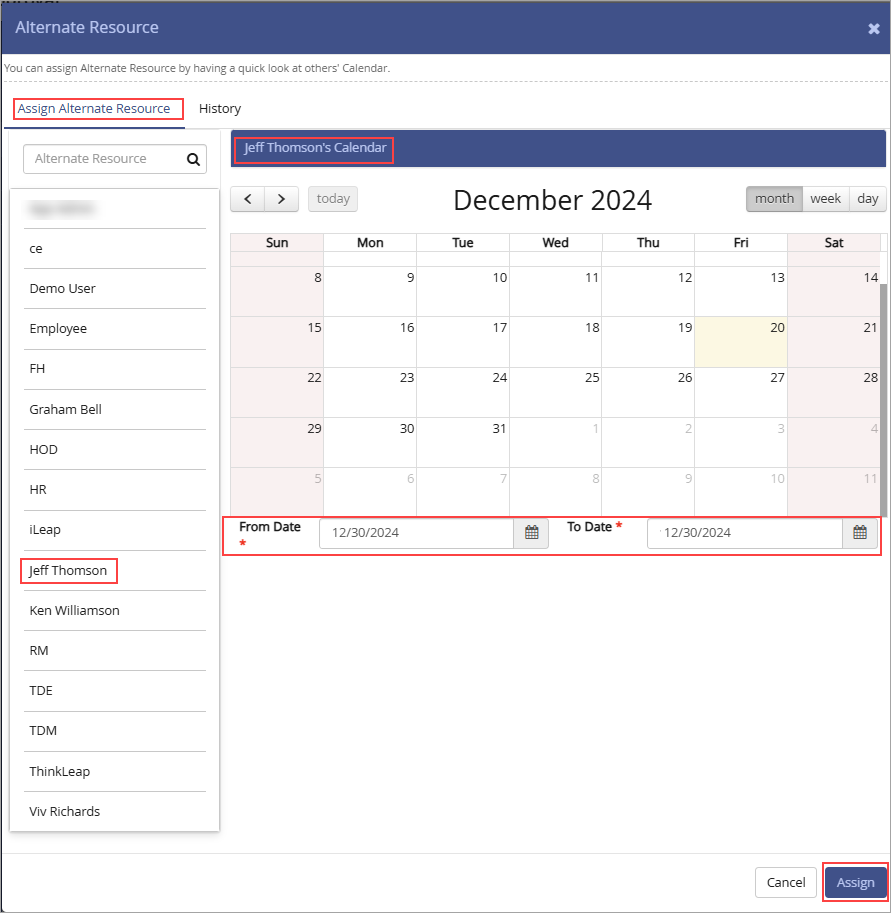
3. Select the start date & end date on which you wish to assign the alternate resource in the respective calendars displayed along with From Date & To Date lists.
4. Click Assign. Immediately, 'Success! Alternate Resource saved successfully' message appears.
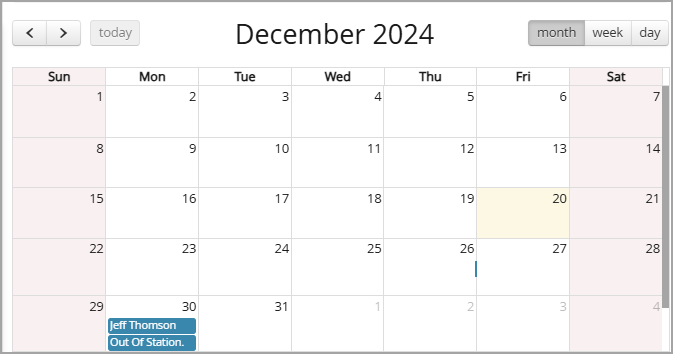
Notice the display of the user name you added/assigned as an alternative resource for the designated day on your calendar as shown.
|
|
5. Click the History tab to view the history of resources who have managed your role on earlier occasions.
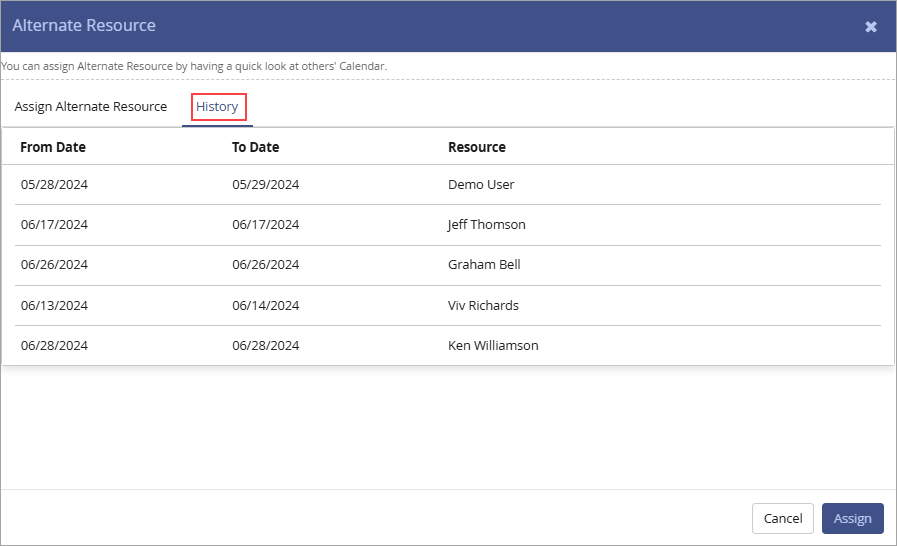
| Previous | Back to Contents |